background image

Getting Started


12

Maximum Capacity: 1TB
Notes on Inserting a microSD Card 
  Do not force the microSD card into the slot. Doing so may cause 
  malfunction of the product and damage to the card.
  Do not repeatedly insert/remove the microSD card.
  If not inserted properly, the microSD card may cause product 
  malfunctions and may become lodged in the product.
Notes on Removing a microSD Card 
  Be sure to safely remove the microSD card from the device.
  Not following the proper procedure may corrupt data and cause 
  serious damage to the both the card and device.
  Do not remove the microSD card during use. Doing so may cause 
  malfunction, delete data and damage the microSD card.

User Guide

Recommended microSD Cards

SAMSUNG, SANDISK

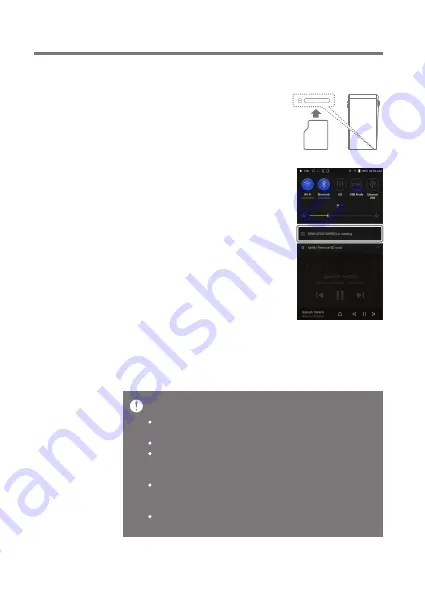
Insert/Remove a microSD Card

1. Refer to the diagram and gently 
  insert a microSD card into the 
  microSD card slot.
2. To safely remove a microSD card,
  on the Home Screen, select 
  [Safely remove SD card] from the 
  Notification Bar or select 
  [Unmount SD card] from
  [Menu - Settings - System
 Information].
3. Gently press the microSD card in
  to unlock and release it from the 
 slot.

Summary of Contents for Astell & Kern PPF34

Page 1: ...INSTRUCTION BOOK PPF34 User Guide...

Page 2: ...ning to Music Playlist Management USB DAC Installation How to Use USB Audio CD Ripping AK CD Player Car Mode Bookmark Function Favorites Function Settings Connecting to Wi Fi Using Bluetooth Equalizer...

Page 3: ...stalled in the product by default USB Type C Cable For charging and data transfer Quick Start Guide Basic overview of device functionality Warranty Card Provides warranty details for your device Maint...

Page 4: ...printed and engraved information may vary depending on the model Product Overview USB Type C Port Previous Rewind Play Pause microSD Card Slot 2 5mm Balanced Port 4 4mm Balanced Port Volume LED Indic...

Page 5: ...connect earphones or headphones that utilize a 4 4mm jack 2 5mm Balanced Port 2 5mm Balanced Port symbol For audio output connect earphones or headphones that utilize a 2 5mm jack Previous Rewind Shor...

Page 6: ...r 7 seconds to force a shutdown The device can then be restarted after the shutdown is complete Turning the Screen On Off 1 While the screen is on press the Power button to turn off the screen 2 Press...

Page 7: ...adapter A fast charger of 9V 1 67A may be used Using a 12V adapter will not charge the device and may cause malfunction The manufacturer shall not be responsible for problems caused by the use of adap...

Page 8: ...tions 3 5mm Unbalanced Port 1 Connect earphones or headphones to the 3 5mm unbalanced port OR 2 5 4 4mm Balanced Port 1 Connect earphones or headphones that support a 2 5mm or 4 4mm headphone jack to...

Page 9: ...tting Started 08 User Guide Connecting to a Balanced Audio Device 1 Connect to an external audio device by using the 3 5mm unbalanced port and 2 5mm balanced port Unbalanced Port Ground Balanced Port...

Page 10: ...p www astellnkern com Support Download For an optimal connection quit any unnecessary programs before connecting the device to the computer Do not use cables other than the USB Type C cable provided w...

Page 11: ...iles folders and drag drop them into the device folder Ensure the USB Type C cable is properly connected Turning off the device computer or disconnecting the USB Type C cable while copying or moving f...

Page 12: ...n select Delete 2 Select Yes in the Confirm File Folder Deletion window to delete the selected files folders Disconnecting from the Computer 1 Disconnect the USB Type C cable after the transfer betwee...

Page 13: ...e Not following the proper procedure may corrupt data and cause serious damage to the both the card and device Do not remove the microSD card during use Doing so may cause malfunction delete data and...

Page 14: ...el of 20 is required Do not disconnect from the wireless network while downloading the update file Doing so may cause data corruption and or damage to the system If an error occurs or the notice in th...

Page 15: ...ures a LCD touchscreen that allows you to perform operations by touch Use the touchscreen to access various features on the device To prevent damage to the screen do not use a sharp object or excessiv...

Page 16: ...ion Back Swipe Gesture 1 Swipe the navigation bar from right to left to return to the previous screen Back Button 1 Press the Back Button to return to the previous screen This feature can be enabled o...

Page 17: ...rner of the screen From the Home Screen swipe your finger to the left right up or down from any edge of the touchscreen to access display menus Each side of the Home Screen will activate a different d...

Page 18: ...Notification Bar 1 From the top edge of the touchscreen swipe your finger down to display the Notification Bar View Current Playlist 1 From the right edge of the touchscreen swipe your finger left to...

Page 19: ...ce 18 User Guide View Play History 1 From the bottom edge of the touchscreen swipe your finger up to display the Play History menu Moving Up Down on a List 1 Scroll through a list by dragging your fin...

Page 20: ...ng title information File name is displayed when the title is unavailable Displays the artist and album info Short press Play the previous song or restart the current song Press and hold Rewind the cu...

Page 21: ...playback progress Drag the Playback Progress Bar to move to the desired track time Indicates the song s total duration Press to switch from elapsed time to remaining time Displays current song informa...

Page 22: ...Using the Device 21 User Guide Notifi cation Bar 13 14 1 2 16 17 18 19 3 4 5 6 7 9 8 10 11 15 12...

Page 23: ...onnected computer through the device After connecting the device to a portable USB DAC press to connect or disconnect the device Turn CD ripping function on off Press to turn AK Connect on off Press t...

Page 24: ...an FTP program Press to display the full settings menu Use the adjustment bar to control the display brightness Device notifications are displayed in this area Clear notifications Returns to the Home...

Page 25: ...the device may be damaged and personal data compromised Depending on the APP some functions may not work If you install an app from an unknown source despite this warning the company is not responsibl...

Page 26: ...Apple s App store or Google Play Store AK CONNECT Using AK Connect to Link Music Libraries Speakers 1 Turn on the music library device and or speaker and AK player 2 Connect all devices to the same Wi...

Page 27: ...Using the Device 26 User Guide For Wi Fi connections see Page 54 7 After selecting a library speaker select a category from the menu to display the corresponding music list...

Page 28: ...d press to initiate the download A message on the Notification Bar will indicate when the download is complete Depending on network conditions song loading may be slow and streaming may stutter Using...

Page 29: ...Using the Device 28 User Guide AK Connect Usage Examples Case 1 LIBRARY SPEAKER AK T1 PPF34 Case 2 AK500N LIBRARY REMOTE SPEAKER AK T1 PPF34...

Page 30: ...Using the Device 29 User Guide Case 3 REMOTE LIBRARY PPF34 SPEAKER AK500N Case 4 LIBRARY SPEAKER AK T1 PPF34 AK500N REMOTE...

Reviews: