background image

Page 2 of 8

Do not discard any of the 

packaging until you have 

checked that you have all the 

parts and the pack of fixings.

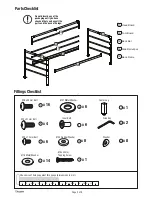
Parts Checklist

01 Head Board

Foot Board

Back Bar

02

03

Side Rail x2pcs

04

Back Frame

05

01

02

03

03

04

04

05

Ø

24 

Rubber Washer

Fittings Checklist

M6 x 20mm 

Bolt

x 4

x 16

M5 x 21mm 

Bolt

Ø

16 Metal Washer

Ø

21 Metal Washer

Allen Key

Check size of fixings against this guage (dimensions in mm)

1 0

2 0

3 0

4 0

5 0

6 0

7 0

8 0

9 0

10 0

11 0

x 8

x 14

x 1

x 1

x 2

x 6

G

A

M5 x 13mm 

Bolt

x 6

C

B

D

E

H

I

N

Washer

x 8

O

Ø

5 x 43mm

Tapping Screw

Center Leg

Inner Bolt

x 6

F

Summary of Contents for OSWALD BED

Page 1: ... should be worth the effort 3 Do not discard any of the packaging until you have checked that you have all the parts and the pack of fittings 4 Assemble this product on a carpet 5 To ensure an easier assembly we strongly advise that all fittings are only finger tightened during initial assembly Only upon completion of the assembly should all fixing points be fully tightened 6 We recommend a periodic c...

Page 2: ...pcs 04 Back Frame 05 01 02 03 03 04 04 05 Ø24 Rubber Washer Fittings Checklist M6 x 20mm Bolt x 4 x 16 M5 x 21mm Bolt Ø16 Metal Washer Ø21 Metal Washer Allen Key Check size of fixings against this guage dimensions in mm 1 0 2 0 3 0 4 0 5 0 6 0 7 0 8 0 9 0 10 0 11 0 x 8 x 14 x 1 x 1 x 2 x 6 G A M5 x 13mm Bolt x 6 C B D E H I N Washer x 8 O Ø5 x 43mm Tapping Screw Center Leg Inner Bolt x 6 F ...

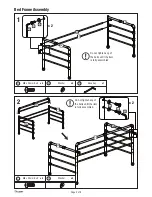
Page 3: ... x 20mm Bolt x 4 Washer x 1 Allen Key N A O A A Do not tighten any of the bolts until the item is fully assembled Do not tighten any of the bolts until the item is fully assembled x 4 M6 x 20mm Bolt A x 4 Washer O 01 01 01 02 02 02 03 03 05 05 N N O O ...

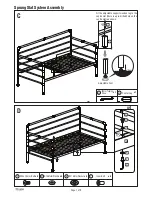
Page 4: ... 4 x 8 Ø24 Rubber Washer G x 8 M6 x 20mm Bolt A x 8 Ø16 Metal Washer D Page 4 of 8 Bed Frame Assembly 3 Fully Tighten bolts when the bed frame is assembled and in position A A D D G G 01 01 02 04 04 04 N ...

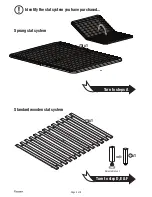
Page 5: ...Page 5 of 8 Identify the slat system you have purchased Standard wooden slat system Sprung slat system Turn to steps A Turn to step D E F x1 x1 06 07 x1 Adjustable Foot I ...

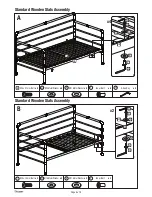
Page 6: ...Metal Washer x 4 Ø21 Metal Washer x 4 B D E F Allen Key x 2 N Standard Wooden Slats Assembly Standard Wooden Slats Assembly x 2 M5 x 13mm Bolt Inner Bolt x 2 Ø16 Metal Washer x 2 Ø21 Metal Washer x 2 C D E F B D E F E F C D 06 06 07 04 04 04 x2 N N N N x4 ...

Page 7: ...50mm Tapping Screw x 1 H x 4 M5 x 13mm Bolt Inner Bolt x 4 Ø16 Metal Washer x 4 Ø21 Metal Washer x 4 C D E F x4 05 03 C D E F N N Adjustable Foot Fit the adjustable support wooden leg to the centre slat there is a pre drilled hole on the centre slat as shown H I ...

Page 8: ...ping with a damp cloth Finally dry with a soft clean cloth Dust with a soft clean cloth only Check all bolts screws and legs regularly to make sure they haven t loosened and tighten all joins of your furniture or bedstead after 6 months Please keep these instructions in a safe place for further use Storage Drawers in Bedsteads are designed to carry lightweight items such as Pillows duvets and line...

Reviews: