background image

Page 4 of 8

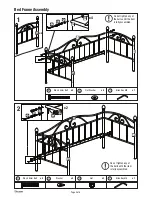
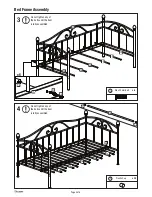
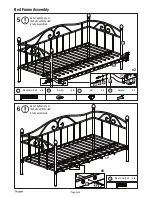
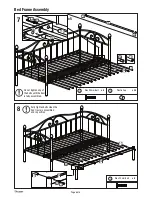
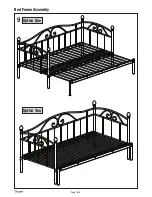
Bed Frame Assembly

3

4

x 6

Ø6 x 20mm Bolt

C

x 20

Plastic Cup

F

01

Do not tighten any of
the bolts until the item
is fully assembled.

Do not tighten any of
the bolts until the item
is fully assembled.

C

I

05

05

05

05

05

05

05

06

06

06

06

06

06

F

F

04

01

x6

Summary of Contents for KYLIE DAY BED

Page 1: ...should be worth the effort 3 Do not discard any of the packaging until you have checked that you have all the parts and the pack of fittings 4 Assemble this product on a carpet 5 To ensure an easier a...

Page 2: ...m Bolt x 4 x 8 6 x 55mm Bolt Check size of fixings against this guage dimensions in mm 1 0 2 0 3 0 4 0 5 0 6 0 7 0 8 0 9 0 10 0 11 0 x 8 D A B 6 x 20mm Bolt x 22 C Nut Plastic Cup Flat Washer x 4 E Sp...

Page 3: ...x 4 Washer x 2 Nut D G x 4 8 x 55mm Bolt A Bed Frame Assembly 1 2 x2 x4 01 01 01 02 02 02 02 02 02 x2 A E Do not tighten any of the bolts until the item is fully assembled Do not tighten any of the bo...

Page 4: ...4 x 6 6 x 20mm Bolt C x 20 Plastic Cup F 01 Do not tighten any of the bolts until the item is fully assembled Do not tighten any of the bolts until the item is fully assembled C I 05 05 05 05 05 05 0...

Page 5: ...1 Spanner G H x 4 8 x 55mm Bolt x 4 Washer A D x 6 6 x 20mm Bolt C Do not tighten any of the bolts until the item is fully assembled Do not tighten any of the bolts until the item is fully assembled...

Page 6: ...is fully assembled F F Page 6 of 8 Bed Frame Assembly 7 8 x 24 Plastic Cup F x 5 6 x 20mm Bolt C x 5 6 x 20mm Bolt C 07 08 08 08 I C 07 07 07 07 07 07 09 09 x5 07 08 08 07 C I 04 Fully Tighten bolts w...

Page 7: ...Page 7 of 8 Bed Frame Assembly 9 Option One Option Two...

Page 8: ...ing with a damp cloth Finally dry with a soft clean cloth Dust with a soft clean cloth only Check all bolts screws and legs regularly to make sure they haven t loosened and tighten all joins of your f...

Reviews: