

Installation steps - Read all steps before starting.
The Template
A
has been designed to help you install your Adhesive Mag Lock
®
in most cabinets.
It is recommended that, before any holes are drilled, you confirm the best place for your lock.
The installation template may not always be suitable for use on drawers.
Installation will depend on your cabinet and drawer construction, as possible mounting positions will vary from style to style.
Some cabinets have bumper pads, additional adjustments may be required when installing.
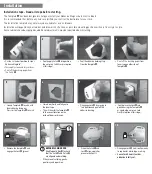
Installation
1
2
3
4
5
6
7
8
9
10
11
12
• Decide on t
he best position for your
Adhesive MagLock®.
• Thoroughly clean and dry surfaces.
• Peel off the backing paper from
the Catch
C
.
•
Gently apply Catch
C
into position
(do not press Catch firmly into place
at this stage).
•
Peel the adhesive backing strip
from the Template
A
.
• Peel off the backing paper
from
foam tape on other side of
Template
A
.
•
Line up Template
A
to catch with
foam adhesive facing out.
Press to stick Template
A
to catch.
•
Close door firmly and fully onto
the foam tape.
•
This will transfer the Template
A
to the correct location on the
inside of doors or drawers.
•
Disengage Lock
B
by moving to
“red” position and peel off the
adhesive backing.
•
Gently place the Lock
B
into
position using the Template
A
as a guide (do not press Lock
firmly into place at this stage).
•
Remove the Template
A
and
engage the Lock
B
(green).
BEFORE CLOSING DOOR
Use Magnetic Key
D
to check
that the Lock
B
and Catch
C
are aligned and working.
• If they are not catching, gently
peel away and reposition.
•
When the Catch
C
and
Lock
B
align, apply firm
pressure to all parts.
•
Disengage Lock
B
(red) to allow entry
to cupboards while tape is setting.
• Leave for 48 hours to allow
adhesive to fully set.
!
!


