background image


2655PIA-DK_Rev0 – User’s Manual 


2655PIA-DK Users Manual - Rev. 03/13 

2


© 2013 Dream S.A.S. 


2.


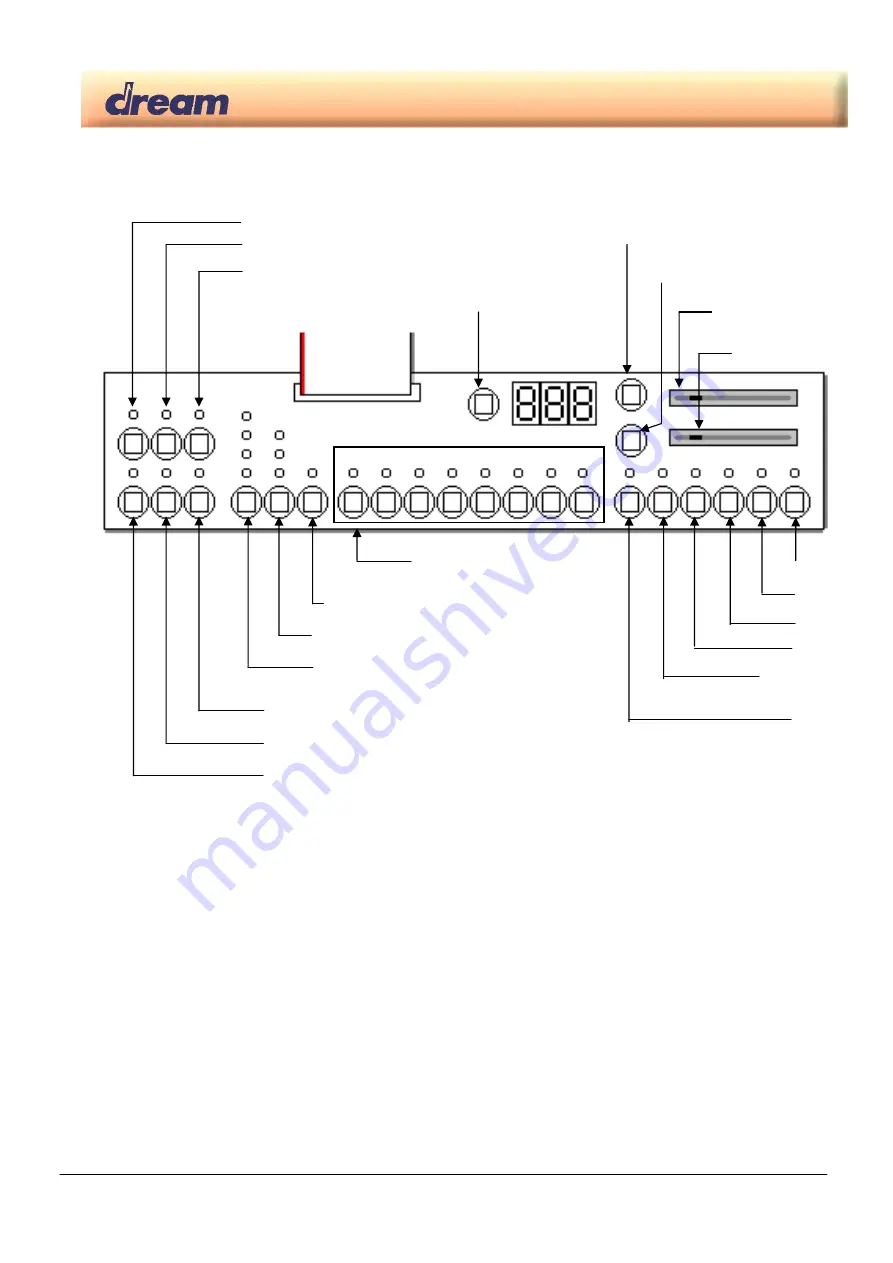
Front Panel 


3.


Functions 


Instrument Select:


1: Studio Grand Piano,   

2: Concert Grand Piano 

3: Electric Piano 1 


4: Electric Piano 2 

5: 

Harpsichord 

  6: 

Vibes 

7: 

Strings 


  8: 

Church 

Organ 


Layer (Dual) mode is available by simultaneously pressing two “Instrument Select” buttons. 


Double function buttons:


There are two different firmwares for 2655PIA-DK. 

2655PIA-ST is firmware version with Style player 

2655PIA is firmware without Style player 

All buttons have same functions in the two versions except that 6 of them have double functions in 2655PIA-ST. To 
alternate between the two sets of functions, just press “Plus” and “Minus” buttons at the same time. 
Blinking point in right down corner of the LED display shows that double functions buttons are in Style Player mode. 
 

Plus 

Minus 

Set 

Demo 

Rec Mode 

Play_Rec Start 

TrackA 

TrackB 

Metronome 

Instrument Select 
Registration select 

Chorus 

Reverb 

Intro_Ending / Split 

Fill In_Key Start /Tune 

Start/Stop / Transpose 

Variation / Touch Curve


Rhythm Only / Manual Drums 

Style selection / Sliders Assign

Registrations Mode 

Assignable Slider 1: 
default = Port 2 volume 


Assignable Slider 2: 
default = Balance 


Summary of Contents for 2655PIA-DK

Page 1: ...ard audio outputs to line level inputs of a mixer a stereo sound system Connect the main board to 12V 1A DC power supply to tip to ring Pedal Inputs J18 Pinout Pin Function Description 1 Pedal Ground Reference Ground for pedal inputs 2 Forte Sustain 4 level Half pedal Sustain Max if connected to Pedal Ground Sustain Off if not connected 3 Sostenuto On Off pedal Sostenuto on if connected to Pedal G...

Page 2: ...tyle player All buttons have same functions in the two versions except that 6 of them have double functions in 2655PIA ST To alternate between the two sets of functions just press Plus and Minus buttons at the same time Blinking point in right down corner of the LED display shows that double functions buttons are in Style Player mode Plus Minus Set Demo Rec Mode Play_Rec Start TrackA TrackB Metron...

Page 3: ...the Upper sound Press one of the 8 instrument buttons Change the Lower sound Press and hold the Split button then press one of the 8 instrument buttons Transpose Global transpose is available in the range 12 12 semitones Press and hold the Transpose button then press the Plus or Minus button to specify the desired transposition value The Transpose LED will turn on indicating that the transpose fun...

Page 4: ...ronome signature can be set Follow the steps below Hold the Metronome button Use the Plus and Minus buttons for choosing the signature Available signatures are 1 4 2 4 3 4 4 4 5 4 6 8 12 8 Press Set button to display metronome volume Metronome volume can be adjusted from 1 to 20 with the Plus and Minus buttons Sequencer A 4 track 3 song sequencer is implemented in 2655PIA DK Sequencer functions ar...

Page 5: ...rt and Track B leds are flashing Note At this step track 4 record operation can be cancelled by pressing Rec Mode button Start the recording by playing the keyboard or by pressing one pedal Play Rec Start led stops flashing and stays lit Stop recording by pressing the Rec Mode button Rec Mode led is off Play track 3 and track 4 Track A led is lit to show that there are data recorded in track 3 Tra...

Page 6: ... Assign button then press the Plus or Minus button to choose the function Available functions are Volume balance Display is b A L Slider 1 is general volume for MIDI In and Style Player and Slider 2 is volume Balance between the two sounds if in Split mode or in Dual Mode Only if Style player Accompaniment volumes Display is A c c Slider1 is Bass Drums volume and slider 2 is volume for the others ...

Page 7: ... Start button Load File from SD Load File from SD to internal memory This menu can be reached only if SD that contains SMF is inserted Press the second Instrument select button Display toggles between L d F and Y E S Pressing the Plus button now will load the latest SMF that was selected with SD Scroll function to current selected song of sequencer If load operation succeeds then display will go b...

Page 8: ...rical temperaments other than the modern equal can be selected Press the third Instrument select button Display toggles between t M P and T P 1 It means that temperament 1 is currently selected Use Plus and Minus buttons to select another temperament through the 7 available Available temperaments are o TP 1 Equal o TP 2 Pythagorean o TP 3 Pure Major o TP 4 Pure Minor o TP 5 Mean Tone o TP 6 Werckm...

Page 9: ...e your current setting in one registration do the next steps Check that the Registration LED is off If it is On press the Registration button to quit the registration mode Adjust all parameters until you get the setting that you want to save in one registration Press and hold Registration button while you press one of the 8 Instrument select buttons The current setting is now stored in the registr...

Page 10: ... to set the Local control to On or Off Program Change On Off Program Change On Off function decides if Program Change are received and transmitted by 2655PIA DK Press the third Instrument select button Display toggles between P G C and On Use Plus and Minus buttons to set value to On or Off Factory Reset 2655PIA can be restored as it was at its first power up by pressing the higher note of the key...

Page 11: ...nstant programmable from 0 to 127 by user Dual 2 sound layer with volume balance Split Programmable Split point Transpose 12 to 12 semi tones Tune 427 to 453 Hz Temperaments Equal Pythagorean Pure Major Pure Minor Mean Tone Werckmeister III Kirnberger III Programmable Root Note USB Optional USB MIDI needs Dream USB DBG IF interface Soundbank Firmware Demo and Style update SD Card SDMMC socket SD C...

Page 12: ...r Sound 0 Keyboard Dual Sound 1 Keyboard Lower Sound 2 Demo tracks 7 14 Piano Sequencer dual tracks 1 4 7 14 Metronome 15 Style Player 24 31 MIDI File Player 16 31 MIDI IN 16 31 6 2655PIA DSP Modules and Audio Routings Audio In GMFX GMSynth Main Out L R Rev Send Out Chr Send Out Main Out L R Reverb Chorus MAIN1 MAIN2 FX1 FX2 DABD0_L DAAD0_L Mike Input Inp Mix DABD0_R Reverb send Piano keyboard tra...

Page 13: ...Rate and maximum depth can be set using SYSEX CTRL 05 BnH 05H cc Portamento time CTRL 06 BnH 06H cc Data entry provides data to RPN and NRPN CTRL 07 BnH 07H cc Volume default 100 CTRL 10 BnH 0AH cc Pan default 64 center CTRL 11 BnH 0BH cc Expression default 127 CTRL 64 BnH 40H cc Sustain damper pedal CTRL 65 BnH 41H cc Portamento ON OFF CTRL 66 BnH 42H cc Sostenuto pedal CTRL 67 BnH 43H cc Soft pe...

Page 14: ...ch coarse of drum instr note rr in semitones vv 40H no modif NRPN 1ArrH BnH 63H 1AH 62H rr 06H vv Level of drum instrument note rr vv 00 to 7FH NRPN 1CrrH BnH 63H 1CH 62H rr 06H vv Pan of drum instrument note rr 40H middle NRPN 1DrrH BnH 63H 1DH 62H rr 06H vv Reverb send level of drum instrument note rr vv 00 to 7FH NRPN 1ErrH BnH 63H 1EH 62H rr 06H vv Chorus send level of drum instrument note rr ...

Page 15: ... plays drums default MIDI channel 10 all other parts play sound SYSEX F0H 41H 00H 42H 12H 40H 1pH 40H v1 v2 v12 xx F7H Scale tuning p is part 0H to FH v1 to v12 are 12 semi tones tuning values C C D A B in the range 64 00H 0 40H 63 7FH cents This SYSEX allows non chromatic tuning of the musical scale on a given MIDI channel Default v1 v2 v12 40H 40H 40H chromatic tuning Scale tuning has no effect ...

Page 16: ...depth 0 100 default 0H SYSEX F0H 41H 00H 42H 12H 40H 2pH 40H vv xx F7H CC1 pitch control 24 24 semitone default 40H SYSEX F0H 41H 00H 42H 12H 40H 2pH 41H vv xx F7H CC1 tvf cutoff control default 40H SYSEX F0H 41H 00H 42H 12H 40H 2pH 42H vv xx F7H CC1 Amplitude control 100 100 default 40H SYSEX F0H 41H 00H 42H 12H 40H 2pH 44H vv xx F7H CC1 lfo1 pitch depth 0 600 cents default 0AH SYSEX F0H 41H 00H ...

Page 17: ...r 1 Press Instrument 1 switch Instrument 1 LED is on Move slider 1 from left to right Display shows values increasing regularly from 0 to 127 Slider 2 Press Instrument 2 switch Instrument 2 LED is on Move slider 2 from left to right Display shows values increasing regularly from 0 to 127 8 5 Pedal test Soft pedal left Press Instrument 3 switch Instrument 3 LED is on Press pedal If pedal is simple ...

Page 18: ...l components test were successfully passed If Inst 1 LED is off then DataFlash test was fail If Inst 2 LED is off then ROM or Flash device test was fail If Inst 6 LED is off then Firmware test was failed Warning ROM and Firmware test can be passed with success only if binary files for ROM or FLASH devices have been created with Dream MakeROM exe tool 8 8 SAM2655 test SAM2655 test will test interna...

Page 19: ...or fitness for a particular application Dream assumes no responsibility for the use of any circuitry No circuit patent licenses are implied The information in this publication is believed to be accurate in all respects at the time of publication but is subject to change without notice Dream assumes no responsibility for errors and omissions and disclaims responsibility for any consequences resulti...

Reviews: