DREAM MULTIMEDIA DREAMBOX DM 800 HD PVR User Manual Download Page 80


- 80 -

U s e r   M a n u a l   D r e a m b o x   D M  8 0 0  H D  P V R


11.1.4 Four satellites via DiSEqC A/B/C/D (DVB-S) 


Use this type of configuration if you want to receive four satellites from one Single Universal 
or Twin Universal LNB for four or eight parties. It does not matter if you use one or two 
dishes to achieve this. 
 
In this case the LNBs are connected to a so-called Multiswitch from which the signal is via 
coax cabled to the satellite receivers (Dreamboxes) in your household. 
Please read the section 

11.1 DVB-S configuration

 to learn how to get into this menu. 


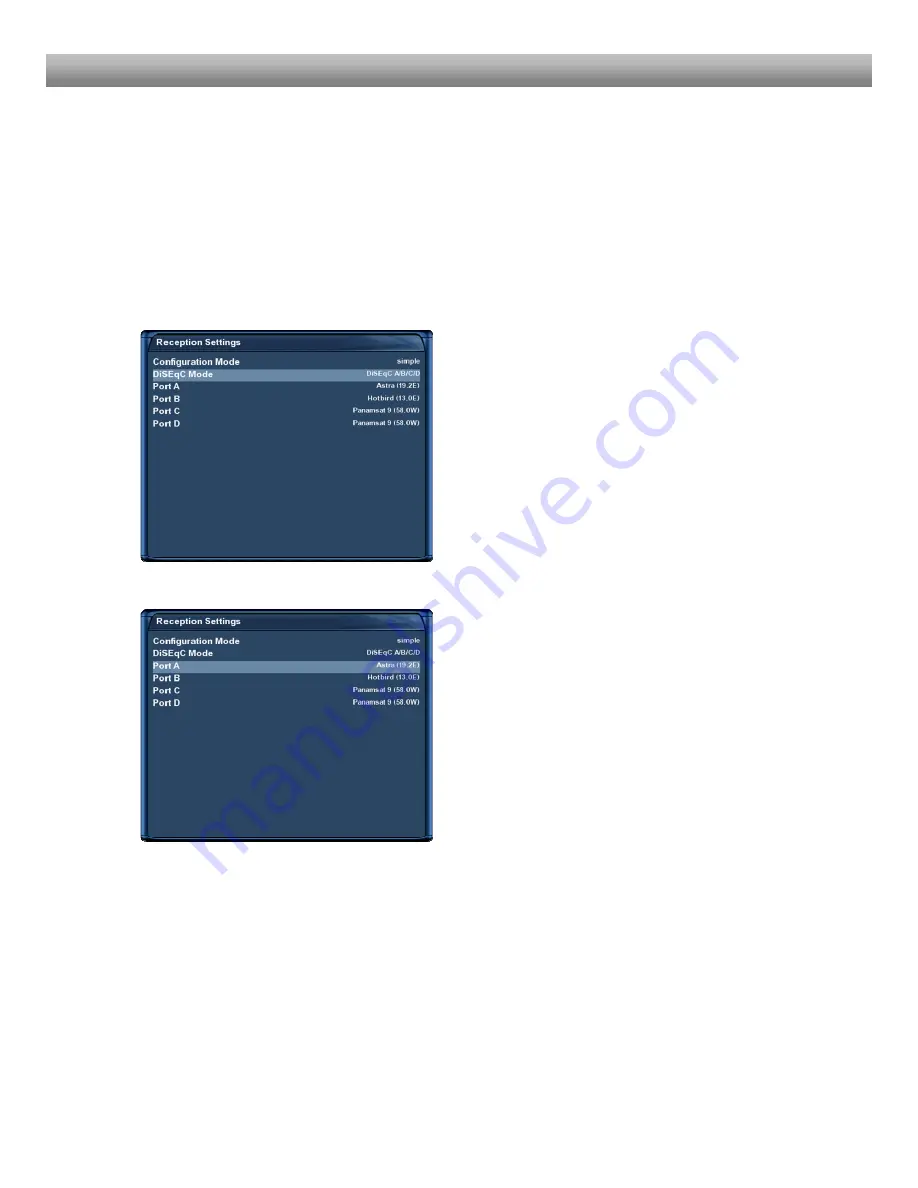
The “Satconfig” menu will open up. 


Use the 

up/down-Buttons

 to navigate to the 

“DiSEqC-Mode” option and use the 

left/right-

Buttons

 to select “DiSEqC A/B/C/D”. 


For Ports A, B, C and D select the desired satellites 
just as described in the 

Single satellite – direct 

connection 

section. 


Make sure you know which satellite is connected to 
which input on the Toneburst switch. 


If you do not find any services in the transponder 
scan later, exchange the two satellites in this list and 
try again. 


Press the 

OK-Button

 to save your settings.  


Summary of Contents for DREAMBOX DM 800 HD PVR

Page 1: ...ichkeit HDTV Mit Netzwerk Schnittstelle Anschluss f r interne SATA Festplatte DVB S2 Tuner steckbar Smartcard Leser Linux OS User Manual Digital satellite receiver for free and encrypted Digital Video...

Page 2: ...13 2 Installation 2 1 Turning the device on 19 3 Start wizard 3 1 Video output selection 20 3 2 Language selection 22 3 3 Tuner setup 23 3 4 Service scan 23 3 5 Parental control 24 4 Basic operation 4...

Page 3: ...vices to a bouquet 35 6 4 Remove a service from favorites 36 6 5 Moving a service to favorites 37 6 6 Adding a marker to favorites 38 6 7 Parental control 40 7 Hard disk operation 7 1 Mounting guideli...

Page 4: ...connection 77 11 1 2 Two satellites via Toneburst A B 78 11 1 3 Two satellites via DiSEqC A B 79 11 1 4 Four satellites via DiSEqC A B C D 80 11 1 5 Stab positioner using USALS 81 11 1 6 Stab position...

Page 5: ...rol 100 16 Technical data 101 17 Features 104 18 Contact support information 105 19 Copyright notes 106 19 1 GNU GPL General Public License 107 20 Menu overview 110 21 Service Slip as PDF attachment U...

Page 6: ...t vases or any other liquid filled containers on top of the device Do not expose the device to dripping or splashing liquids Do not place open flame sources such as lit candles on top of the device Th...

Page 7: ...rd or power plug immediately disconnect the device from the power outlet In case the device was exposed to humidity immediately disconnect the device from the power outlet In case you notice any serio...

Page 8: ...gnated collection point for the recycling of waste electrical and electronic equipment The separate collection and recycling of your waste equipment at the time of disposal will help to conserve natur...

Page 9: ...n box Remote control 2 Batteries 1 5V Mignon AA LR6 Dreambox DM 800 HD PVR 1 Power cord 1 Power supply DVE Modell DSA 36W 12 1 User manual most recent version online http www dream multimedia tv de 1...

Page 10: ...x D M 8 0 0 H D P V R 1 3 Views Front view Rear view Smartcard Reader Power Button OLED Display Remote control sensor Power supply connector DVI output USB 2 0 ports Digital audio output LNB input out...

Page 11: ...button The Power Button switches your Dreambox on and off 1 3 2 Explanation rear panel LNB input DVB S Tuner Connect the coaxial cable from your LNB here LNB output DVB S Tuner You can connect an ana...

Page 12: ...Dreambox if your TV has the right input USB 2 0 ports The USB 2 0 Port is designed for devices that support the USB 2 0 standard The amount of supported USB devices depends on the installed image Sof...

Page 13: ...utton Power Button TV Mode Button Numeric Keypad Arrow Left Button Arrow Right Button Mute Button Volume Buttons Bouquet Buttons INFO Button EXIT Button MENU Button Navigation Buttons OK Button VIDEO...

Page 14: ...have multiple functions You will notice control symbols below the four colored Options Buttons the TV and the RADIO Button In PVR Mode these buttons are used to control the digital recording accordin...

Page 15: ...the button See chapter 15 TV Mode setup Enter a service number to directly access the option by using the Numeric Keypad The service numbers are on the left side of the service list The Numeric Keypa...

Page 16: ...own Pressing the Bouquet Buttons will jump back and forth between the bouquets If no OSD menu is visible on the screen and you are in TV or RADIO Mode pressing the INFO Button will reveal the EPG info...

Page 17: ...the AUDIO Button you can choose the different audio tracks offered by the station Pressing the VIDEO Button activates the PVR Mode The Infobar will show the control symbols You can instantly start re...

Page 18: ...n PVR Mode this button is mapped with the stop function as indicated by the small square underneath it Pressing the HELP Button activates the Help menu Pressing the RADIO Button activates the RADIO Mo...

Page 19: ...rear panel Connect the Dreambox to your TV using a DVI or Scart cable Plug in the power cable into the Dreambox and then into a 110V 60Hz or 230V 50Hz power socket If you are using a switchable power...

Page 20: ...and the OK Button to select it Pressing the red Options Button will toggle the language You can choose from the following video output options 1 Scart using a Scart cable 2 DVI using a DVI or DVI to...

Page 21: ...ays black just wait 20 seconds and the picture will be automatically returned to 60Hz To start the test press the OK Button You can see the result on your screen Finally you can adjust the screen usin...

Page 22: ...etup of your Dreambox Press the OK Button on your remote control to get to the next step You will be asked if you want to set the basic settings for your Dreambox now or if you want to quit the start...

Page 23: ...D M 8 0 0 H D P V R 3 3 Tuner setup Detailed information about the tuner setup can be found in chapter 11 1 DVB S Tuner configuration 3 4 Service scan Detailed information about the service scan can...

Page 24: ...s e r M a n u a l D r e a m b o x D M 8 0 0 H D P V R 3 5 Parental Control Refer to section 6 7 Parental control for further information about this feature Entering the pincode Finalizing the basic s...

Page 25: ...nect your Dreambox from power Another way to achieve the same thing is to access the main OSD menu and selecting the Standby Restart option After that select the Deep Standby option and press the OK B...

Page 26: ...ing channel using the service list Pressing the Up Down Buttons on your remote control activates the service list Use the Navigation Buttons up down to select the desired service and press the OK Butt...

Page 27: ...pressing the TV or EXIT Button you can quit the RADIO Mode 4 8 Teletext Use the Text Button to enter the Teletext and the Exit Button to leave 4 9 Subtitles Press the Menu Button to enter the main me...

Page 28: ...ent time Remaining time Next show Current show Is highlighted yellow as soon as a show is broadcasted Encrypted Is highlighted yellow as soon as a show is broadcasted in Dolby Digital Is highlighted y...

Page 29: ...milar will appear in the red window Pressing the red Options Button opens a listing of similar broadcasts By pressing the green Options Button you can set a timer for this rerun For additional informa...

Page 30: ...of you bouquets will appear Select the bouquet for which you want the Multi EPG view This view shows the currently airing shows on the services listed in the left column A progress bar showing the pro...

Page 31: ...a time and date After you have entered the desired time and date press the OK Button to activate you selection The Multi EPG will be displayed according to your set time and date As a example we have...

Page 32: ...related bouquets You can only delete channels in the favorites view You cannot delete the channels in the All view The use of the All view is to keep an internal list of all available stations If you...

Page 33: ...nu will open up Navigate to the option add bouquet Use the Numeric Keypad on your remote control to enter the name for the new bouquet The according letters are printed on button The Mute Button and t...

Page 34: ...Buttons on your remote control activates the service list Press the red Options Button to change to the All view Use the Navigation Buttons up down to select the desired service and press the MENU Bu...

Page 35: ...ired bouquet After that select a service and switch to it by pressing the OK Button By pressing the Menu Button the Channellist menu will open up Navigate to the option enable bouquet edit The All vie...

Page 36: ...which is the default setting the selected services will be added to you favorites list 6 4 Remove a service from favorites Pressing the Up Down Buttons on your remote control activates the service lis...

Page 37: ...tivates the service list Use the Navigation Buttons up down to select the desired service and press the MENU Button to open the Channellist menu Navigate to the option enable move mode and press the O...

Page 38: ...ist menu and chose the option disable move mode by pressing the OK Button 6 6 Adding a marker to favorites You have the option to add makers within the favorites bouquets Pressing the Up Down Buttons...

Page 39: ...ters are printed on button The Mute Button and the Arrow Left Arrow Right Button deletes a character Press the OK Button to add the marker to your favorites list You will be taken back to the Channell...

Page 40: ...vigate to the Parental lock option and press the OK Button The Parental control setup menu will open up Set the Enable parental control option to yes Under the Parental control type option you can cho...

Page 41: ...nto the Parental control menu If the entered pincode was false you will see this notice Press the OK Button to get back into the Change service pin menu and to enter the correct new pincode twice Now...

Page 42: ...nder the Parental control type then this channel will be the only one that can be viewed without entering the right pincode Protecting the parental lock setup Additionally you have the option to prote...

Page 43: ...vice in your living room or in any other rooms with carpeting or any other flooring that can carry an electrostatic charge Remove all connection from the device Only open the device with the tools dep...

Page 44: ...he hard disk included in the shipping contents of your Dreambox DM 800 HD PVR 1x Phillips screwdriver not included 1x 2 5 SATA hard disk of your choice not included 4x Hard disk screws included in the...

Page 45: ...45 U s e r M a n u a l D r e a m b o x D M 8 0 0 H D P V R 4 Lift the cover on the sides on slide it backwards...

Page 46: ...e Remove the hard disk cage by lifting it upwards Now you need the Phillips screwdriver the hard disk cage the 4 hard disk mounting screws and your hard disk 6 Attach the hard disk cage to the hard di...

Page 47: ...below 8 Connect the big black plug of the included SATA cable to your harddisk Marker 1 and insert the hard disk cage back into your Dreambox Connect the other end of the red SATA cable Marker 2 to th...

Page 48: ...he hard disk cage see step 5 Slide the cover from the rear back onto the device Screw the one screw on each side and the two screws on the rear back into place Reattach all connector to your Dreambox...

Page 49: ...the OK Button The System menu will open up 2 Navigate to the option Harddisk and press the OK Button 3 Navigate to the Harddisk setup option and press the OK Button You now can set the duration of tim...

Page 50: ...System menu will open up 2 Navigate to the option Harddisk and press the OK Button 3 Navigate to the Harddisk setup option and press the OK Button Navigate to the Initialization option and press the...

Page 51: ...epends on the number of services residing on a transponder1 It is possible to make up to four simultaneous SDTV or two HDTV recordings Pressing the Up Down Buttons on your remote control activates the...

Page 52: ...o the option Timer and press the OK Button to select You see the Timer Editor menu Pressing the red Options Button will delete a timer The green Options Button adds a timer the yellow Options Button t...

Page 53: ...ing options daily weekly with choice of weekday Monday through Friday user defined For all four options you can set a date for the first execution of the timer You can decide what should happen after...

Page 54: ...n and selection the Timer option from the main OSD menu Press the OK Button to acces it 7 3 4 Timeshift Once you started an instant recording you can fast forward and rewind while recording as long as...

Page 55: ...hed the movie you will be asked to continue where you left off when you start watching it the next time If you do not make a selection within 10 seconds the window will disappear and the movie starts...

Page 56: ...o x D M 8 0 0 H D P V R The Infobar does not have to be visible to use the PVR Mode The PVR Mode can be exited by pressing the TV Button You will be asked if you want to stop the replay of the record...

Page 57: ...x 48x 64x 128x Every press on the button increases the speed by one step 7 5 Setting a marker Bookmarks Fast forward to the point where you want to add a marker and press the 0 on the Numeric Keypad T...

Page 58: ...he Navigation Buttons up and down to select a recording Press the Menu Button Use the Navigation Buttons up and down to select Delete and press the OK Button You will be asked if you want to delete th...

Page 59: ...o Button and then the Menu Button Sorting options You have the choice between two different sorting options 1 Alphabetic sort 2 Sort by date List styles You have the choice between different list styl...

Page 60: ...s e r M a n u a l D r e a m b o x D M 8 0 0 H D P V R List styles List style default List style default with extended desciption List style single line List style compact List style compact with desci...

Page 61: ...a couple of times to toggle between transparent mode invisible mode and full mode The alpha mode shows the picture from the running program through the text pages The invisible mode shows the complete...

Page 62: ...Text TV mode 16 9 on off Enabling this switches the TV to 16 9 Aspect Ratio if the PIG Mode is activated with the Volume down Button Press the OK Button to enable or disable this option The default s...

Page 63: ...isabled to deactivate a set sleep timer Press the red Options Button to change the status Sleep timer action Select Deep Standby to completely turn off you Dreambox or Standby to put it into standby m...

Page 64: ...press the OK Button to select 1 Navigate to the option System and press the OK Button The System menu will open up 2 Navigate to the option Language and press the OK Button The Language menu will open...

Page 65: ...Intermediate and Expert This gives you the possibility to set the level of options to your needs Intermediate is the default setting We will not explain the expert mode in detail in this manual Simple...

Page 66: ...ement If you own a satellite dish with a positioner you can see a flashing symbol of a satellite dish on your screen if you set this option to yes Enable multi bouquets Set this option to Yes if you w...

Page 67: ...e to the option Setup and press the OK Button to select 1 Navigate to the option System and press the OK Button The System menu will open up 2 Navigate to the option Timezone and press the OK Button T...

Page 68: ...menu is visible on your screen press the Menu Button to open the main OSD menu Navigate to the option Setup and press the OK Button to select 1 Navigate to the option System and press the OK Button Th...

Page 69: ...as Pillarbox 4 3 shows will be shown in full height on a 16 9 screen and you will have black bars on both sides Pan Scan 4 3 shows will be shown in full width on a 16 9 screen and a bit will be cut o...

Page 70: ...eams at top and bottom Pan Scan 16 9 programs will be zoomed to full hight on 4 3 TV s parts of the picture on the left and right side will cut off Just Scale 4 3 shows will be shown in full height on...

Page 71: ...K Button The System menu will open up 2 Navigate to the option Display setup and press the OK Button Using the Navigation Buttons left and right you can set the brightness of the OLED display Standby...

Page 72: ...tton The System menu will open up 2 Navigate to the option Network and press the OK Button 3 Navigate to the option Device setup and press the OK Button 4 Navigate to the option Integrated Ethernet an...

Page 73: ...to the Internet over a router enter the router s IP address here Activate the network Press the OK Button to save the setting and activate the network Nameserver Setup If no OSD menu is visible on you...

Page 74: ...Navigate to the option Setup and press the OK Button to select 1 Navigate to the option System and press the OK Button The System menu will open up 2 Navigate to the option Skin and press the OK Butt...

Page 75: ...OK Button to select 1 Navigate to the option System and press the OK Button The System menu will open up 2 Navigate to the option Factory reset and press the OK Button The Factory reset menu will open...

Page 76: ...n the main OSD menu Navigate to the option Setup and press the OK Button to select 1 Navigate to the option Service searching and press the OK Button The Service searching menu will open up 2 Navigate...

Page 77: ...nected from you Dreambox to the LNB Please read the section 11 1 DVB S configuration to learn how to get into this menu The Satconfig menu will open up Use the up down Buttons to navigate to the DiSEq...

Page 78: ...ox Please read the section 11 1 DVB S configuration to learn how to get into this menu The Satconfig menu will open up Use the up down Buttons to navigate to the DiSEqC Mode option and use the left ri...

Page 79: ...oxes in your household Please read the section 11 1 DVB S configuration to learn how to get into this menu The Satconfig menu will open up Use the up down Buttons to navigate to the DiSEqC Mode option...

Page 80: ...eceivers Dreamboxes in your household Please read the section 11 1 DVB S configuration to learn how to get into this menu The Satconfig menu will open up Use the up down Buttons to navigate to the DiS...

Page 81: ...p Use the up down Buttons to navigate to the DiSEqC Mode option and use the left right Buttons to select Positioner This menu is meant for a Stab positioner You only have to enter the geographical det...

Page 82: ...dvanced configuration Navigate to the option Satellite Use to the Navigation Buttons left and right to select the desired satellite and Navigate to the option Satellite and press the Navigation Button...

Page 83: ...n up 2 Navigate to the option Tuner configuration and press the OK Button The Choose tuner menu will open up 3 Use the Navigation Buttons up and down to select the DVB C Tuner and press the OK Button...

Page 84: ...to Frequency steps Frequency scan step size kHz Use the Numeric Keypad to set the step increment Press the OK Button to save your settings You will be taken back to the Select slot menu Provider This...

Page 85: ...rching menu will open up 2 Navigate to the option Tuner configuration and press the OK Button The Choose tuner menu will open up 3 Use the Navigation Buttons up and down to select the DVB T Tuner and...

Page 86: ...e OK Button The Automatic scan menu will open up Set the Clear before scan option to Yes if you want to delete all services before the scan starts Otherwise leave the setting to No which results in on...

Page 87: ...u a l D r e a m b o x D M 8 0 0 H D P V R You can see the progress of the scan here The scan is done once you see this menu It shows how many channels were found during the scan Press the OK Button t...

Page 88: ...searching and press the OK Button The Service searching menu will open up 2 Navigate to the option Manual scan and press the OK Button The Service scan menu will open up Use the Navigation Buttons lef...

Page 89: ...s the Menu Button to open the main OSD menu Navigate to the option Games Plugins and press the OK Button to select Navigate to the option Backup Restore and press the OK Button Set the Backup Mode opt...

Page 90: ...is menu Press the yellow Options Button to start restoring your settings You will be prompted with a list of backups that you have made so far Select the desired backup and press the yellow Options Bu...

Page 91: ...modem cable 1 network cable optional Firstly disconnect your Dreambox from main power Start the DreamUp software on your PC Select COM1 or COM2 depending on the port which the null modem cable is conn...

Page 92: ...8 0 0 H D P V R The flash loader will now be transferred to your Dreambox After the flash loader has been transferred to your Dreambox select the Flash Box Button in the DreamUp software Select the s...

Page 93: ...0 0 H D P V R The new software is now being transferred to your Dreambox If the process was successful you will get a Box was flashed successfully message Click on OK and on Exit afterwards Disconnec...

Page 94: ...you will need a crossover network cable If you plan on connection your Dreambox to your Hub Switch Router you will need a regular patch cable To be able to install a new software image on your Dreamb...

Page 95: ...ddress displayed in the OLED Display of your Dreambox In our example the IP address your have to enter would look like this http 192 168 0 104 2 Select the firmware upgrade link in the displayed webpa...

Page 96: ...you have successfully finished flashing the new software image onto your Dreambox press the Power Button on the front cover Your Dreambox will turn off Press the Power Button again to start your Dream...

Page 97: ...the option Information and press the OK Button to select The Information menu will open up Navigate to the option Service and press the OK Button This window shows detailed technical information about...

Page 98: ...press the Menu Button to open the main OSD menu Navigate to the option Information and press the OK Button to select The Information menu will open up Navigate to the option About and press the OK But...

Page 99: ...g house or tree Reposition dish so it has a clear view towards the satellite Dish aligned incorrectly or faulty Check dish Channel is transmitted in a new slot Start service scan see chapter 11 No re...

Page 100: ...e TV Mode Button once Press the SHIFT Setup Button for 3 seconds the TV Mode Button will flash twice Use the Numeric Keypad to enter the four digit device code into the remote control The TV Mode Butt...

Page 101: ...mpatible Ethernet Interface Internal SATA Connector Support for all regular hard disks 2 5 SATA or use it as the external eSATA connector 2x USB 2 0 port DVI Serial V 24 RS232 port OLED Display Tuner...

Page 102: ...ulation QAM Constellation 16 32 64 128 and 256 QAM Input Symbol Rate 7 252 Msps max DVB T Tuner plugable Input Loop through Connector IEC 169 24 Female Male Frequency Range VHF 174 230MHz UHF 470 862M...

Page 103: ...d disk on the eSATA connector USB 2x USB 2 0 Host Connector LNB power and polarization per tuner LNB Current 500mA max short circuit proof LNB Voltage vertical 14V without load 11 5V at 400mA LNB Volt...

Page 104: ...ually configurable timers e g single or recurring timers DiSEqC 1 0 1 1 1 2 1 3 USALS Channel change in less than a second Start wizard for initial setup Pre installed service list for DVB S Support o...

Page 105: ...ch the dealer s hotline from Mo Fr 09 00 am 12 00 pm and 01 00 pm 03 00 pm Technical Hotline Tel 49 0 180 368 43 99 777 0 09 min Fax 49 0 180 368 43 99 778 0 09 min You can reach the technical hotline...

Page 106: ...s that are distributed under different licenses especially a Open Source License the GNU General Public License You can find details about this License on the next three pages Additional notes about t...

Page 107: ...for this free software If the software is modified by someone else and passed on we want its recipients to know that what they have is not the original so that any problems introduced by others will...

Page 108: ...a Accompany it with the complete corresponding machine readable source code which must be distributed under the terms of Sections 1 and 2 above on a medium customarily used for software interchange or...

Page 109: ...ation excluding those countries so that distribution is permitted only in or among countries not thus excluded In such case this License incorporates the limitation as if written in the body of this L...

Page 110: ...ice searching System Service About Standby Restart Tuner configuration Automatic scan Manual scan Language Customize Timezone A V settings Display Setup Harddisk Skin Network Parental control Subtitle...

Reviews: