background image


Vigor N61 User’s Guide


29

4


M

M

i

i

s

s

c

c

e

e

l

l

l

l

a

a

n

n

e

e

o

o

u

u

s

s


W

W

i

i

n

n

d

d

o

o

w

w

s

s


Z

Z

e

e

r

r

o

o


C

C

o

o

n

n

f

f

i

i

g

g

u

u

r

r

a

a

t

t

i

i

o

o

n

n


Each time you power on your computer, the wireless monitor utility will activate 
automatically after you configured for your PC. If you do not want to activate it but want to 
enable wireless connection, simply activate Windows Zero Configuration to achieve your 
goal. 

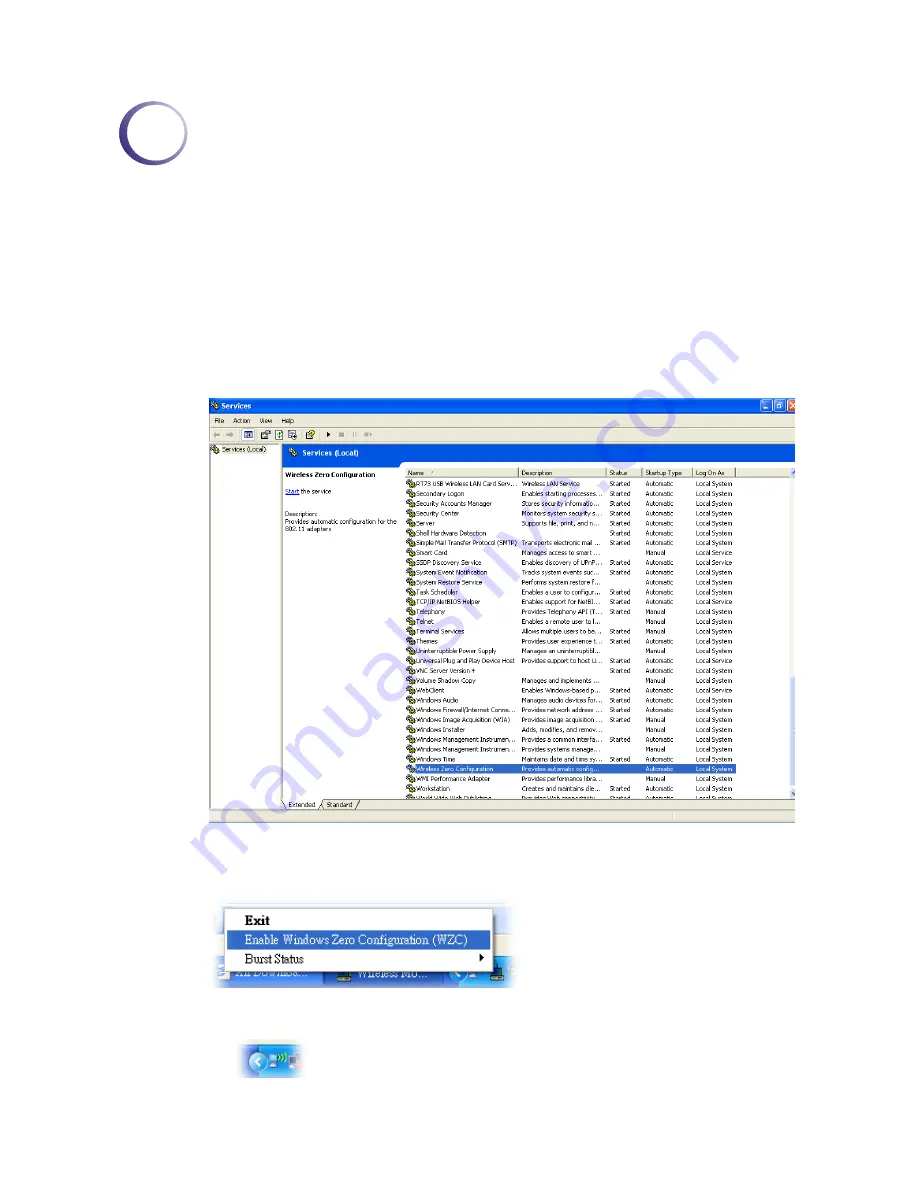
First, you have to check if the Windows Zero Configuration is enabled or not. Go to 

Start>>Settings>>Control Panel 

and double click 

System Administrative Tools >> Service

The Service window will appear as follows. 


Locate Wireless Zero Configuration. If you find that the status of WZC is not enabled, please 
click the wireless monitor utility icon and choose

 Enable Windows Zero Configuration 

(WZC) 

to activate it.   


Then follow the steps below to configure WZC. 

1.


Double click the wireless connection icon on the system tray. 


Summary of Contents for VIGOR N61

Page 1: ...written permission from the copyright holders The scope of delivery and other details are subject to change without prior notice Microsoft is a registered trademark of Microsoft Corp Windows Windows 95 98 Me NT 2000 XP and Explorer are trademarks of Microsoft Corp Apple and Mac OS are registered trademarks of Apple Computer Inc Other products may be trademarks or registered trademarks of their res...

Page 2: ...th the instructions may cause harmful interference to radio communications However there is no guarantee that interference will not occur in a particular installation If this equipment does cause harmful interference to radio or television reception which can be determined by turning the equipment off and on the use is encouraged to try to correct the interference by one of the following measures ...

Page 3: ...reface 5 Wireless LAN Basics 5 Warning 5 2 Installation Overview 7 Introduction 7 Installation Procedure 7 Uninstalling USB Driver 12 3 Configuration 15 Wireless USB Adapter Utility 15 Configuration 16 Status 24 Option 25 About 27 4 Miscellaneous 29 Windows Zero Configuration 29 ...

Page 4: ...Vigor N61 User s Guide iv This page is left blank ...

Page 5: ...s LAN systems can provide LAN users with access to real time information anywhere in their organization This mobility supports productivity and service opportunities not possible with wired networks y Installation Speed and Simplicity Installing a wireless LAN system can be fast and easy and can eliminate the need to pull cable through walls and ceilings y Installation Flexibility Wireless technol...

Page 6: ...Vigor N61 User s Guide 6 This page is left blank ...

Page 7: ...ng your wireless network connection y Install the USB Driver for Vigor N61 by using the Install CD y Install the Wireless card y Configure network protocol s that is required to communicate on your network Most likely you will need the TCP IP protocol I In ns st ta al ll la at ti io on n P Pr ro oc ce ed du ur re e Important Before you installing USB driver for Vigor N61 do not insert the wireless...

Page 8: ...igor N61 User s Guide 8 2 The setup wizard will appear as follows Please click Next 3 Now you can insert Vigor N61 to the USB port of your computer Then click Next Connect with USB cable Connect directly ...

Page 9: ...ou do not accept the agreement you can click I do not to exit the wizard And the driver installation will not be installed to your computer 5 There are two types of setup that you have to choose Complete or Install Driver Only If you do not know which one is proper simply choose Complete and click Next ...

Page 10: ...tination folder will be specified in this page Also you can click Browse to choose another folder for storing the driver Click Next 7 A default program folder will be offered by the setup program If you do not want to change it simply click Next ...

Page 11: ...omplete the whole installation After choosing the proper setting please click Finish 10 After restarting your system the system will find out the hardware wireless LAN card automatically When it locates a message will be shown on the system tray 11 Now you can find the N61 utility icon in the system tray Double click it to open the configuration window of Vigor N61 wireless adapter ...

Page 12: ...ou want to remove the driver for this wireless card please do the following 1 Run Start Programs Vigor N61 802 11n Wireless USB Adapter Utility Uninstall 2 The Preparing Setup will appear 3 When the following screen appears please click OK 4 Now the system starts to remove the corresponding files ...

Page 13: ...Vigor N61 User s Guide 13 5 When the following dialog appears please click Finish ...

Page 14: ...Vigor N61 User s Guide 14 This page is left blank ...

Page 15: ...gh wireless connection Double click on the N61 utility icon on the system tray Or open the wireless monitor utility by clicking Start Programs USB Wireless LAN Card 802 11g USB Wireless LAN Card Utility The Wireless USB Adapter Utility window will appear as the following Basically the software will scan and display available wireless AP automatically This chapter will introduce each tab in detail ...

Page 16: ...connection is failed It the available APs are many scroll bars will appear for the user to scroll and select preferred AP Please select the one Access Point that you want to connect for accessing Internet MAC BSSID It means the MAC address of current wireless card Signal The more the percentage is the better the link quality will be Security It displays security method that the AP used CH It displ...

Page 17: ... several APs Click New to open the following dialog box Type a new name in the box and click OK The new group with the name you typed will be shown as the following Rename It allows you to modify the selected profile name Delete It allows you to delete the selected profile Select It allows you to select one profile for use ...

Page 18: ...ck this button to remove it Export It allows you to save the profile record as a file with file format of AWP Please type the required password as shown in the following dialog Properties It displays properties of current connected AP For the detailed information refer to To add a new WLAN AP below Import It allows you to load a pre saved profile record into current connected AP When you want to i...

Page 19: ...ere are six modes provided for you to choose for data encryption in connection Data Encryption It will be different according to the Authentication Mode you choose For Open System Shared Key and Open System the data encryption can be disabled or assigned with WEP For Shared WPA WPA PSK WPA2 and WPA2_PSK the data encryption can be TKIP or AES You have to choose the one which is the same with the se...

Page 20: ...hat you have to set will differ For 10 26 Hexadecimal digits Type 10 26 hexadecimal numbers in this field For 5 13 ASCII digits Type 5 13 ASCII characters in this field Default Key Specify the one which is the same as the setting in the connected AP Enable 802 1X It will be available when you choose Open System Authentication Config Such button will be available after you check Enable 802 1X You h...

Page 21: ...s in this box Validate Server Certificate Check this box to validate the server certificate for radius server User Name Type the certificate account for radius server Domain Name Type the domain name for the radius server Password Type the password for connection with WPA PSK mode Confirm Password Type the password again to confirm it TTLS Identify Type the TTLS ID for the radius server Add You ca...

Page 22: ...e default gateway for the wireless card Obtain DNS server address automatically Check this button to get DNS server address automatically for such device If you do not check this button you have to type Preferred DNS server address and Alternative DNS server manually Preferred DNS server Type the address for primary DNS server Alternate DNS server Type the address for secondary DNS server Primary ...

Page 23: ...ed in LAN Bypass proxy server for local address The proxy server will not be used for local address if you check this box HTTP Port Type proxy IP and port number used for HTTP Use the same proxy server for all protocols Check this box to make all the protocols to use same proxy server Secure Port Type proxy IP and port number for secure FTP Port Type proxy IP and port number for FTP Gopher Port Ty...

Page 24: ...used for this wireless card Data Encryption It displays the encryption way for authentication mode used for this wireless card Speed It displays current transferring rate for the link Authentication State It displays the encryption status for connection Signal Strength The longer the red bar for signal strength is the better the connection effect will be The graph is active only when you choose Ac...

Page 25: ...ting and Proxy Setting in profile Refer to IP Proxy Setting on page 20 for more information Group Roaming You can configure several groups with different APs The wireless card allows the station to be roamed among different groups of APs Simply check this box to have group roaming Infrastructure and Ad hoc network Infrastructure and Ad hoc network are the common two types for connection through wi...

Page 26: ... It must match the channel set in AP Power Save Mode To save the power you can choose Max Save or Fast Save The default setting is Disable MaxSave It can save lots of power However the wireless signal also is bad FastSave It is standard mode for power saving Disable The power will not be saved However the wireless signal will be better Tx Burst Such function can increase the data transmission rate...

Page 27: ...ides software information such as utility version and driver versions Simply click About tab on the Wireless USB Adapter window Utility Version It displays the version number of this utility Driver Version It displays the driver version of this wireless card ...

Page 28: ...Vigor N61 User s Guide 28 This page is left blank ...

Page 29: ...e Windows Zero Configuration to achieve your goal First you have to check if the Windows Zero Configuration is enabled or not Go to Start Settings Control Panel and double click System Administrative Tools Service The Service window will appear as follows Locate Wireless Zero Configuration If you find that the status of WZC is not enabled please click the wireless monitor utility icon and choose E...

Page 30: ...Vigor N61 User s Guide 30 2 Next the following window will appear 3 Click Change Advanced Settings and the following window will be shown Press the Wireless Networks tab ...

Page 31: ...onnect with the wireless card Here Tom is entered as an example And choose WPA PSK as the Network Authentication and TKIP as the Data encryption Then type the encryption key characters The type for Network Authentication Data encryption and key must be the same values as configured in the AP that you want to connect ...

Page 32: ...s the Authentication tab Choose the EAP type which is the same as configured in the AP 6 After click OK the wireless station can associate with the AP 7 Open Wireless Connection window Please choose Tom as an example and click Connect ...

Page 33: ...Vigor N61 User s Guide 33 8 The wireless connection starts Please wait for it completes 9 The wireless connection has been established ...

Reviews: