Draper 97974 Manual Download Page 12

– 12 –

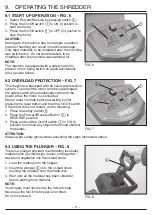
9.   OPERATING THE SHREDDER

9.4 KEEPING THE SHREDDER CLEAN

Before commencing cleaning and maintenance 

procedures, make sure the garden shredder is 

switched off and disconnected from the mains supply. 

Always wear sturdy leather gloves when cleaning the 

cutter blades.
To ensure the best performance from the garden 

shredder, it must be kept clean.
1.  Always clean the garden shredder immediately  


after use.

2.  Do not allow material to because dry and hard on  


any of the garden shredder surface. This will  


directly affect the shredding performance.

3.  Make sure that the inlet chute and the ejector  


chute are kept clean and clear of all waste material.

4.  Make sure that all nuts, bolts and screws are tight  


and secure.

5.  Always have any damaged or worn parts repaired,  


or replaced by qualified personnel.

6.  Do not use detergents or solvents as these could  


cause irreparable damage to your machine.  


Chemicals can destroy the plastic parts.

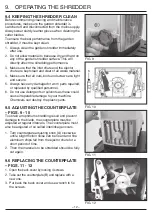
9.5 ADJUSTING THE COUNTERPLATE 

– FIGS. 9 - 10

To obtain an optimum shredding result and prevent 

damage to the blade, the counterplate must be 

adjusted at regular intervals. The counterplate must 

also be adjusted of so called interlinkage occurs.

1.  Turn counterplate adjusting knob (A) clockwise  


until a slight friction noise can be heard and fine  


aluminum chips fall from the ejector chute for a  


short period of time.

2.  Then the materials to be shredded should be fully  


cut again.

9.6 REPLACING THE COUNTERPLATE 
– FIGS. 11 - 12

1.  Open the back cover by loosing 4 screws.
2.  Take out the counterplate (B) and replace with a          

  new one.
3.  Put back the back cover and use wrench to fix    

  the screws.

FIG. 10

FIG. 11

FIG. 12

FIG. 9

(10)

Summary of Contents for 97974

Page 1: ...duct has been designed and contains all the necessary information to ensure its correct and safe use By following all the general safety instructions contained in this manual it will ensure both produ...

Page 2: ...23 8026 0784 1 3 UNDERSTANDING THIS MANUALS SAFETY CONTENT Warning Information that draws attention to the risk of injury or death Important Information that draws attention to the risk of damage to t...

Page 3: ...7 6 TECHNICAL DESCRIPTION 6 1 IDENTIFICATION 8 7 UNPACKING AND CHECKING 7 1 PACKAGING 9 7 2 WHAT S IN THE BOX 9 8 PREPARING THE SHREDDER 8 1 ASSEMBLY 10 8 2 PREPARATION 10 9 OPERATING THE SHREDDER 9...

Page 4: ...ere tools are hired out when the warranty period is 90 days from the date of purchase This warranty does not apply to any consumable parts any type of battery or normal wear and tear nor does it cover...

Page 5: ...1dB A Sound power level LWA 94dB A Uncertainty K 3dB A Weight machine only 20 5kg 4 3 HANDLING AND STORAGE Care must be taken when handling this product Dropping this power tool could have an effect...

Page 6: ...ing a tool will result in tool failure and user injury This covers the use of accessories Dress properly Loose clothing long hair and jewellery are all dangerous because they can become entangled in m...

Page 7: ...able for that environment When using an extended lead select one capable of handling the current amps drawn by the machine in use Fully extend the lead regardless of the distance between the power sup...

Page 8: ...On off switch 2 Circuit breaker button 3 Forward reverse switch 4 Plunger 5 Collection box catch 6 Collection box 7 Top feed housing 8 Hopper 9 Feed chute 10 Counterplate adjusting knob 11 Wheel and c...

Page 9: ...east during the warranty period in case the machine needs to be returned for repair Warning Some of the packaging materials used may be harmful to children Do not leave any of these materials in the r...

Page 10: ...t roots remove soil from roots before shredding 5 Feed the material to be shredded into the corner of the in feed chute if it is not too bulky the material will be drawn in by the blades 6 Do not over...

Page 11: ...ch off the power when the motor is overloaded Wait at least 1 minute before restarting by first pressing the reset button and then the On Off switch If the motor does not restart do the following 1 Pr...

Page 12: ...ays have any damaged or worn parts repaired or replaced by qualified personnel 6 Do not use detergents or solvents as these could cause irreparable damage to your machine Chemicals can destroy the pla...

Page 13: ...erlock feature of the top feed housing 7 Remove deposited matter from the machine using a brush 8 Always clean the machine after use Clean the plastic body and plastic parts using soap and a moist clo...

Page 14: ...r supply before carrying out any maintenance when not in use Warning Sharp objects Warning Keep bystanders away Pay more attention to the operator s hands and feet to avoid injury Do not operate the m...

Page 15: ...e that it is disposed of according to national regulations Contact your local authority for details of collection schemes in your area In all circumstances Do not dispose of power tools with domestic...

Page 16: ...y Repair Agent For aftersales servicing or warranty repairs please contact the Draper Tools Help Line for details of an agent in your local area YOUR DRAPER STOCKIST TAJB0221 Published by Draper Tools...

Reviews: