background image

BATTERY STORAGE AND HANDLING

The camera contains sensitive components, including the battery. Avoid exposing your
camera to very cold or very hot temperatures. Low or high temperature conditions may
temporarily shorten the battery life or cause the camera to temporarily stop working
properly. Avoid dramatic changes in temperature or humidity when using the camera, as
condensation may form on or within the camera.
Do not dry the camera or battery with an external heat source such as a microwave oven
or hair dryer. Damage to the camera or battery caused by contact with liquid inside the
camera is not covered under the warranty.
Do not store your battery with metal objects, such as coins, keys or necklaces. If the
battery terminals come in contact with metal objects, this may cause a fire.
Do not make any unauthorized alterations to the camera. Doing so may compromise
safety, regulatory compliance, performance, and may void the warranty.

WARNING:

 Do not drop, disassemble, open, crush, bend, deform, puncture, shred,

microwave, incinerate or paint the camera or battery. Do not insert foreign objects into the
battery opening on the camera. Do not use the camera or the battery if it has been
damaged - for example, if cracked, punctured or harmed by water. Disassembling or
puncturing the battery can cause an explosion or fire.
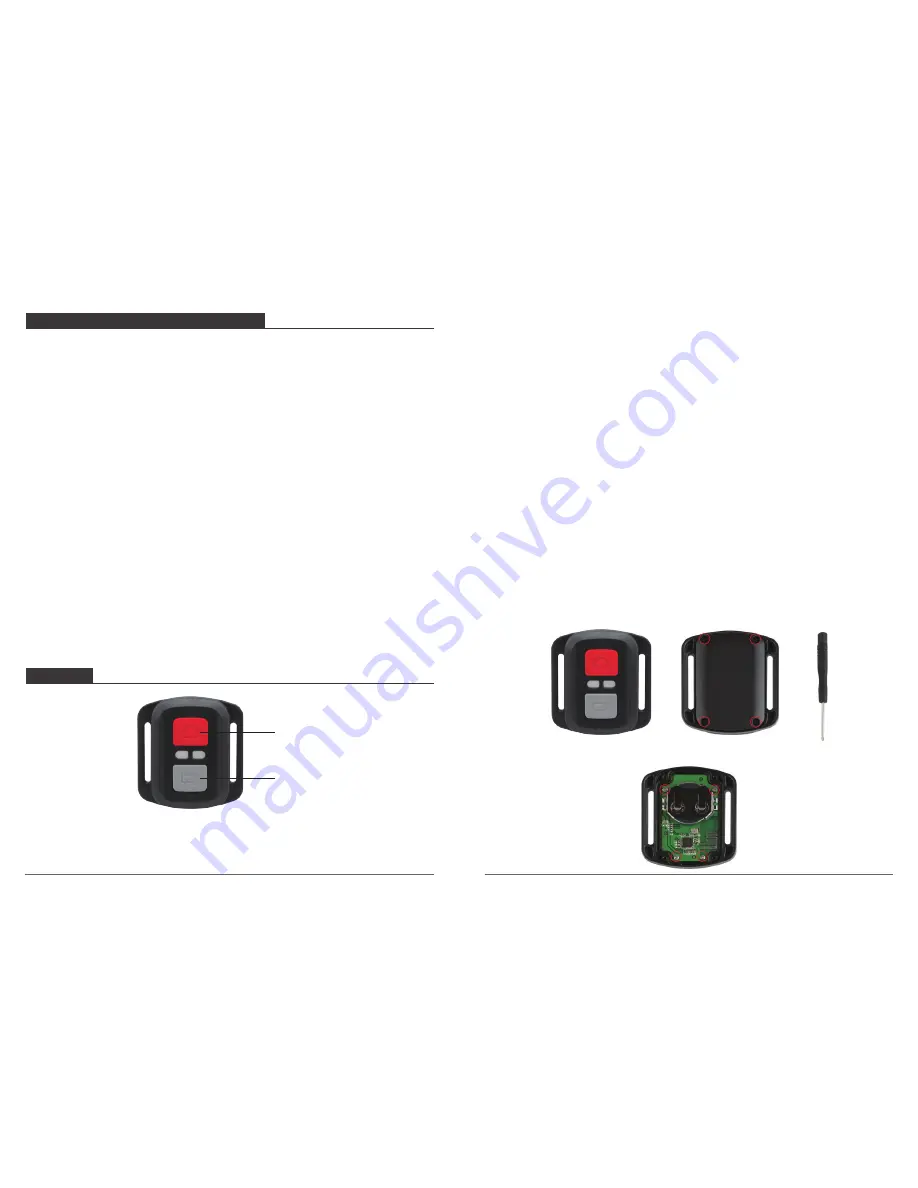
REMOTE

VIDEO

To record Video, verify the camera is in Video mode.

Photo Button

Video Button

Splashproof only, not waterproof

CR2032 BATTERY REPLACEMENT FOR VISION 4 REMOTE

1. Use a 1.8mm Phillips tip screwdriver to remove the 4 screws on the back cover of the
    remote, allowing you to open it.

2. Remove another 4 screws on PCB board.

To start recording:

Press and hold the video button for 5 seconds.  The camera will emit one beep and the 
amera light will flash while recording.

To stop recording:

Press and hold the video button for 5 seconds.  The camera will emit one beep and the
camera light will stop flashing while recording.

PHOTO

To capture a photo, verify the camera is in Photo mode.

To take a photo:

Press the Red Photo Button. The camera will emit a camera shutter sound.

Note:

 Press the video button, the camera screen goes to sleep mode. 

In sleep mode, press the video button, the camera screen wakes up. 

17

18

Summary of Contents for Vision 5

Page 1: ...USER MANUAL Vision 5 Action Camera ...

Page 2: ... Videos and Photos on Your Vision 5 Offloading Your Content Offloading Your Content to Smartphone or Tablet Adjusting The Zoom Level Reformatting Your Micro SD Card Maintenance Your Camera Maximizing Battery Life Battery Storage and Handling Remote Mounting Your Camera Contact US 1 3 4 8 12 12 13 13 15 15 16 16 16 17 17 20 21 CONTENTS ...

Page 3: ...er Mode Exit Button 2 Shutter Select Button 3 Up Button 4 Down Button 5 Latch 6 WiFi Indicator 7 Lens 8 Working Charging Indicator 9 Screen 10 1 4 Screw Hole tripod interface 11 MicroSD Slot 12 Micro USB Port 13 Speaker MIC 14 Micro HDMI Port 10 13 01 02 ...

Page 4: ...nds The camera beeps while the camera status light is on When information appears on the LCD display or the camera status screen your camera is on To Power Off Press and hold the Mode button for three seconds The camera beeps while the camera status light is off SWITCHING MODE To Switch Mode Press Mode button to switch mode To Exit Mode Press the Mode button to exit mode TURNING ON OFF Wi Fi To tu...

Page 5: ... to stop recording slow motion video 16M 4373 2018 10 01 10 11 23 TF 720P120FPS 14 4G 2018 10 01 10 13 23 TF Playback Mode Press Mode button several times to switch to Playback Mode In Playback Mode press the Up Down button to scroll through video or photo files Video Setting Mode Press Mode button several times to switch to Video Setting Mode You can change camera settings in this mode 00001 0437...

Page 6: ...WiFi Auto Image Rotation Driving Mode 0 Language Date Time Format Reset To Factory Settings Firmware Version English CUSTOMIZING YOUR VISION 5 Video Setting 1 Video Resolution 4K 30FPS 2 7K 30FPS 1080P 60FPS 1080P 30FPS 720P 120FPS 720P 60FPS 720P 30FPS Default setting is 4K 30FPS 2 Recording Sound On Off Default setting is On Turn off Recording Sound the camera does not record sound when you reco...

Page 7: ... in 1 second so it is perfect for capturing fast moving activities Camera Setting 1 Exposure 3 2 1 0 1 2 3 Default setting is 0 By default your camera uses the entire image to determine the appropriate exposure level However Exposure lets you select an area that you want the camera to prioritize when determining exposure This setting is particularly useful in shots where an important region might ...

Page 8: ...ware Version Model Vision5 Version Vision5 0928 V1 0 Updated 20180928s Manufacturer DragonTouch You can check the model version updated time and manufacturer of your Vision 5 CONNECTING TO THE XDV APP The XDV app lets you control your camera remotely using a smartphone or tablet Features include full camera control live preview playback download sharing of content and setting camera 1 Download XDV...

Page 9: ...ly and your computer s file explorer connect the card reader to the computer then insert the micro SD card You can then transfer files to your computer or delete selected files on your card You can also offload files to a Windows computer using a USB cable Note This camera does not support Mac computer Exit Connected Action Cam Saved Action Cam connected iCam AKASO offline WIFI Setting Media Captu...

Page 10: ...ean the lens wipe it with a soft lint free cloth Do not insert foreign objects around the lens 3 Don t touch the lens with fingers 4 Keep the camera away from drops and bumps which may cause damage to the parts inside 5 Keep the camera away from high temperature and strong sunshine to avoid being damaged MAXIMIZING BATTERY LIFE If the battery reaches 0 while recording the camera saves the file and...

Page 11: ...microwave incinerate or paint the camera or battery Do not insert foreign objects into the battery opening on the camera Do not use the camera or the battery if it has been damaged for example if cracked punctured or harmed by water Disassembling or puncturing the battery can cause an explosion or fire REMOTE VIDEO To record Video verify the camera is in Video mode Photo Button Video Button Splash...

Page 12: ... the PCB board to avoid reversing the camera and video button functions 4 Install the new battery keeping the pole facing up 5 Install all 4 screws back onto the PCB board 6 Install all 4 screws back into the cover 19 Attach your camera to helmets gear and equipment MOUNTING YOUR CAMERA 20 ...

Page 13: ...ssues or comments concerning our products please send E mail to the address below and we will respond as soon as possible E mail cs tabletexpress com US customer service line 301 670 7335 8am 5pm EST Monday Friday except holidays 21 ...

Reviews: