background image

Directions

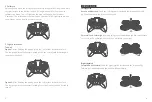
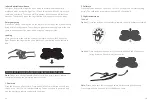
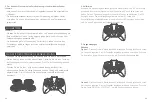
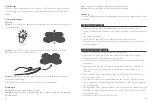
Forward:

 Release the Finger button during the flight, then tilt your fist downward.

Backward:

 Release the Finger button during the flight, then tilt your fist upward.

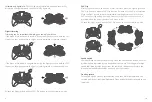
Leftward: 

Release the Finger button during the flight, then lean your fist leftward.

Rightward: 

Release the Finger button during the flight, then lean your fist rightward.

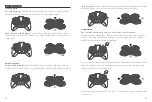
Ascend:


Press and hold the Finger button during the flight, then tilt your fist upward.

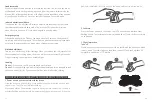
Descend:


Press and hold the Finger button during the flight, then tilt your fist

                  downward.

Rotate left:

 Press and hold the Finger button during the flight, then lean your fist

                     leftward.

Rotate right:

 Press and hold the Finger button during the flight, then lean your fist

                       rightward.

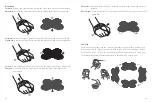
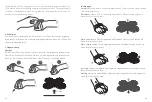
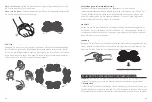
360° Flip

Move your fist to make sure the remote is parallel with the surface on which you
are stood during the flight (as you were before take-off). Press the Finger button,
then release it. The LEDs on the drone will start flashing quickly. Then move your
fist forward/backward/leftward/rightward to flip the drone accordingly.

13

14

Summary of Contents for DK01

Page 1: ...USER MANUAL Dragon Touch DK01 Mini Drone V1 0 Please read this manual before operating your drone and keep it for further reference AGES...

Page 2: ...CONTENTS 77 95 01 19 20 38 58 76 39 57...

Page 3: ...170mm x 38mm Battery capacity 3 7V 500mAh Charging time 60 minutes Flight time 6 minutes Remote distance 60 meters Gravity Sensor Remote Control Battery capacity 3 7V 150mAh Charging time 30 minutes...

Page 4: ...wer switch 3D Flip Forward ne tuning Right joystick Leftward ne tuning Rightward ne tuning Backward ne tuning High Low speed switch Left joystick One key landing Long press to activate emergency stop...

Page 5: ...ld weather Please avoid exposing the battery to sunlight heat or high temperatures FLIGHT OPERATION Note For each ight power on the drone rst and then power on the remote Please repeat the pairing pro...

Page 6: ...LED lights on the drone will blink white for about 3 seconds The calibration is complete when the colorful LED lights turn on and you will hear a beep from the remote control 3 Flight instructions Ta...

Page 7: ...to adjust If the drone drifts leftward or rightward during the ight press and hold the 360 Flip button then gently move the Right joystick rightward or leftward to adjust Leftward and rightward Pull t...

Page 8: ...over at its current ight altitude Proper trimming can help achieve a stable ight Landing Option 1 Press down the One key landing button to land Option 2 During the ight pull the Left joystick backward...

Page 9: ...ur st upward Descend Press and hold the Finger button during the ight then tilt your st downward Rotate left Press and hold the Finger button during the ight then lean your st leftward Rotate right Pr...

Page 10: ...n on the remote to land FLIGHT WITH THE WATERDROP REMOTE CONTROL Note Please turn o the standard remote control and gravity sensor remote control before using the waterdrop remote control 1 Power on P...

Page 11: ...the batteries in the remote have enough power Make sure to turn o the gravity sensor remote control 3 The ight is not stable Return the drone and restart to do calibration as instructed Make the ight...

Page 12: ...ack 6 The rotor blades need to be replaced The propellers and motors are marked A and B Please pair them when replacing the rotor blades 7 The waterdrop remote control does not work Make sure you turn...

Page 13: ...e angezeigt laden Sie sie bitte vor dem Gebrauch auf Infrarotsensor Infrarotsensor Infrarotsensor Einschalten Ausschalten Propeller Motor Drohne Standardfernbedienung Schwerkraftsensor Fernbedienung W...

Page 14: ...nsors auf 4 Tragen Sie die Fernbedienung des Schwerkraftsensors bei voller Ladung auf Ihrer Hand che 5 Kaufen Sie 3 AAA 1 5 V Batterien nicht im Lieferumfang enthalten und installieren Sie sie in der...

Page 15: ...en Dr cken Sie die Ein Aus Taste auf der Fernbedienung um das Ger t einzuschalten Warten Sie einige Sekunden und das Pairing wird automatisch abgeschlossen Die LEDs an der Drohne wechseln von wei zu b...

Page 16: ...s Flugtrimmen Das Trimmen kann wichtig sein um Ihre Drohne zu kontrollieren Wenn die Drohne w hrend des Fluges vorw rts oder r ckw rts driftet halten Sie die 360 Flip Taste gedr ckt und bewegen Sie de...

Page 17: ...blinken und Benutzer h ren einen Piepton von der Fernbedienung In diesem Modus iegt die Drohne unabh ngig von der Position des Kopfes oder Hecks Ihrer Drohne in Richtung des rechten Joysticks Dr cken...

Page 18: ...uf der Sie stehen Dr cken Sie die Fingertaste und lassen Sie sie dann los Die Drohne wird vertikal bis zu einer H he von 1 2 Metern iegen 1 2m Richtungen Vorw rts Lassen Sie die Fingertaste w hrend de...

Page 19: ...e Richtung wenn sie ein Hindernis erkennt Dr cken Sie die Fingertaste dreimal wiederholt um den Modus zu verlassen Not Halt Halten Sie die Ein Aus Taste auf der Fernbedienung 2 Sekunden lang gedr ckt...

Page 20: ...t bevor Sie es verwenden wenn etwas kaputt oder besch digt ist SICHERHEITSHINWEISE 1 Halten Sie die kleinen Komponenten von Kindern fern 2 Bitte stellen Sie sicher dass die Drohne langsam aufsteigt um...

Page 21: ...und die Fernbedienung erneut Ersetzen oder laden Sie den Akku der Drohne Stellen Sie sicher dass die Batterien in der Fernbedienung ausreichend mit Strom versorgt werden Stellen Sie sicher dass die F...

Page 22: ...idad de bater a 3 7V 500mAh Tiempo de carga 60 minutos Tiempo de vuelo 6 minutos Distancia remota 60 metros Control remoto del sensor de gravedad Capacidad de la bater a 3 7V 150mAh Tiempo de carga 30...

Page 23: ...Joystick derecho Giro no hacia la izquierda Giro no hacia la derecha Giro no hacia atr Interruptor de velocidad alta baja Joystick izquierdo Aterrizaje de una tecla Mantenga pulsado para activar la pa...

Page 24: ...s Por favor evite exponer la bater a a la luz solar al calor o a altas temperaturas OPERACION DE VUELO Nota Para cada vuelo encienda el dron primero y luego encienda el control remoto Por favor repita...

Page 25: ...ces LED del dron parpadear n en blanco durante unos 3 segundos La calibraci n se completa cuando se encienden las luces LED de colores y escuchar un pitido del control remoto 3 3 Instrucciones de vuel...

Page 26: ...e el joystick derecho hacia la derecha o hacia la izquierda para ajustar Hacia la izquierda y hacia la derecha Tire del joystick derecho hacia la izquierda y el dron volar hacia la izquierda tire de l...

Page 27: ...1 Presione el bot n de aterrizaje de una tecla para aterrizar Opci n 2 Durante el vuelo tire del joystick izquierdo hacia atr s tanto como sea posible para aterrizar el dron y mant ngalo presionado du...

Page 28: ...tenga presionado el bot n de dedo durante el vuelo luego incline el pu o hacia abajo Girar a la izquierda Mant n presionado el bot n de dedo durante el vuelo luego inclina tu pu o hacia la izquierda G...

Page 29: ...el bot n de encendido en el control remoto para aterrizar VUELO CON EL MANDO A DISTANCIA WATERDROP Nota Por favor apague el control remoto est ndar y el control remoto del sensor de gravedad antes de...

Page 30: ...ater a del dron Aseg rese de que las bater as del control remoto tengan su ciente energ a Aseg rese de apagar el control remoto del sensor de gravedad 3 El vuelo no es estable Devuelva el dron y reini...

Page 31: ...stick derecho para volar el dron de regreso 6 Es necesario reemplazar las palas del rotor Las h lices y los motores est n marcados con A y B Empar jelos cuando reemplace las palas del rotor 7 El mando...

Page 32: ...ant lentement veuillez la charger avant utilisation Capteur Infrarouge Capteur Infrarouge Capteur Infrarouge Marche Arr t H lice Moteur Drone T l commande standard T l commande Capteur de Gravit T l c...

Page 33: ...r de gravit 4 Portez la t l commande du capteur de gravit sur votre paume lorsqu elle est compl tement charg e 5 Achetez 3 piles AAA 1 5 V non incluses et installez les dans la t l commande standard M...

Page 34: ...ont clignoter Appuyez sur le bouton d alimentation de la t l commande pour allumer Attendez quelques secondes et l appairage sera termin automatiquement les LED du drone passeront du blanc au color et...

Page 35: ...ajustement peut tre important pour vous aider contr ler votre drone Si le drone d rive vers l avant ou vers l arri re pendant le vol appuyez et maintenez le bouton retournement 360 puis d placez douce...

Page 36: ...ue soit la position de la t te ou de la queue de votre drone Appuyez nouveau sur le m me bouton pour quitter ce mode vitement d obstacles infrarouge Appuyez sur le bouton d collage par un bouton vitem...

Page 37: ...uyez sur bouton doigt puis rel chez le Le drone d collera verticalement une altitude de 1 2 m tre 1 2m Instructions Avant Rel chez bouton doigt pendant le vol puis inclinez votre poing vers le bas Arr...

Page 38: ...il d tectera un obstacle Appuyez nouveau 3 fois sur le bouton Finger pour quitter ce mode Arr t d urgence Appuyez sur le bouton d alimentation de la t l commande et maintenez le enfonc pendant 2 secon...

Page 39: ...llez vous assurer que le drone monte lentement pour viter tout dommage potentiel haute vitesse 3 Apr s l atterrissage veuillez d abord teindre la t l commande puis teindre le drone 4 Veuillez garder l...

Page 40: ...pond aucune commande de la t l commande standard Jumelez nouveau le drone et la t l commande Remplacez ou chargez la batterie du drone Assurez vous que les piles de la t l commande sont su samment cha...

Page 41: ...ella batteria 3 7V 500mAh Tempo di carica 60 minuti Tempo di volo 6 minuti Distanza remota 60 metri Telecomando con sensore di gravit Capacit della batteria 3 7V 150mAh Tempo di carica 30 minuti Tempo...

Page 42: ...zione esigua verso sinistra Regolazione esigua verso destra Regolazione esigua all indietro Interruttore alta bassa velocit Joystick sinistro Una chiave di Atterraggio Premere a lungo per attivare l a...

Page 43: ...sse temperature Evitare di esporre la batteria alla luce solare al calore o alle alte temperature OPERAZIONE DI VOLO Nota Per ogni volo accendi prima il drone e poi il telecomando Ripetere la procedur...

Page 44: ...eranno in bianco per circa 3 secondi La calibrazione completa quando le luci LED colorate si accendono e sentirai un segnale acustico dal telecomando 3 Istruzioni di volo Decollare Opzione 1 Dopo aver...

Page 45: ...a 360 quindi sposta delicatamente il joystick destro verso destra o verso sinistra per regolare Verso sinistra e verso destra Tirare il joystick destro verso sinistra e il drone voler verso sinistra t...

Page 46: ...o Opzione 1 Premere il pulsante Una chiave di atterraggio per atterrare Opzione 2 Durante il volo tirare indietro il joystick sinistro il pi possibile per far atterrare il drone e tenerlo premuto per...

Page 47: ...o verso l alto Discesa Tieni premuto il pulsante del dito durante il volo quindi inclina il pugno verso il basso Ruota a sinistra Tieni premuto il pulsante Dito durante il volo quindi inclina il pugno...

Page 48: ...il pulsante di accensione sul telecomando per atterrare VOLO CON IL TELECOMANDO WATERDROP Nota Spegnere il telecomando standard e il telecomando con sensore di gravit prima di utilizzare il telecoman...

Page 49: ...o standard Associa nuovamente il drone e il telecomando Sostituire o caricare la batteria del drone Veri care che le batterie del telecomando abbiano energia su ciente Assicurarsi di spegnere il telec...

Page 50: ...il telecomando sia e cace 5 Il drone voler oltre il raggio di controllo Attiva la modalit Headless quindi sposta il joystick destro per riportare indietro il drone 6 Le pale del rotore devono essere...

Reviews: