background image

DPS Telecom


“Techno Knowledge” Paper 

“Your Partners in Network Alarm Management” 


Problem:  

Trouble Setting Up ASCII for the First Time


Platform:  

T/Mon NOC, SLIM, XM 

 
________________________________________________________________________ 
 
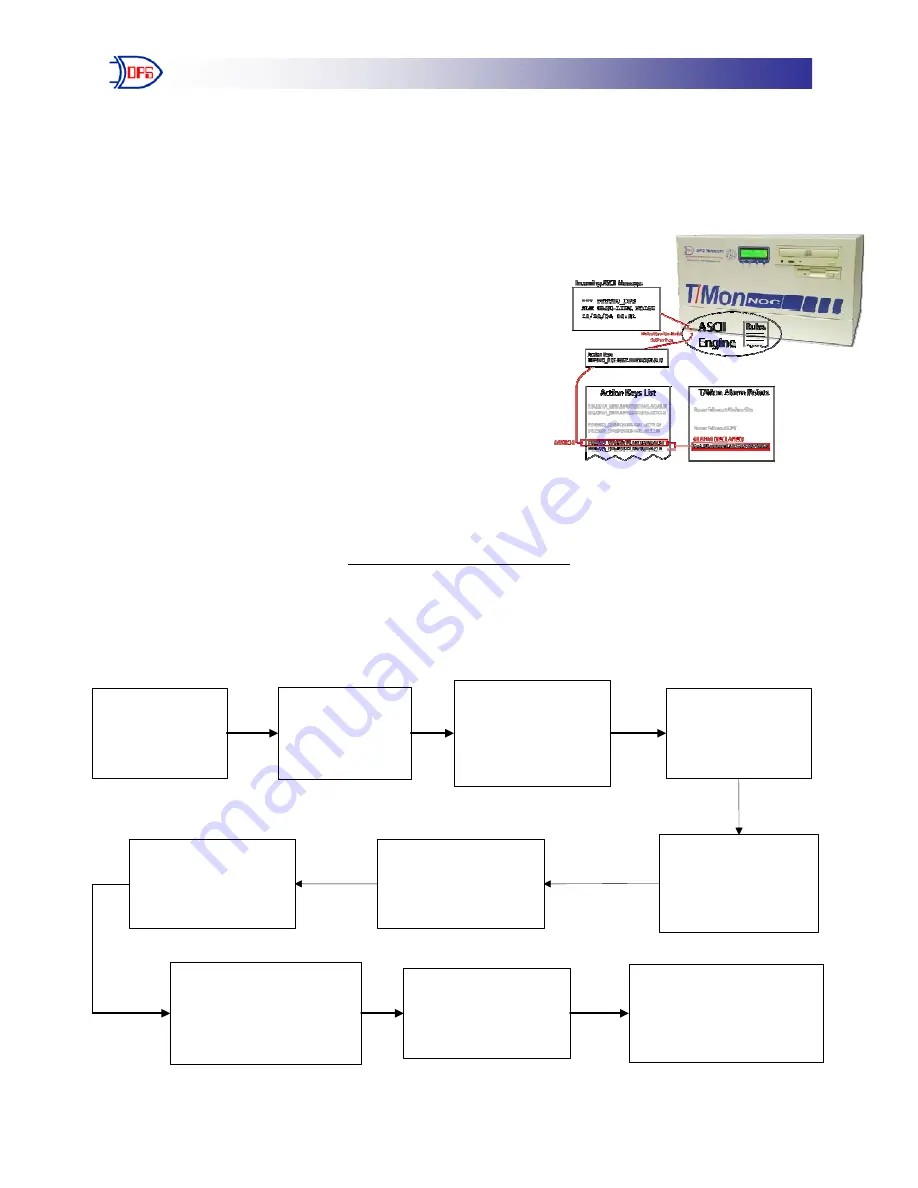
ASCII Processing is one of the most powerful and flexible features 
supported by T/Mon. It gives T/Mon the ability to monitor 
the English output of your telecom network and declare 
alarms based on your selection criteria from ASCII devices 
like switches, PBXs, and routers. Unlike other protocols 
that may be used to report alarm information, ASCII is 
free-form, non-standard, and may say almost anything.  
 

This Techno Knowledge Paper can help you if: 


You are setting up ASCII on T/Mon for the first 
time 


________________________________________________________________________ 


Quick Reference Chart 

(for more details, review the troubleshooting checklist, starting on page 2 of this guide) 


Create ASCII

Device Rule 0

(general)

Enter Port

Desciption for

ASCII device

Create ASCII

Device Rule 20

(general)

Create job and

data connection

for your ASCII

device

Enter TCP

connection for

new ASCII job

Enter in name of

one of the sites that

will receive alarms

Select the rule set

for this device

Enter 'Monitor Mode'

Go to 'Craft

Interface' and

select ASCII job

Sign-in (if necessary)

and view text received

by ASCII device

S

S

T

T

A

A

R

R

T

T


H

H

E

E

R

R

E

E


Summary of Contents for T/Mon NOC

Page 1: ...ree form non standard and may say almost anything This Techno Knowledge Paper can help you if You are setting up ASCII on T Mon for the first time _____________________________________________________...

Page 2: ...es a Give your rule a name 8 characters max and hit ENTER Start on rule 0 then hit ENTER again Give the rule a description go down to the Line Terminator Field then hit TAB Select LF for Line Feed Kee...

Page 3: ...3 Hit E for Edit and then TAB to select an ASCII INPUT job Hit ENTER Fig 3 Create ASCII Input job 4 4 Here you will enter in a port description For a full description of ASCII port connection options...

Page 4: ...ASCII Input Job 5 You will notice No Data Connection is blinking at the top Hit F6 for Data Connection then F1 for TCP Ports Fig 5 Hit F1 to go to the TCP Port assignment screen 6 This step is where...

Page 5: ...device listens e The job number to the right will initially be 0 Don t worry this number will change when we assign it to the job When your cursor is at the beginning of the next line hit F8 to save...

Page 6: ...be receiving alarms from you can have up to 999 sites per ASCII device 9 Now ESC out to the Main Menu Go to Initialize and choose Monitor Mode a From the Alarm Summary Screen hit CTRL F7 to go to the...

Page 7: ...your T Mon or viewed directly on the system To view it directly on the system escape out of Monitor Mode and go to Files Utilities Report Maintenance Hit TAB to select the file discussed in Step 5 Fi...

Reviews: