Doufit EB-01 Instruction Manual Download Page 5

Page 4

3. ASSEMBLY METHOD


For the assembly video, please visit:

www.youtube.com/channel/UCorBKk34KZgI96OyGSkjFdA

(page 3) to check if all 

* Before assembly, please accord to the 

SPARE PARTS DETAILS 

   parts are complete. If not, please contact [email protected]. We will send to you ASAP.

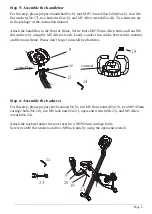
Step 1: Unfold the main frame

Step 2: 

Assemble the foot pipes

Pull the safety pin out from hole B of the main frame.Unfold the main frame to the angle 

you prefer, and insert the safety pin into hole A to fix the main frame.

*Warning: If the safety pin placed in hole B, please don’t assemble to avoid accidents.   

A

(Hole B is next to the main frame.)

For this step, please prepare two foot pipes(No.3) and open-end wrench(No.23). There are 

four M8*50mm carriage bolts(No.12), four M8 curved washers(No.13), and four M8 acorn 

nuts(No.14) on two foot pipes. Please unscrew them before assembly.

Attention: There are two kinds of foot pipes. One foot pipe has two wheels, the other one 

doesn’t have wheels. Please assemble the front foot pipe with wheels in front of the main

frame. The wheels face outward.

Insert two M8*50mm carriage bolts from the bottom of each foot pipe, and then screw four

M8 curved washers and four M8 acorn nuts by using the open-end wrench. 

23

3

12

13

14

The wheels face outward.

Summary of Contents for EB-01

Page 1: ...Instruction Manual EB 01 Exercise Bike If the item is damaged or you are missing some parts please contact service doufit net with your order number then we will try our best to solve it for you ASAP...

Page 2: ...octor for instructions before next use To ensure your safety every time before using please check whether there is any wear and tear especially in the seat screw knob and safety pin If there is please...

Page 3: ...me This product is just suitable for general household use not for commercial use Children are prohibited from using the product For elderly or disable people they can only use it under guardianship D...

Page 4: ...x 4 Pre assembled to two foot pipes 18 Battery x 2 21 M8 lock nut x 2 14 M8 acorn nut x 6 Four are pre assembled to two foot pipes 13 M8 curved washer x 6 Four are pre assembled to two foot pipes 16...

Page 5: ...ced in hole B please don t assemble to avoid accidents B A Hole B is next to the main frame For this step please prepare two foot pipes No 3 and open end wrench No 23 There are four M8 50mm carriage b...

Page 6: ...the extension pipe Screw these three washer and three lock nuts back Insert the extension pipe into the main frame Adjust the height and twist the knob to fix Attention the letters L and R and the scr...

Page 7: ...n bolts and four M6 flat washers by using the M5 Allen wrench Lastly connect two cables between the monitor and the main frame Please don t forget to install two batteries 8 16 17 18 24 connect connec...

Page 8: ...curved washers No 13 two M8 acorn nuts No 14 two M8 35mm Allen bolts No 22 open end wrench No 23 and M5 Allen wrench No 24 Attach the seat armrest to the backrest Screw two M8 35mm Allen bolts two M8...

Page 9: ...exercise and you can also turn on it manually by pressing the button The mnitor will automatically turn off after a while when you stop exercise If there is no data showing please check if the wire h...

Page 10: ...e rotate the resistance adjustment button on the frame There are 8 gears of resistance in total and the 8th level is the maximum resistance Clockwise rotation will increase resistance On the contrary...

Page 11: ...be placed out of children s reach 4 After placed for a period of time if you want to use it again please ensure that the product can be used normally and read the precautions again 5 If wet the produc...

Reviews: