background image

4

5

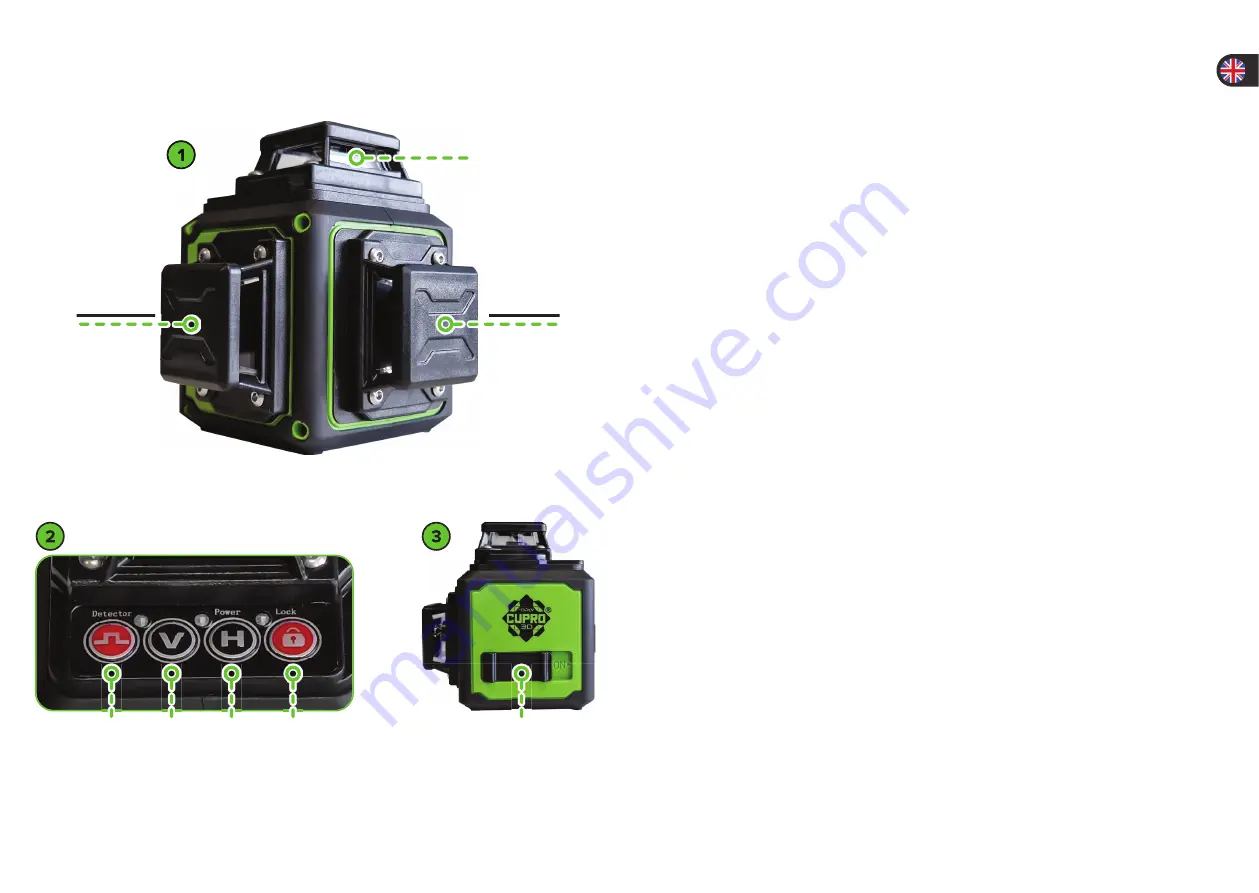
PRODUCT OVERVIEW

Horizontal Laser

Vertical Laser

Vertical Laser

Vertical L

aser S

witch

Detector mode

Horizontal L

aser S

witch

Tilt L

ock S

witch

ON / OFF

Switch

OPERATION

Only move the CUPRO laser in the “OFF” state. 

(3)

 This locks the laser emitters 

in their place and prevents damage or decalibration as a result of excessive 
movement.

1)   (Optional) Fix the Cupro laser to the desired accessory, such as a tripod or 
  magnetic bracket. Make sure the connection is secure and the placement is 
 reliable.
2)  Move the instrument as close to the desired position as possible, as close to 
  level as possible.
3)  Turn on the instrument using the ON/OFF switch. 

(3)

 The instrument will 

  auto-level within 2,5°. If the placement deviates more than 2,5° from level 
  the laserbeams will keep fl ashing.  
4)  Turn on the desired laser emitters by pressing the “V” or “H” buttons. 

(2)

Pressing the “V” button multiple times switches between the on/off  states of 

  each vertical laser beam. Pressing the “H” button multiple times switches 
  the horizontal laser beam on or off .
5)  Micro-adjustments can be made in the ON-state by 

carefully

 moving the 

  instrument a few millimeters in place.

DETECTOR

1)  When using an optional laser detector the working range can be doubled. 
  Switching on the detector function on the control panel 

(3)

 will activate 

  the high frequency pulse needed for detection. This cannot be detected 
  with the naked eye, the laserbeams will look less bright.

TILT FUNCTION

The tilt function enables the instrument to emit laser beams in an angled 
position. To use the tilt function:

1)  Keep the “ON/OFF” switch in the “OFF” position. 

(3)

2)  Press the “Lock” button on the control panel. 

(2)

3)  Enable the desired laser emitters by pressing the corresponding buttons on 
  the control panel.
4)  To switch off  the device press the “Lock” button again.

Summary of Contents for CUPRO 3D

Page 1: ...ORLY CUPRO 3D SELF LEVELING LASER USER MANUAL D ORLY CUPRO 3D KRUISLIJNLASER HANDLEIDING D ORLY CUPRO 3D L SER AUTONIVELANTE MANUAL DE USUARIO D ORLY CUPRO 3D SELBSTNIVELLIERENDER LASER BENUTZERHANDBU...

Page 2: ...the instrument 7 Declaration of conformity 27 NEDERLANDS Aandachtspunten 9 Specificaties 9 Productoverzicht 10 Gebruik 11 Accessoires 12 Voeding 13 Certificering 27 ESPA OL Puntos de atenci n 15 Cara...

Page 3: ...eams will keep flashing 4 Turn on the desired laser emitters by pressing the V or H buttons 2 Pressing the V button multiple times switches between the on off states of each vertical laser beam Pressi...

Page 4: ...e charged using the supplied USB C charging cable Connect the cable directly to the battery pack A A blue light will blink during the charging process it will light up continuously when fully charged...

Page 5: ...aan regen of overmatig vocht Verwijder de batterij als de Cupro langere tijd niet wordt gebruikt 1 maand Neem contact op met uw dealer als kalibratie of service noodzakelijk wordt geacht Indien u het...

Page 6: ...e kunnen bewegen doordat de plaatsing meer dan 2 5 graden afwijkt van perfect vlak zullen de lasers knipperen 4 Zet de gewenste lasers aan door op de V of H knoppen te drukken tot de gewenste instelli...

Page 7: ...et de accupack A Gedurende het laadproces zal er een blauw licht knipperen wanneer het licht continu brandt is het laden voltooid Batterijen In plaats van de accupack kan de kruislijnlaser ook van str...

Page 8: ...dos prolongados Retire la bater a cuando no vaya a utilizar el Cupro durante m s de un mes P ngase en contacto con su distribuidor cuando considere necesario calibrar o reparar el instrumento La apert...

Page 9: ...haces l ser seguir n parpadeando 4 Encienda los emisores l ser deseados pulsando los botones V o H 2 Pulsando varias veces el bot n V se cambia entre los estados de encendido apagado de cada rayo l s...

Page 10: ...e cargar con el cable de carga USB C suministrado Conecte el cable directamente a la bater a A Una luz azul parpadear durante el proceso de carga se encender de forma continua cuando est completamente...

Page 11: ...l ngere Zeit Regen oder berm iger Feuchtigkeit aus Entfernen Sie die Batterie wenn der Cupro l nger als einen Monat nicht benutzt wird Wenden Sie sich an Ihren H ndler wenn eine Kalibrierung oder War...

Page 12: ...ken der Tasten V oder H ein 2 Durch mehrmaliges Dr cken der Taste V wird zwischen den Ein und Ausschaltzust nden der jedes vertikalen Laserstrahls Mehrmaliges Dr cken der Taste H schaltet schaltet den...

Page 13: ...C Ladekabel aufgeladen werden Verbinden Sie das Kabel direkt mit dem Akkupack A W hrend des Ladevorgangs blinkt ein blaues Licht das kontinuierlich leuchtet wenn der Akku vollst ndig geladen ist Batte...

Page 14: ...und Vorschriften entspricht NL Wij verklaren onder onze volledige verantwoordelijkheid dat dit product voldoet aan de conform Richtlijn 2011 65 EU van het Europees Parlement en de Raad van 8 juni 2011...

Page 15: ......

Reviews: