background image

*

*

*

*

*

*

*

    WARNING:  Should this product become damaged, and/or 

components are broken or missing, DO NOT USE.

Dorel warrants its product to be free from defects in material and workmanship and agrees to remedy 
any such defect. This warranty covers 1 year from the date of original purchase. This warranty is valid 
only upon presentation of proof of purchase.  This is solely limited to the repair or replacement of 
defective furniture components and no assembly labor is included. This warranty does not apply to any 
product which has been improperly assembled, subjected to misuse or abuse or which has been altered 
or repaired in any way. Any wearing, tearing or fading of the fabric is not covered under the warranty. 
This warranty gives you specific legal rights and you may also have other rights which vary from State to 
State.

CARE AND CLEANING      

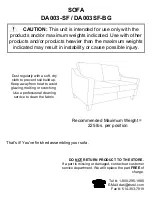
Dust regularly with a soft, dry cloth to prevent soil build up.  Keep away from heat to avoid glazing, 
melting or scorching.  Use a professional cleaning service to clean the fabric.

MAINTENANCE

Check bolts/screws periodically and tighten them if necessary.

LIMITED WARRANTY

Assemble on a soft, smooth surface to prevent damage to the product finish.

Read all instructions completely before assembly.

DO NOT

 use power tools.

CAUTION: Adult assembly required.

Estimated assembly time: 15


minutes. 

Montreal, Quebec

Canada H1G 3L1

E-MAIL: [email protected]

NOTES

Ensure all parts and components are present before beginning assembly.

Assembly and handling will require two people.

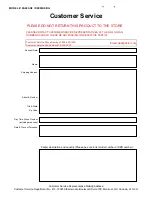
CUSTOMER SERVICE    

If you are missing parts or have any questions about this product, contact our customer 
service representative first!

CALL 1-800-295-1980      

You can also order parts by writing to the address listed below. Please include the 
product model number, color and a detailed description of the part.

Customer Service Department No. 413

12345 Albert-Hudon Boulevard, Suite 100

Summary of Contents for 0-65857-17699-5

Page 1: ...n mind We trust it will provide you with many years of exceptional comfort and service Before beginning assembly we encourage you to familiarize yourself with your new furniture piece by taking a few...

Page 2: ...ust regularly with a soft dry cloth to prevent soil build up Keep away from heat to avoid glazing melting or scorching Use a professional cleaning service to clean the fabric MAINTENANCE Check bolts s...

Page 3: ...PARTS LIST A B C D E F G H I SUPPORT LEG 1 PC BACK CUSHION FOOT 2 PCS 4 PCS 1 PC 2 PCS 1 PC 1 PC RIGHT ARM SEAT CUSHION 1 PC 1 PC FRONT RAIL LEFT ARM SOFA DA003 SF DA003SF BG BACK SEAT PANEL...

Page 4: ...STEP 1 SOFA DA003 SF DA003SF BG Place all parts on a clean smooth surface Attach feet H to right arm E and left arm D as shown below NOTE remove the protective cap on feet H before beginning assembly...

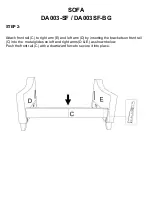
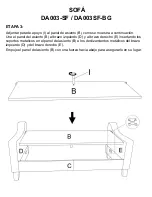
Page 5: ...BG Attach front rail C to right arm E and left arm D by inserting the brackets on front rail C into the metal glides on left and right arms D E as shown below Push the front rail C with a downward fo...

Page 6: ...I to seat panel B as shown below Attach seat panel B to left arm D and right arm E by inserting the metal brackets on seat panel B into the metal glides on left arm D and right arm E Push the seat pan...

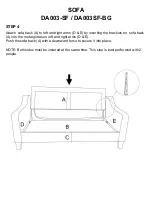
Page 7: ...right arms D E by inserting the brackets on sofa back A into the metal glides on left and right arms D E Push the sofa back A with a downward force to secure it into place NOTE Both sides must be inst...

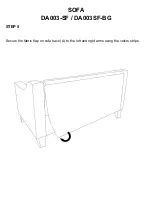
Page 8: ...STEP 5 SOFA DA003 SF DA003SF BG Secure the fabric flap on sofa back A to the left and right arms using the velcro strips...

Page 9: ...SOFA DA003 SF DA003SF BG STEP 6 Place the seat cushion F and back cushion G onto the sofa...

Page 10: ...gularly with a soft dry cloth to prevent soil build up Keep away from heat to avoid glazing melting or scorching Use a professional cleaning service to clean the fabric DO NOT RETURN PRODUCT TO THE ST...

Page 11: ...omer Service Fax Number 514 353 7819 Request Date Name Shipping Address Street Number City State Zip Code Day Time Phone Number including area code Date Place of Purchase Part s description and quanti...

Page 12: ...iene informaci n importante sobre nuestra garant a y consejos de cuidados para que su mueble siempre conserve su apariencia de nuevo Dorel Asia le da mucha importancia a la satisfacci n de nuestros cl...

Page 13: ...mpra Esto se limita a la reparaci n o reemplazo de componentes defectuosos del mueble y no se incluye ning n trabajo de ensamblaje Esta garant a no se aplica a ning n producto que haya sido mal armado...

Page 14: ...E F G H I SOF DA003 SF DA003SF BG RESPALDAR DE LA SOF PANEL DEL ASIENTO 1 PZA 1 PZA RIEL DELANTERO BRAZO IZQUIERDO 1 PZA 1 PZA BRAZO DERECHA COJ N DEL ASIENTO 1 PZA 2 PZAS COJ N TRASERO PATA 2 PZAS 4...

Page 15: ...Coloque todas las piezas sobre una superficie limpia y lisa Fije las patas H para el brazo derecho E y el brazo izquierdo D como se muestra a continuaci n NOTA retire la tapa protectora de los patas...

Page 16: ...ro C al brazo derecho E y al brazo izquierdo D insertando los soportes met licos en el riel delantero C en los deslizamientos met licos de los brazos izquierdo y derecho D E Empuje el ra l delantero C...

Page 17: ...ntinuaci n Una el panel del asiento B al brazo izquierdo D y al brazo derecho E insertando los soportes metalicos en el panel del asiento B a los deslizamientos met licos del brazo izquierdo D y del b...

Page 18: ...ando los soportes en la parte posterior de la silla A a los deslizadores met licos de los brazos izquierdo y derecho D y E Deslice el respaldo de la silla A con una fuerza hacia abajo para asegurarlo...

Page 19: ...ETAPA 5 SOF DA003 SF DA003SF BG Fije la solapa de tela en la parte posterior de la silla A a los brazos izquierdo y derecho usando las tiras de velcro...

Page 20: ...SOF DA003 SF DA003SF BG ETAPA 6 Coloque los cojines del asiento F y los coj nes de respaldo G sobre la silla del sofa...

Page 21: ...vitar que la suciedad se acumule Mantenga alejado del calor para evitar que se agriete se funda o se queme Utilice un servicio de limpieza profesional para limpiar la tela NO DEVUELVA EL PRODUCTO A LA...

Page 22: ...ugar de compra Descripci n de pieza s y cantidad Por favor aseg rese de incluir n mero de modelo o n mero SKN Servicio a la Clientela POR FAVOR CONTACTE LOS REPRESENTANTES DEL SERVICIO A LA CLIENTELA...

Page 23: ...ce manuel Il contient de l information importante concernant notre garantie et des conseils d entretien pour vous assurer de garder votre meuble aussi beau qu aux premiers jours La satisfaction de no...

Page 24: ...ussi re de s accumuler Gardez loin des sources de chaleur pour viter le gla age la fusion ou les br lures Utilisez un service de nettoyage professionnel pour nettoyer le tissu ENTRETIEN V rifiez les b...

Page 25: ...C D E F G H I SOFA DA003 SF DA003SF BG DOSSIER DU FAUTEUIL PANNEAU DU CHAISE 1 PCE 1 PCE RAIL AVANT BRAS GAUCHE 1 PCE 1 PCE BRAS DROIT COUSSINS DE L ASSISE 1 PCE 2 PCES DOSSIER PATTE 2 PCES 4 PCES PAT...

Page 26: ...003SF BG Placez toutes les pi ces sur une surface propre et lisse Fixez les pieds H au bras droit E et au bras gauche D comme indiqu ci dessous NOTE retirez le capuchon protecteur des pieds H avant de...

Page 27: ...il avant C au bras droit E et aux bras gauche D en ins rant les supports m talliques sur le rail avant C dans les glissi res m talliques sur les bras gauche et droit D E Poussez le rail avant C avec u...

Page 28: ...indiqu ci dessous Fixez le panneau du si ge B au bras gauche D et au bras droit E en ins rant les supports m talliques sur le panneau du si ge B dans les patins m talliques sur le bras gauche D et le...

Page 29: ...ins rant les supports sur le dossier du fauteuil A dans les patins m talliques des bras gauche et droit D E Pousser le dossier de la chaise A avec une force vers le bas pour le fixer en place NOTE 1 L...

Page 30: ...TAPE 5 SOFA DA003 SF DA003SF BG Fixez le rabat en tissu sur le dossier de la chaise A aux bras gauche et droit l aide des bandes de velcro...

Page 31: ...SOFA DA003 SF DA003SF BG TAPE 6 Placez les coussins de l assise F et du dossier G sur le sofa...

Page 32: ...muler Gardez loin des sources de chaleur pour viter le gla age la fusion ou les br lures Utilisez un service de nettoyage professionnel pour nettoyer le tissu C est tout Vous avez fini d assembler vot...

Page 33: ...Province Code Postal No de t l phone jour incluant le code r gional Date Nom du Magasin Description quantit de pi ce s S V P ne pas oublier le num ro de mod le ou de SKU Service la Client le No de t...

Reviews: