background image

ES

Lea antes de comenzar a ensamblar

B344120039WE00

Precauciones

   Llame a nuestro número gratuito si necesita asistencia.

   Trabaje en un área espaciosa y cerca de donde su producto será utilizado, 

preferiblemente sobre una alfombra o utilice el cartón del empaque para proteger su 
piso y su producto. 

   El número de personas recomendadas para el montaje de este producto es: 

2


(sin embargo es recomendable contar con ayuda adicional). Tiempo estimado de 
ensamble es 

2

 horas.

   Asegúrese de que todas las partes están incluidas. La mayoría de las partes 

están etiquetadas o selladas en los bordes.

   Lea cada paso cuidadosamente. Es muy importante que cada paso de las 

instrucciones sea realizado en el orden correcto. Si estos pasos no se siguen en 
secuencia, pueden ocurrir dificultades durante el ensamble.

   Este producto esta diseñado para uso domestico y no para uso comercial.

   ADVERTENCIA PARA NIÑOS PEQUEÑOS - Este producto contiene 

componentes pequeños. Por favor asegúrese de que las piezas esten fuera del 
alcance de los niños.

   No utilice herramientas eléctricas para ensamblar su mueble. Este tipo de 

herramientas pueden rasgar o dañar las partes.

Partes

Piezas de reemplazo, visite 

www.dhpfurniture.com/spa/support-home


Todo se incluye en 1 caja grande!


Hay 1 caja(s) interna(s) que incluyen los componentes necesarios para 
completar este ensamblaje.

Paquete de componentes

Paquete de componentes #: 

 T4120009W-00


Nota: 

Por favor no apriete completamente las piezas hasta que el 

ensamblaje sea completado, a menos de que se indique específicamente en 
las instrucciones de paso a paso.
 

Los tornillo(s), perno(s) que se utilizarán en cada paso se muestran en tamaño
real en la esquina inferior derecha de cada página.


Antes de tirar este paquete, por favor utilice la Casilla de Verificación para 
identificar sus partes y garantizar de que cuenta con todas las piezas 
necesarias para el ensamblaje.

A
B
C
D
E
F
R
J
G
H
I
 

Poste: T943750
Poste: T943760
Poste: T943770
Poste: T943780
Barandilla lateral: T937890
Barandilla lateral: T937880
Poste: T943790
Barandilla De Cabecera: T945200
Armazón: T937990
Armazón: T937910
Armazón: T937920
 

T
Z
N
Q
P
M
S
K
Y

Barandal de extremo: T945210
Armazón: T945220
Armazón: T945230
Armazón: T945240
Tubo: T919610
Pata: T937930
Perilla: T943850
Soporte: T937950
Cubiertas de plástico: T392590

Summary of Contents for 4120039WE

Page 1: ...nopy Metal Bed N C 2 7 2017 If parts are missing or damaged we will gladly ship your replacement parts free of charge Lot Number Thank you for purchasing from DHP THIS INSTRUCTION BOOKLET CONTAINS IMP...

Page 2: ...nty period only The defective components will be repaired or replaced without charge subject to the terms and conditions described above Visit www dhpfurniture com to view the limited warranty valid i...

Page 3: ...3 B344120039WE00...

Page 4: ...ed to complete this assembly Replacement Parts Visit www dhpfurniture com eng support home A Post T943750 X 1 B C D E F R J G H I T Z Post T943760 X 1 Post T943770 X 1 Post T943780 X 1 Side Rail T9378...

Page 5: ...u have all the parts needed for the assembly There are inner box es that include components required to complete this assembly Replacement Parts Visit www dhpfurniture com eng support home M S K Y Leg...

Page 6: ...complete unless otherwise indicated in the step by step instructions The screw s bolt s to be used at each step are shown in actual size in the lower right corner of the page 6 7 8 4 5 3 2 1 1 4 X 2...

Page 7: ...7 B344120039WE00 Step 1 Attach T to A and B with BOLT Attach J to A and B with BOLT X 2 A B T J 1 1 4 4 X 4 4 1...

Page 8: ...8 B344120039WE00 Step 2 Attach T to C and D with BOLT X 4 C D T 4...

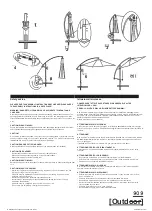
Page 9: ...9 B344120039WE00 Step 3 Insert F X 2 into E X 2 with X 4 F E F E 6 Holes on the top side E F...

Page 10: ...10 B344120039WE00 Step 4 4 1 Attach H X 2 to sub assembly E F x 2 from previous step with 4 2 Attach G to E X 2 with X 8 F F E E G H H F H E G 4 1 4 2 4...

Page 11: ...11 B344120039WE00 Step 5 Attach M X 2 to G with X 4 4 G M M G M...

Page 12: ...12 B344120039WE00 Step 6 Attach sub assembly E F from previous step to A B C and D with X 8 5 E E F F A B C D F A Do not completely tighten the bolts until STEP 9 is completed...

Page 13: ...13 B344120039WE00 Step 7 7 1 Insert one end of both I into the slot on G as illustrated 7 2 Attach the other end of both I to H with and X 2 G I I I H 7 1 7 2 X 2 3 8 8 H I I G 3 H...

Page 14: ...14 B344120039WE00 Step 8 Attach M and K to G with and X 2 8 X 2 K M G 3 8 M G K 3...

Page 15: ...15 B344120039WE00 Step 9 2 1 2 3 3 1 E E F F P E E Y P P Insert P into E and F as illustrated then lock P into place with Y Y You can now tighten the BOLTS in A B C and D A B D C...

Page 16: ...16 B344120039WE00 Step 10 A B C D R R B R X 4 2 2 R R Insert R X 4 onto A B C D with...

Page 17: ...7 11 1 11 2 S S 11 1 Insert N X 2 into Q X 2 and secure with 11 2 Place subassembly N Q X 2 and parts Z X 2 sequentially at each corner Align holes of all parts and secure them by screwing S X 4 into...

Page 18: ...They are illustrated on this page and available for replacement WARNINGS For safety reasons and to prevent injuries This bed is not intended for use by children under 4 years old Prohibit jumping and...

Page 19: ...tre en el que se realiza la compra Visite www dhpfurniture com eng register para m s detalles acerca de este concurso Registra tu producto y participa para ganar DHP garantiza que este producto est li...

Page 20: ...l ctricas para ensamblar su mueble Este tipo de herramientas pueden rasgar o da ar las partes Partes Piezas de reemplazo visite www dhpfurniture com spa support home Todo se incluye en 1 caja grande H...

Page 21: ...aso 1 Una T con A y B con Una J con A y B con Paso 2 Una T con C y D con Paso 3 Insertar F X 2 dentro de E X 2 con Paso 4 4 1 Una la parte H X 2 con subconjunto E F x 2 del paso anterior con 4 2 Una l...

Page 22: ...l vous donnera de nombreuses ann es de service Remarque Le produit doit tre enregistr dans le m me trimestre o l achat est effectu Visitez www dhpfurniture com eng registrer pour plus de d tails sur c...

Page 23: ...nts Ne pas utiliser d outils lectriques pour assembler votre mobilier Les outils lectriques risquent d endommager les pi ces Pi ces Pi ces de rechange visitez www dhpfurniture fre support home Tout da...

Page 24: ...iser rehausseur de lit sous ce produit tape 1 Attacher T A et B avec Attacher J A et B avec tape 2 Attacher T C et D avec tape 3 Ins rer F X 2 dans E X 2 avec tape 4 4 1 Attacher H X 2 au sous assembl...

Reviews: