

Use these programming instructions only if the factory defaults in the converter need to be changed
1.
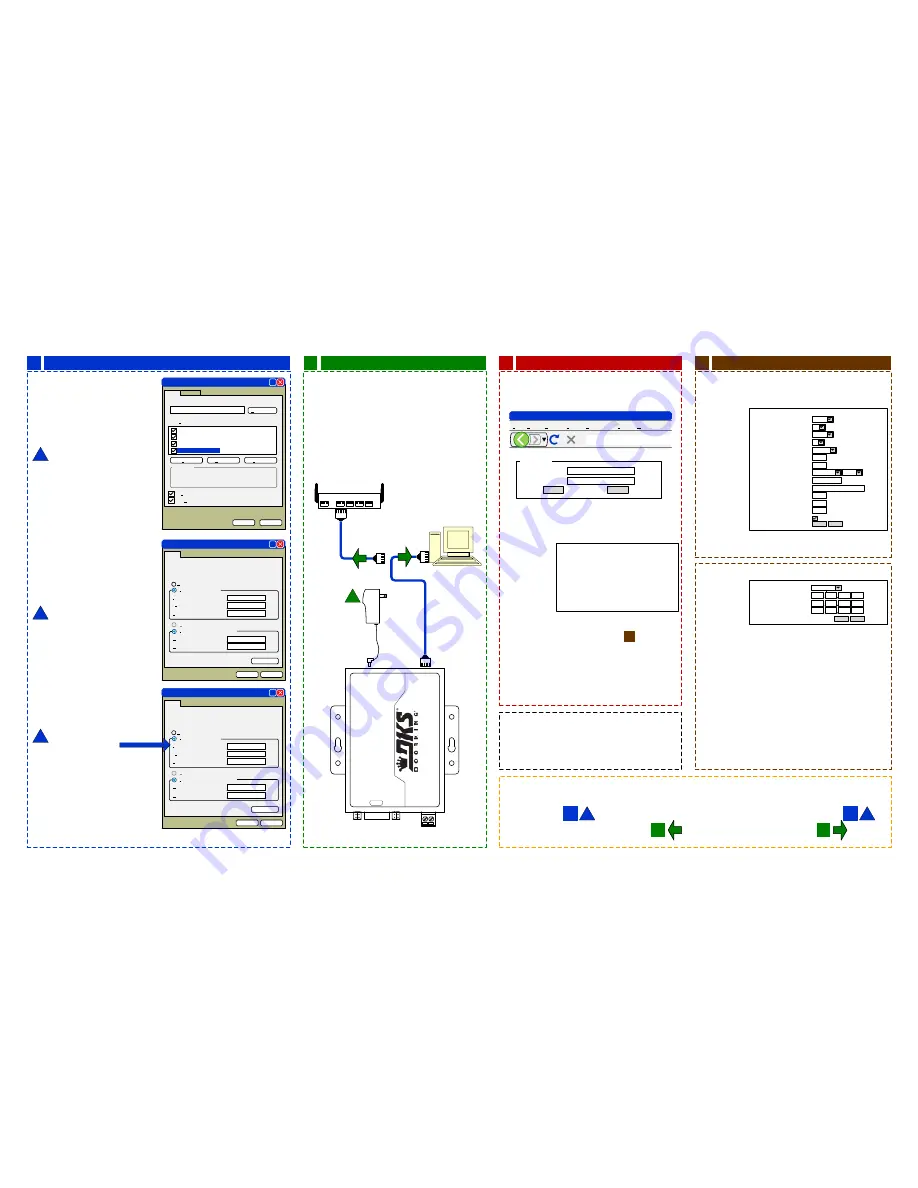
Unplug the network cable from your PC.
2.
Using the
network cable supplied
with the 1830-185 kit,
plug one end into your PC and the other into the
CONVERTER
.
3.
Power the
CONVERTER
with the supplied power supply.
4.
When completed, don’t forget to plug the network cable back
into the PC and the 1830-185 cable back into the router.
The following defaults in the
CONVERTER
are factory set. If they are satisfactory to
your system, there is no need to change
them.
IP Address:
192.168.1.40
Gateway:
192.168.1.1
Port:
1040
Baud:
19200
If these defaults are not
satisfactory, navigate to
Local
Area Connections
in Windows.
(Start – Control Panel – Network
Connections – Properties)
Highlight
Internet Protocal (TCP/IP)
Then click
Properties
to show the Internet
Protocol (TCP/IP) Properties Window.
Before proceeding, write down the
numbers (or take a screen print) in this
window. You are only going to change the
IP Address and you will need to put the
same IP Address number back when
programming of the
CONVERTER
is
complete.
Ex: write down the numbers:
(these numbers will not be the same in your
computer)
IP Address:
10.43.76.171
Subnet mask:
255.255.255.0
Default gateway:
10.43.76.211
Preferred DNS server:
10.43.76.198
Alternate DNS server:
10.43.76.158
Change IP Address to:
192.168.1.1
(This will allow your PC to connect to the
CONVERTER so that you can change its
settings.)
1.
Open any browser and type in the address of the
CONVERTER: http://192.168.1.40
The user Log In window for the
CONVERTER
will appear.
1
2
B
A
2.
Enter the User name and pass word:
User name:
admin
Pass word:
admin
The Status and Configuration window will appear.
C
D
3
3
Windows (Computer) Settings
Connect 1830-185 for Programming
Changing 1830-185 Settings
Accessing the 1830-185 Menus
1
IMPORTANT!
When you are finished
configuring the
CONVERTER
, you must set the
IP Address
back to the original settings in order
to get access back to your network.
2
1
2
3
4
Router
Modem
N.I.D.
IMPORTANT!
When you are finished configuring the CONVERTER, you must set the Internet Protocol (TCP/IP) Properties screen on your PC
back to its original settings in order to get access back to your network.
Follow the instructions to get to the Internet Protocol (TCP/IP) Properties screen and then put your old settings back.
Don’t forget to plug the netowrk cable back into the PC and the CONVERTER cable back into the router.
A
2
1
A
B
1
2
B
OK
Cancel
Advanced
10 . 43 . 76 . 158
10 . 43 . 76 . 198
Preferred DNS server:
Alternate DNS server:
Obtain DNS address automatically
Use the following DNS server address:
IP address:
Subnet mask:
Default gateway:
192 . 168 . 1 . 1
255 . 255 . 255 . 0
192 . 168 . 1 . 40
Obtain IP address automatically
Use the following IP address:
You can get IP settings assigned automatically if your network supports
this capability. Otherwise, you need to ask your network administrator
for the appropriate IP settings.
General
Internet protocol (TCP/IP) Properties
?
OK
Cancel
Advanced
10 . 43 . 76 . 158
10 . 43 . 76 . 198
Preferred DNS server:
Alternate DNS server:
Obtain DNS address automatically
Use the following DNS server address:
IP address:
Subnet mask:
Default gateway:
10 . 43 . 76 . 171
255 . 255 . 255 . 0
10 . 43 . 76 . 211
Obtain IP address automatically
Use the following IP address:
You can get IP settings assigned automatically if your network supports
this capability. Otherwise, you need to ask your network administrator
for the appropriate IP settings.
General
Internet protocol (TCP/IP) Properties
?
Advanced
Local Area Connection Properties
?
General
Show icon in notification area when connected
Notify me when this connection has limited or no connectivity
Connect using:
Configure...
Intel(R) 82566DM Gigabit Network C
This connection uses the following items:
Client for Microsoft Networks
File and Printer Sharing for Microsoft Networks
QoS Packet Scheduler
Internet Protocol (TCP/IP)
Transmission Control Protocol/Internet Protocol. The default
wide area network protocol that provides communication
across diverse interconnected networks.
Description
Install
Uninstall
Properties
OK
Cancel
File Edit View History Bookmarks Tools Help
http://192.168.1.40
Mozilla Firefox
User name:
Pass word:
admin
* * * * *
Please login:
Login
Reset
Status and Configuration
The current settings for port 0 may be changed using the form below.
Port 0 Settings
Hardware
23
None
bps
19200
8
bit
1
bit
1040
None
TCP Server
default
type
192.168.0.201
[N/A]
0
seconds
(< 256, 0 for no timeout)
10
ms
(< 256)
512
chars
(< = 1460, 0 for no use)
Save
Baud Rate:
Data Size:
Parity:
Stop Bits:
Flow Control and RS485:
Local Port Number:
Remote Port Number:
Work Mode:
TCP Server detail:
Remote Server Addr:
Timeout:
UART packet Time:
UART packet length:
Sync Baudrete (RF2217 similar):
You can access settings of the
CONVERTER
by using the
menu at the left in the Status and Configuration screen. Only
selections 1, 2 and 6 apply to this module.
It is highly recommended that you
DO NOT
change the password
on the authentication screen. DoorKing will not be able to assist
you if you don’t know your ID or password. This system status
window is informational and there’s no need to change anything
here.
D
Notes:
Baud Rate can only be set to 9600 or 19200. These are the only two speeds that 1830 Series boards will run at.
Leave all other settings as shown when the converter is used in the
Server Mode
.
Reset:
1. Remove power from module.
2. Press the Reload button and apply power.
3. Hold the reload button for 3 seconds, then release.
Module is now reset. TCP IP address will be 192.168.1.40. User
name and password will be admin. All other settings will need to
be configured.
RS-232
A(+) B(-)
RS485
Net
w
ork
Pwr
DC 5-18
V
Ethernet
10M/100M
RS
-232 &
485 To E
thernet
Re
lo
a
d
De
fa
u
lt
s
IP Address Selection
Notes:
These are the default settings and should be left alone. If the static IP address
is changed, the module will lose communication with the PC. You will need to
log into the module at the new IP address using the browser.
Cancel
Current Status
Local IP Config
RS232
RS485
Web to Serial
Misc Config
Reboot
Current Status
Local IP Config
RS232
RS485
Web to Serial
Misc Config
Reboot
Static IP:
Submask:
Gateway:
IP type:
Static IP
192
168
1
40
255
255
255
0
192
168
1
1
Save
Cancel
Current Status
Local IP Config
RS232
RS485
Web to Serial
Misc Config
Reboot
Module Name:
USR-TCP232-410
Firmware Revision:
3004
Current IP Address:
192.168.1.40
MAC Address:
d8-b0-4c-00-8d-55
Run Time:
0day: 0hour: 4min
TX Count(ETH):
0/0/0 bytes
RX Count(ETH):
0/0/0 bytes