background image

25

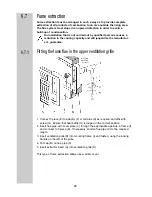
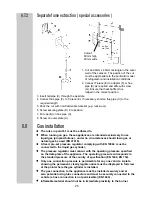
Separate fume extraction ( special accessories )

1. Cut an 80mm x 40mm rectangle in the outer

wall of the caravan. The position of the cut 

must be appropriate to the particular model 

of refrigerator and installation conditions.

2. Connect T-piece (E) to adaptor (F) or flue 

pipe (K) as required and affix with screw 

(G). Ensure that heat baffle (H) is 

lodged in the correct position.

3. Insert tail pipe (C) through the aperture.
4. Connect flue pipe (C) to T-piece (E). If necessary, shorten flue pipe (C) to the 

required length.

5. Pack the cut with non-flammable material (e.g. rock wool).
6. Screw securing plate (D) into position.
7. Put cap (B) on flue pipe (C).
8. Screw on outer plate (A).

Gas installation

ŸŸ

The rules in point 6.1 must be adhered to.

ŸŸ

When running on gas, these appliances are intended exclusively to use 

liquid gas (propane/butane) - under no circumstances should town gas or 

natural gas be used (EN 27418).

ŸŸ

A fixed, pre-set pressure regulator complying with EN 12864  must be 

connected to the liquid gas cylinder.

ŸŸ

The pressure regulator must concur with the operating pressure specified 

on the data plate of the appliance. The operating pressure corresponds to 

the standard pressure of the country of specification (EN 1949, EN 732).

ŸŸ

Only one connection pressure is permissible for any one vehicle. A plate 

showing the permanent, clearly legible notice must be displayed in full view 

at the point where the gas cylinder is installed.

ŸŸ

The gas connection to the appliance must be installed securely and at 

zero potential using tube connectors and must be securely connected to the

vehicle (a hose connection is not permissible) (EN 1949) .

ŸŸ

Inflamable material should not be in immediate proximity to the burner.

6.7.2

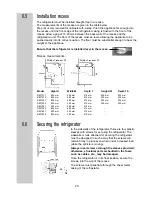
Cutout:

80mm high

40mm wide

6.8

min. 10 mm

max. 20 mm

Summary of Contents for RM7271L

Page 1: ...6100 01 T B 06 2003 MANUAL ABSORPTION REFRIGERATOR for CARAVAN and MOTORHOME EN English OPERATING INSTRUCTIONS INSTALLATION INSTRUCTIONS RM 7271 L RM 7275 L RM 7291 L RM 7295 L RM 7361 L RM 7365 L RM...

Page 2: ...ct to change without notice Printed in Germany Dansk Deutsch English Espa ol Fran ais Italiano Nederlands Norsk Portugu s Suomi Svensk via INTERNET www dometic com Kundeservice Kundendienst Customer S...

Page 3: ...rior light 13 5 11 Changing the decor panel 13 5 12 Changing the doorhang 14 5 13 Troubleshooting 15 5 14 Maintenance 16 5 15 Product liability 16 5 16 Environmental hints 16 5 17 Disposal 16 5 18 Ene...

Page 4: ...e cylinder open the windows and leave the room do not switch on anything electrical extinguish naked flames Never open the cooling unit it is under high pressure Work on the gas flue system and electr...

Page 5: ...his information on the data plate inside the refrigerator Damage in transit After removing the packaging check whether the refrigerator has been damaged during transportation Any damage sustained in t...

Page 6: ...s propane butane The desired power option is selected by means of energy selector switch A Energy selector switch A has four settings AC mains power DC 12V Gas liquid gas OFF Appliances with automatic...

Page 7: ...perature in the main refrige rator compartment A 1 Set energy selector switch A to 12V 2 Operating display C 12V lights green Appliance is in function 3 Use rotary switch B to regulate the temperature...

Page 8: ...hts yellow The refrigerator is in function Use rotary switch B to regulate the temperature in the main refrigerator compartment Gas faults In the event of a gas fault e g gas cylinder empty the operat...

Page 9: ...ected from the D connection of the alternator to the electronics or from the respective sig nal on the solar charge regulator Gas operation Gas operation is selected in the following circumstances No...

Page 10: ...an authorised Dometic Service Centre Additional functions RM 7XX5 L models only Temperature setting cooling compartment As shown you are able to regulate the temperature of the cooling compartment if...

Page 11: ...off the refrigerator as described in Section 5 8 Switching off 2 Remove the ice cube tray and food 3 Leave the refrigerator door open 4 After defrosting freezer compartment and fins free of frost wip...

Page 12: ...it 5 9 park position vent position close open 5 7 1 Set energy selector switch A to position 0 OFF The appliance is now fully switched off 2 Secure the door open by means of the door stop The door wil...

Page 13: ...e cover 2 Detach defective light bulb 3 Fit new light bulb 4 Clip the cover back in place 90 1 2 Note For 12V DC 1 light bulb 12V 2W Please contact Dometic Service Centres for replacement light bulbs...

Page 14: ...s not always possible to change the door when the refrigerator is installed 1 Open the door unscrew the hinge screw and keep it to hand 2 Take off the door by moving it upwards 5 Attach the door 8 Scr...

Page 15: ...230V Possible cause Action you can take a On board fuse defective b No connection to supply voltage c AES gas operation despite connection to the supply voltage a Fit new fuse b Establish power connec...

Page 16: ...hints Refrigerators manufactured by Dometic GmbH are CFC free Ammonia a natural compound of hydrogen and nitrogen is used in the cooling unit as a coolant The non ozone hazardous cyclopentan is used...

Page 17: ...821x525x541 86 lit 10 5 lit 125 W 120 W ca 2 6 KWh 260 g 27 kg X X RM 7361 L 821x486x541 88 lit 9 5 lit 135 W 130 W ca 2 6 KWh 260 g 28 kg X RM 7365 L 821x486x541 88 lit 9 5 lit 135 W 130 W ca 2 6 KWh...

Page 18: ...18 Declaration of conformity 5 20...

Page 19: ...ows The electrical installation must comply with national regulations Technical regulationsEN 60335 1 EN 60335 2 24 EN 1648 1 EN 1648 2 The gas installation must comply with national regulations Techn...

Page 20: ...option is to provide the refrigerator with a cowl A The cowl A should ideally be affixed to the caravan wall not to the refrigerator Insert sealing strips at the bottom and sides of the cover Finally...

Page 21: ...ower ventilation grille should be flush with the floor of the vehicle allowing any gas leakages heavier than air to escape directly into the open air If such an arrangement is not possible a hole must...

Page 22: ...tractor insert in position only for upper ventilation system L100 and screw into position 1 Seal the mounting frame making it waterproof Item 1 does not apply for installation framess with an integrat...

Page 23: ...tor In the sidewalls of the refrigerator there are four plastic sleeves with screws for securing the refrigerator The sidewalls or rails attached for securing the refrigerator must be designed in such...

Page 24: ...the cooling capacity and will jeopardize the manufactur er s guarantee 1 Connect T piece E to adaptor F or tail pipe K as required and affix with screw G Ensure that heat baffle H is lodged in the cor...

Page 25: ...exclusively to use liquid gas propane butane under no circumstances should town gas or natural gas be used EN 27418 A fixed pre set pressure regulator complying with EN 12864 must be connected to the...

Page 26: ...0 37 50 28 37 30 37 50 30 Gas pressure Following proper installation a testing for leakage and a flame test must be car ried out by qualified personnel in compliance with EN 1949 A certificate of test...

Page 27: ...ugh an on board fuse or automatic circuit breaker The power cable must be laid in such a way that it does not come in contact with hot components of the unit burner or with sharp edges If the connecti...

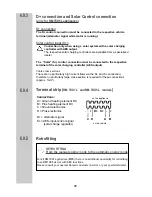
Page 28: ...s There are no particularly high current flows via the D and S connection therefore no particularly large cross section is required for these connections approx 1mm Terminal strip RM 7XX1 L and RM 7XX...

Page 29: ...eating element DC C Ground electronics D Plus electronics Colours schwarz black violett violet braun brown weiss white gr n green gelb yellow rot red C B A D For the RM 7XX1 L models there is no X106...

Page 30: ...Dometic GmbH In der Steinwiese 16 D 57074 Siegen www dometic de caravan www dometic com...

Reviews: