background image

5-11

EN

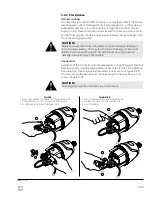
Ground strap:

 install one end of the ground strap between the nut and 

washer on the helm’s mounting stud as shown. Connect the other end to a 

ground point on the boat. This could be a negative bus bar, the negative 

terminal of the battery, or a designated grounding terminal.

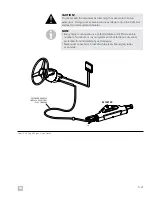
5.4.2.1 Front Mount helm (EH1512)

WARNING!

Use only the self-locking nuts provided. Substitution with non-locking nuts 

may result in loosening or separation of equipment. This may result in loss 

of steering, which could lead to a collision and/or ejection from the boat, 

causing property damage, personal injury, and/or death.

Figure 5-7.

Summary of Contents for OPTIMUS 360

Page 1: ...eering with Electric Actuator Installation and User Manual Book 54 EA1000 EA1100 REVISION B Form No 682220 2020 Dometic Corporation WARNING Cancer and Reproductive Harm www P65Warnings ca gov POWER CONTROL OPTIMUS EPS EN ...

Page 2: ...ouncil http www abycinc org NMEA 2000 is a registered trademark of the National Marine Electronics Association Optimus Optimus 360 SeaStar and BayStar are all trademarks of Dometic California Proposition 65 Warning Battery posts terminals and related accessories contain lead and lead compounds chemicals known to the state of California to cause cancer and reproductive harm Wash hands after handlin...

Page 3: ...tive steering 3 9 3 3 7 Display brightness 3 9 3 4 Autopilot operation 3 10 3 5 Joystick operation if so equipped 3 11 3 5 1 Joystick fundamentals 3 11 3 5 2 Joystick tips 3 14 3 5 3 Joystick operation examples 3 15 3 5 4 Returning to conventional operation 3 18 4 System Faults and Hazards 4 1 4 1 Fault types 4 1 4 2 Fault notification 4 1 4 3 Danger fault handling 4 2 4 3 1 Limp home 4 2 4 3 2 Em...

Page 4: ...ng setup 6 4 6 3 1 Configuration 6 4 6 3 2 Calibrating the Electric Actuators 6 4 6 3 3 Set Proportional Sensitivity 6 7 6 3 4 Check installation 6 7 6 3 5 Move steering 6 7 7 Maintenance and Troubleshooting 7 1 7 1 Maintenance schedule 7 1 7 1 1 Owner Operator 7 1 7 1 2 Qualified marine mechanic 7 1 7 2 Troubleshooting guide 7 2 Appendix A A 1 A 1 Helm templates A 1 A 1 1 Front Mount Helm EH1510 ...

Page 5: ...ion of this product Observe these warnings and notices carefully The safety alerts alone cannot eliminate hazards strict compliance with any special instructions during installation operation and maintenance along with common sense operation are important measures to prevent hazardous situations 1 1 Explanation of symbols DANGER Safety instruction Indicates a hazardous situation that if not avoide...

Page 6: ... the boat After use Rinse off the Electric Actuator s thoroughly using only fresh clean water at low pressure Never use high pressure water from a hose nozzle or pressure washer Do not use acetone or cleaners containing ammonia acids or any other corrosive ingredients on any Optimus components Some products formulated for cleaning fiberglass hulls are known to aggressively corrode stainless steel ...

Page 7: ...nd tested to ensure system integrity Substitution of components may compromise safety performance and reliability If an instruction is unclear contradictory or you are otherwise unsure how to proceed do not guess Contact Dometic Marine technical support After installation Perform the system inspection and interference checks described in section 3 1 1 and 3 1 2 Correct any interference issues befo...

Page 8: ...ectric actuator is shipped with a decal that warns of safety hazards and contains some instructional information In the event the decal has been damaged or is otherwise illegible the decal is reproduced here Figure 1 1 Safety Decal ...

Page 9: ...ed third party autopilot system The SCU replaces the PCM used in the standard Optimus electro hydraulic system The helm converts steering wheel movement into digital messages that are sent over CAN1 to the SCU A system of friction plates in the helm allow the steering effort to be adjusted according to a setpoint received from the SCU A steering wheel is not included with the Optimus EPS system Th...

Page 10: ... NMEA 2000 protocol The Optimus system broadcasts public messages onto this network and monitors the network for engine RPM The optional Optimus 360 joystick control system converts an operator s inputs into steering shift and throttle commands using this three axis joystick controller The joystick can rotate move forward and back and side to side Combinations of these movements give the operator ...

Page 11: ...K PRIVATE NETWORK CAN2 ELECTRONIC HELM COLOR CANtrak BUZZER CAN1 HUB ENGINE GATEWAY 12V POWER OPTIONAL AUTOPILOT CCU SWITCH PANEL ELECTRIC ACTUATOR ELECTRIC ACTUATOR P S PURPLE PURPLE 1A FUSE COMPONENTS NOT SUPPLIED BY DOMETIC CAN1 HUB AVAILABLE MID 2020 BREAKER PORT POWER SOURCE BREAKER STARBOARD POWER SOURCE ...

Page 12: ...IVATE NETWORK CAN2 ELECTRONIC HELM COLOR CANtrak BUZZER JOYSTICK CAN1 HUB ENGINE GATEWAY 12V POWER OPTIONAL AUTOPILOT CCU SWITCH PANEL ELECTRIC ACTUATOR ELECTRIC ACTUATOR P S PURPLE PURPLE 1A FUSE COMPONENTS NOT SUPPLIED BY DOMETIC CAN1 HUB AVAILABLE MID 2020 BREAKER PORT POWER SOURCE BREAKER STARBOARD POWER SOURCE ...

Page 13: ...wly to port and starboard and make sure the engine s follow the commands Check at all helm stations 2 Inspect all steering components cables and connections for wear kinking and or signs of damage Check the harness between the actuator and transom for any worn abraded or cracked insulation or any physical damage Check that the connector at the actuator is tight and properly secured Check that the ...

Page 14: ...teps below to confirm there is no interference between actuators splashwell engines tie bars or any combination of these parts At each step check that the harnesses are moving freely with no rubbing or binding and that the bend radius is never less than 3 5 90 mm Steer slowly while performing these checks and always have someone watching at the transom The tilt operation is where the potential for...

Page 15: ...se the trip to get a feel for the steering response When in deep enough water try various maneuvers with the boat at various speeds until you are comfortable operating the boat Spend some time backing up at slow speed Once you are familiar with the operation and steering response run the boat in a safe normal fashion and enjoy using the most advanced outboard steering system available today Always...

Page 16: ...ak display All Helms Active screen The CANtrak display serves these purposes 1 Displays the current system operating conditions 2 Handles system faults a Displays system warnings in case of a system fault b Sounds an audible alarm in case of a system fault c Instructs the operator what to do in case of a system fault 3 Permits changes to the basic system settings 4 Provides system and diagnostic i...

Page 17: ...ng of the selected item Accepts a given statement or condition and advances to the next screen Returns to previous menu Saves change and returns to previous menu OK Save 3 3 1 CANtrak display navigation The five buttons at the bottom of the unit are used to select various actions The five boxes at the bottom of the display screen indicate the legend for each button These legends vary based on what...

Page 18: ...our dealer MENU All Helms Active Maintenance Diagnostic and maintenance functions Settings Set steering parameters such as number of turns and steering effort Faults View active faults System Health View the status of all devices on the network Good Warning but operational Failed Not found Devices Access product information such as part number and serial number for each device on the network Splas...

Page 19: ...ns MULTI ENGINE SINGLE ENGINE Figure 3 4 All Helms Active screens 3 3 4 Steering maintenance screen The Steering Maintenance screen allows user access to actuator calibration and move functions We recommend that you use these functions only under the direction of a Dometic technical support representative Calibration is required if you used the emergency manual override procedure See section 6 3 2...

Page 20: ...range is 3 5 to 8 Turns Helm Effort at Low Speed Sets the steering resistance when the vessel is running at low speeds It is adjustable between 1 and 100 Helm Effort at High Speed Sets the steering resistance when the vessel is running at high speeds It is adjustable between 1 and 100 Helm Effort in Auto Pilot Sets the steering resistance when autopilot is engaged To prevent accidental course corr...

Page 21: ...m These are not user adjustable Display brightness You can adjust the display brightness according to ambient lighting conditions To access the brightness setting press Menu from the All Helms Active screen then press Display Use the and buttons to adjust the brightness High Speed Rudder Limit The boat builder or dealer may have set a high speed rudder limit in order to keep the vessel in a comfor...

Page 22: ...aging the autopilot mode Do not leave the helm unattended while the autopilot is engaged The Title Bar will display Autopilot Mode when the autopilot is engaged Figure 3 8 Autopilot mode screen When autopilot is engaged The CANtrak run screen will display a notification as shown in figure 3 8 The steering effort at the helm is increased to prevent inadvertent use This resistance may be user adjust...

Page 23: ...ll increase to remind the user that the helm is disengaged 3 5 1 Joystick fundamentals Handle motion The handle can be moved in any direction or rotated left or right When released the spring loaded joystick will return to center and put the engine in neutral at idle throttle Moving the handle away from center or rotating it will cause the engines to shift into the correct gear for the desired mot...

Page 24: ...ion Causes the boat to rotate on the spot A fore aft handle movement after engaging rotation mode will cause the boat to rotate but with a forward or reverse bias Always engage Rotation Mode first then apply the desired correction Pushing the handle fore aft then twisting would cause the system to enter Forward Reverse mode with a steering correction 2 When released the joystick always returns to ...

Page 25: ...0 Figure 3 11 PRIMARY MOTION SIDEWAYS PRIMARY MOTION SIDEWAYS CORRECTION ROTATE TO BIAS HEADING CORRECTION FORWARD REVERSE TO DIAGONAL b OR NOTICE In the event of an engine stall only the Forward Reverse mode is available Restart stalled engine or switch to conventional controls ...

Page 26: ...s but will not steer the boat change heading Twisting rotating the handle steers and rotates the boat see illustrations previous page 4 It is recommended to return to the center position when switching between primary operational modes 5 Practice joystick maneuvers in open water before attempting close quarters docking This will help you understand the primary operational modes and how they contro...

Page 27: ...ard or backward with direct forward or backward joystick motions until the boat is stopped and centered in the location on the dock you wish to approach 2 Return the joystick to the center position 3 Move the joystick directly port to approach the dock 3a If the boat does not stay parallel due to wind or current while holding the joystick to the side just rotate the joystick to keep the boat paral...

Page 28: ... to the dock return the joystick to the center position Figure 3 18 Figure 3 20 Figure 3 17 Figure 3 19 4 CURRENT 3b Example 2 1 Move the boat forward by pushing the joystick forward 2 With the joystick forward and the boat moving forward rotate the joystick as needed to correct for wind or current Return the joystick to the home position as you near the slip wind 4 2 1 ...

Page 29: ...slip Return the joystick to the home position when the boat stops 4 Rotate the joystick to turn the boat and align it with the slip Use a straight port or starboard move of the joystick if necessary to realign the boat 5 Pull the joystick back to move the boat into the slip 6 A short bump forward on the joystick will stop the boat in position 3 4 5 6 ...

Page 30: ...2 Control head lamp s turn ON Mercury Move the control head levers out of neutral 1 Joystick blue lamp s turn OFF Suzuki Press Select button on station control panel 1 Joystick blue lamp s turn OFF 2 Select LED turns ON Yamaha To control head at active station Move the control head levers out of neutral OR Press Take Command on the active joystick to toggle control back to the control head To cont...

Page 31: ...t you must return to port or seek assistance immediately Warning A warning fault is a non critical system fault which may cause the steering speed to be reduced Even if a warning fault does not adversely affect steering performance it is an indication of a problem in the system and you should correct it as soon as possible Caution A caution fault is a non critical system fault that will have no ef...

Page 32: ...ed should Limp Home mode be required A danger fault is typically not recoverable and your actions are generally limited to limping home or calling for assistance The display will suggest the best course of action based on the nature of the fault You cannot exit out of the fault screen when a danger fault is present 4 3 Danger fault handling 4 3 1 Limp home When a danger fault causes limited or sus...

Page 33: ...disabled 1 Return to port using throttles to steer 2 If engine s require re centering a Put all engines in neutral b Use tool provided 3 8 wrench c Loosen clamp bolts on BOTH ends of steering actuator shaft d Rotate shaft to reposition steering e Tighten shaft clamp bracket bolts Steering is disabled 1 Drive towards port 2 If engine requires re centering a Put engine in neutral b Use tool provided...

Page 34: ...nsom of the boat and or in the splashwell Please take every possible safety precaution 1 Use the emergency override tool included with your documentation package to loosen the flange bolt that is securing the ground strap to the starboard side of the actuator step 1 in figure 4 2 If you do not have the tool you will need a 3 8 wrench or socket Loosen it enough that the ground strap tab will be fre...

Page 35: ...vice 3 If you have no steering response you are unable to call for assistance and you are in an emergency situation use the Limp Home procedure in section 4 3 1 You may exit the fault display screen and return to the All Helms Active screen by pressing the Exit button A warning icon will flash on the screen as shown in figure 4 3 until the fault is repaired In rare cases there may be more than one...

Page 36: ...4 6 EN This page left intentionally blank ...

Page 37: ...need technical assistance or wish to report an error in our documentation please contact Dometic technical support Email seastar dometic com Phone 604 248 3858 The standard pivot plate orientation is recommended for most applications while the flipped plate orientation is recommended for most Suzuki applications Refer to the installation diagrams that follow for detailed selection information Ther...

Page 38: ...he tilt tube as far as it will go 4 Liberally grease the support rod item 9 with a quality marine grease and slide it through the engine tilt tube 5 Review the assembly drawing to determine the orientation of the actuator item 13 the tiller bolt item 2 and self locking nut item 1 Grease the tiller bolt and while holding the actuator in position fully thread it into the steering arm and through the...

Page 39: ...to the support rod and the actuator shaft Fasten the brackets to the support rod using the washers item 5 and nuts item 4 and tighten to the indicated torque 9 Tighten the two clamp bolts item 6 to secure the support brackets to the actuator shaft Tighten to the indicated torque 10 Eliminate the free play in the support rod by turning the adjuster nut item 10 counter clockwise by hand until snug D...

Page 40: ...port Rod 4 202027 2 Washer Flat 1 2 SS 5 192126 2 Nut 1 2 NF Nylok NI Plate Br 6 351166 2 Screw flange 5 16 7 995876 2 Spacer Thick 8 996689 1 Spacer Thin ITEM PART QTY DESCRIPTION 9 351154 1 Support Rod 10 828085 1 Adjusting Nut Screw SS Teflon Coated 11 202300 2 Washer Flat 5 8 SS 12 351167 2 Support Brackets 13 EA1XXX 1 Electric Actuator T TORQUE POINT T TORQUE to 22 ft lb T T TORQUE to 45 ft l...

Page 41: ... midsection steering bracket holes using the correct fasteners NOTICE Incorrect routing of ground strap may cause entanglement with moving components during steering maneuvers Ensure there is enough slack in the ground strap to allow the engine to pivot freely in all trim and tilt positions and throughout the steering range of the engine INTERNAL TOOTH TERMINAL YAMAHA ENGINES USE M6 SCREW INCLUDED...

Page 42: ...arness In multi engine applications you will need to use a CAN1 hub available mid 2020 or a Y harness to join both CAN1 harnesses together at the aft of the boat You may need to use different harness lengths for the port and starboard actuator if you locate the hub Y harness on one side of the boat See section 5 6 for more information Bulkhead installation The Electric Actuator harness is supplied...

Page 43: ...o move through its full stroke as well as trim and tilt without restriction or interference Ensure the harness bend radius is not less than 3 5 90mm at any point in the actuator s steering range or in the trim tilt range You should end up with a nice loop from bulkhead fitting to the actuator as shown in figure 5 3 4 Tighten the strain relief gland by hand just tight enough to compress the grommet...

Page 44: ... the cables together every 6 150 mm along the harness from the actuator to the bulkhead fitting 2 For a cleaner looking installation you can use a braided plastic cable sleeve Techflex or similar The harness connector has a molded feature for securing the sleeve with a tie wrap At the bulkhead fitting you can either route the sleeve through the fitting or use a tie wrap to secure it Figure 5 4 Fig...

Page 45: ...ay 4 Tighten all four screws until they are just snug then torque to 18 22 in lb 2 0 2 5 Nm There are four helm styles available Different helms may be used at different stations Mounting templates are in Appendix A 5 4 Electronic helm NOTE The EPS helm contains an electromagnet which may affect a magnetic compass For less than one degree of effect the helm and compass must be at least 24 61cm apa...

Page 46: ...nting template for each helm type can be found in Appendix A Make sure you are using the correct template before drilling or cutting the dash The helm must be grounded to the negative bus or battery negative with the supplied ground strap as described below each installation diagram The steering sensor may be damaged by static electricity discharge if the ground strap is not installed We recommend...

Page 47: ...bar the negative terminal of the battery or a designated grounding terminal 5 4 2 1 Front Mount helm EH1512 WARNING Use only the self locking nuts provided Substitution with non locking nuts may result in loosening or separation of equipment This may result in loss of steering which could lead to a collision and or ejection from the boat causing property damage personal injury and or death Figure ...

Page 48: ...r the negative terminal of the battery or a designated grounding terminal 5 4 2 2 Sport Plus Tilt helm EH1532 WARNING Use only the self locking nuts provided Substitution with non locking nuts may result in loosening or separation of equipment This may result in loss of steering which could lead to a collision and or ejection from the boat causing property damage personal injury and or death Figur...

Page 49: ...ative terminal of the battery or a designated grounding terminal 5 4 2 3 Classic Tilt helm EH1552 WARNING Use only the self locking nuts provided Substitution with non locking nuts may result in loosening or separation of equipment This may result in loss of steering which could lead to a collision and or ejection from the boat causing property damage personal injury and or death Figure 5 9 4X WAS...

Page 50: ...bar the negative terminal of the battery or a designated grounding terminal 5 4 2 4 Rear Mount helm EH1572 WARNING Use only the self locking nuts provided Substitution with non locking nuts may result in loosening or separation of equipment This may result in loss of steering which could lead to a collision and or ejection from the boat causing property damage personal injury and or death Figure 5...

Page 51: ...ation around the unit Ensure you can get to the rear of the unit for harness connections 5 5 CANtrak display DISPLAY PART NO FOR USE WITH NOTES ED1700 Twin triple and quad outboard vessels Comes with harness CM21504 for connection to both CAN1 and CAN2 networks ED1800 Single outboard vessels Comes with harness CM20030 for connection to CAN1 only Table 5 4 NOTE A CANtrak display is required at the ...

Page 52: ...harness bundle which has the following connections 1 12V power a ve red b ve black 2 Communication bundle a CAN1 b CAN2 optional on single engine systems c CAN3 for engine RPM d Ignition sensing purple 5 6 Electrical connections 5 6 1 1 Planning your 12V power connections Figure 5 13 shows a sample power schematic For each actuator in your system you will need the following items not included with...

Page 53: ...e intervening wire Secondary device must be rated based on intervening wire size and usually has a higher rating than the circuit breaker Refer to ABYC E 11 AC and DC Electrical Systems on Boats for more details A 60A circuit breaker designed for marine use Red wire that meets ABYC requirements of the appropriate size for the intervening wire length between the actuator harness and the battery see...

Page 54: ...etect that the starboard battery is being discharged and connect it to the center battery A twin engine system would look similar to the center starboard pair in the figure with center engine replaced with port engine Figure 5 15 shows a possible quad engine connection but without ACRs In single engine trolling this configuration does not guarantee that the actuator is connected to a charging batt...

Page 55: ...attery negative terminal or a negative bus bar Do not use the vessel bonding system for the negative connection 4 Connect the ve red lead from each actuator to the corresponding circuit breaker Tighten the terminal to the torque specified by the circuit breaker manufacturer NOTICE The power supply wires in the harness are correctly sized for the load and harness length Do not extend the harness Ex...

Page 56: ...ceed 120ft 36m in total The pages that follow present some sample connection diagrams to help you determine the harnesses that you need It s not possible to show every possible configuration so please contact Dometic technical support if you need assistance 5 6 2 CAN1 connection CAN1 is a fault tolerant network used to connect the actuator to the helms and CANtrak displays The network is safety cr...

Page 57: ...tion failures NOTE Every harness connection is a potential failure point Minimize the number of connections in your system and locate them in dry areas protected from incidental physical damage Never put connections in inaccessible places like rigging tubes or conduit Figure 5 16 Single Engine Single Station ACTUATOR EXTENSION HARNESS CM20036 OR CM22401 PLUS CM 204XX ...

Page 58: ...5 22 EN Figure 5 17 Single Engine Dual Station STATION 1 STATION 2 WYE HARNESS CM21702 HARNESS CM204XX ACTUATOR EXTENSION HARNESS CM20036 OR CM22401 PLUS CM 204XX ...

Page 59: ...EN Figure 5 18 Multi Engine Dual Station Option 1 Hub available Mid 2020 PORT ACTUATOR STARBOARD ACTUATOR STATION 1 STATION 2 WYE HARNESS CM21702 HARNESS CM204XX CM204XX CAN1 HUB CAN1 HUB AVAILABLE MID 2020 ...

Page 60: ...N Figure 5 19 Multi Engine Dual Station Option 2 PORT ACTUATOR STARBOARD ACTUATOR STATION 1 STATION 2 WYE HARNESS CM21702 EXTENSION HARNESS CM20036 OR CM22401 PLUS CM 204XX WYE HARNESS CM21702 HARNESS CM204XX ...

Page 61: ...steering which could lead to a collision and or ejection from the boat causing property damage personal injury and or death CAUTION A sealing plug must be installed in any unused ports Connectors Installation of the connectors into the receptacles is straightforward Push the female connector into the mating male socket listen for the click indicating a positive lock then engage the secondary lock ...

Page 62: ...k is used to connect the CANtrak display and a third party autopilot that is certified by Dometic to work with the EPS system The CAN2 network is optional on single engine systems if you are not using an autopilot leave the cap on the harness connector coil the harness and secure it out of the way NOTE The details of each autopilot s network connection will be specific to the manufacturer so be su...

Page 63: ...cables with sealed M12 connectors that are NMEA 2000 compliant and compatible with the tees supplied with the autopilot systems Table 5 7 shows the available extension harnesses you can use to build your backbone You can chain up to three harnesses together to a maximum length of 90 feet 27 3m NOTE Every connection is a potential failure point Minimize the number of connections in your system and ...

Page 64: ...6 CM10012 16 4 9 CM10016 20 6 1 CM10020 30 9 1 CM10030 Table 5 7 3 Ensure that you have two and only two terminating resistors one at each end of the network backbone as shown in figure 5 22 4 When installation is complete use a permanent marker to draw a line across all DeviceNet connections If one of the connections become loose it will be evident NOTE The actuator harness has two DeviceNet conn...

Page 65: ...to add one CM10060 You may also require an extension harness from Table 5 7 to extend the backbone and bring the tee within reach of the harness Create a new bus if the boat does not have an NMEA 2000 bus you can create one using kit HA5496 In addition to the kit you will need a gateway device that bridges the engine network to the NMEA 2000 bus supplied by the engine manufacturer The instructions...

Page 66: ... strain relief devices on either side of any splice and at the final connection point If someone inadvertently pulls on the wire anywhere in its travel it must not pull any splice or connection apart Use sealed heat shrink butt splices such as Molex Perma Seal or a soldered connection with heat shrink tubing Follow the manufacturer s instructions to ensure a proper splice Ignition source options O...

Page 67: ... a way that an ignition on signal is received when any of the engine ignition switches are on Some boats may be wired to deliver such an ignition signal but you may require one triple engine or two quad engine Dual Ignition Kits HA1201 to combine the ignition from a pair of engines into a single source IGNITION SOURCE TO ACTUATOR TO ENGINE MOLEX PERMA SEAL STEP DOWN BUTT SPLICE P N 0191640043 OR E...

Page 68: ...5 32 EN This page left intentionally blank ...

Page 69: ...ause the system has not yet been fully configured and calibrated Silence the buzzer by pressing Mute on the display Press and hold the Menu button for five seconds to show the Dealer Menu PIN entry screen Active alarms may hide the Menu button it is always the right most button under the display Enter your PIN to access the Dealer Menu Before the Optimus EPS system can be used it must be configure...

Page 70: ...ct system type There are four system types shown in table 6 1 Select Optimus EPS System Type Description Optimus EPS Standalone EPS system Optimus EST Standalone i7700 or i6800 EST system Optimus EPS EST EPS system with a standalone i7700 or i6800 EST system Optimus 360 Optimus 360 joystick control system Table 6 1 NOTE This manual covers only the Optimus EPS system if you are setting up another s...

Page 71: ...tions Each device on the network must be instanced correctly when there are more than one of each type present Instancing means teaching the system which actuator is port which is starboard and which helm is main station and which is 2nd station The CANtrak will list all the devices on the CAN network along with their serial numbers Match the devices by the serial numbers and use the and buttons t...

Page 72: ... parameter tells the SCU how much to correct for this angle Use the and buttons to adjust the wedge angle up to the maximum supported angle of 10 Calibrating the Electric Actuators The calibration procedure teaches the SCU the end of travel points for the actuators in the system The SCU expects to see these end points within a range of values based on the actuator stroke If the actuator is unable ...

Page 73: ...t you to steer back and forth to check the actuator instancing Only the starboard actuator should move If the port actuator moves you must correct the instancing or damage may result Press Setup to return to the system setup screen Figure 6 6 ...

Page 74: ... If the calibration is successful you will see the screen in figure 6 8 Exit the screen or power cycle the system to continue If the calibration fails you will see the screen in figure 6 9 Double check the installation and ensure that there is no interference that is preventing the steering actuators from moving through their full stroke Exit the screen and try again Figure 6 7 Figure 6 8 Figure 6...

Page 75: ...ering angle of 30 degrees Check installation At this point you have almost completed the installation and setup of the Optimus EPS with Electric Actuator The final step is to check the installation for interference Follow the interference check procedure in section 3 1 2 and correct any interference before handing the boat over to the customer Move Steering optional The Move Steering function allo...

Page 76: ...6 8 EN If the actuators are calibrated backing out of the Move Steering mode and turning the helm will cause the actuators to auto align Figure 6 10 Figure 6 11 ...

Page 77: ... Check all harnesses not just the actuator harness for signs of chafing or wear Use a grease gun to grease the support bracket grease nipples with a quality marine grease WARNING Do not operate the boat if any component is not in proper working order It may result in a loss of steering control which could lead to a collision and or ejection from the boat causing property damage personal injury and...

Page 78: ...st problems with Optimus EPS usually occur when an instruction is not followed and usually show up immediately on power up Listed below are the most common faults you ll encounter along with their most likely causes 7 2 Troubleshooting guide FAULT CAUSE SOLUTION Batteries not turned ON or in poor working condition Ignition wires disconnected CANtrak connection damaged and or not connected Load tes...

Page 79: ...e A 1 Helm templates A 1 1 Front Mount Helm EH1510 EH1512 NOTICE If this template has been downloaded electronically or copied from another document please verify all template dimensions prior to cutting Print copy reproductions may be scaled differently ...

Page 80: ...A 2 EN This page left intentionally blank ...

Page 81: ...plate A 1 2 Sport Plus Tilt Helm EH1530 EH1532 NOTICE If this template has been downloaded electronically or copied from another document please verify all template dimensions prior to cutting Print copy reproductions may be scaled differently ...

Page 82: ...A 4 EN This page left intentionally blank ...

Page 83: ...plate A 1 3 Classic Tilt Helm EH1550 EH1552 NOTICE If this template has been downloaded electronically or copied from another document please verify all template dimensions prior to cutting Print copy reproductions may be scaled differently ...

Page 84: ...A 6 EN This page left intentionally blank ...

Page 85: ...plate A 1 4 Rear Mount Helm EH1570 EH1572 NOTICE If this template has been downloaded electronically or copied from another document please verify all template dimensions prior to cutting Print copy reproductions may be scaled differently ...

Page 86: ...A 8 EN This page left intentionally blank ...

Page 87: ...mplate has been downloaded electronically or copied from another document please verify all template dimensions prior to cutting Print copy reproductions may be scaled differently 3 38 3 5 DIA 86 89 mm OVERALL NOMINAL 3 775 96 mm OVERALL NOMINAL 3 937 100 mm 1 97 50 mm 1 88 48 mm 0 22 DIA 5 6 mm 4 PLACES ...

Page 88: ...A 10 EN This page left intentionally blank ...

Page 89: ...khead fitting template NOTICE If this template has been downloaded electronically or copied from another document please verify all template dimensions prior to cutting Print copy reproductions may be scaled differently 1 5 34 mm DIA 3 x 3 16 PILOT HOLE ...

Page 90: ...A 12 EN This page left intentionally blank ...

Page 91: ...6 20 33 0 44 74 27 0 36 61 1 2 13 43 0 58 30 35 0 47 45 1 2 20 45 0 61 01 37 0 50 17 9 16 12 57 0 77 28 47 0 63 72 9 16 18 63 0 85 42 51 0 69 15 5 8 11 93 0 126 09 76 0 103 04 5 8 18 104 0 141 00 85 0 115 24 3 4 10 128 0 173 55 104 0 141 00 3 4 16 124 0 168 12 102 0 138 29 7 8 9 194 0 236 03 159 0 215 58 7 8 14 193 0 261 67 158 0 214 22 1 8 287 0 389 12 235 0 318 62 1 14 259 0 351 16 212 0 287 43 ...

Page 92: ..._____________________________ _______________________________________________ _______________________________________________ _______________________________________________ _______________________________________________ _______________________________________________ _______________________________________________ _______________________________________________ __________________________________...

Page 93: ..._____________________________ _______________________________________________ _______________________________________________ _______________________________________________ _______________________________________________ _______________________________________________ _______________________________________________ _______________________________________________ __________________________________...

Page 94: ..._____________________________ _______________________________________________ _______________________________________________ _______________________________________________ _______________________________________________ _______________________________________________ _______________________________________________ _______________________________________________ __________________________________...

Page 95: ...he warranty period to the dealer from whom such product were purchased or to us at the appropriate address In such a case SeaStar Solutions products found to be defective and covered by this warranty will be replaced at SeaStar Solutions option and returned to the customer The above quoted statement is an extract from the complete SeaStar Solutions products warranty statement A complete warranty p...

Page 96: ...B 2020 DOMETIC PRINTED IN CANADA 03 20 Please scan this QR code and watch our latest Boating Safety video DOMETIC VANCOUVER 3831 NO 6 ROAD RICHMOND B C CANADA V6V 1P6 www dometic com ISO 25197 2012 Mobile living made easy ...

Reviews: