10
9.4 Connection of gas supply
Always connect in the following sequence:
GAS BOTTLE
→
PRESSURE-REGULATOR
→
→
APPLIANCE.
To connect the appliance to the pressure-regulator
SUREFLEX ARMOURED FLEXIBLE PIPE should be
used. This can be ordered through CALOR GAS
dealers, caravan accessory shops, or direct from the
manufacturer, The Lunken Co. Ltd.
When ordering the Sureflex Pipe, it must be specified
which type of connector is required at each end:
a) if the pressure-regulator outlet has a 3/8" B.S.P.
female thread, the pipe must have a 3/8" B.S.P.
male thread at one end;
b) if the pressure-regulator has a ridged nozzle outlet
instead of a thread, the pipe must have a special
connector at one end.
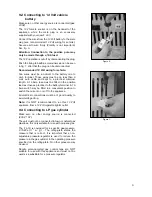
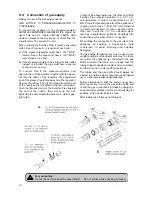
To connect this to the pressure-regulator, first
unscrew the nut (3) and place it tgether with the sleeve
(2) onto the nozzle of the regulator. The shouldered
end of the sleeve should face away from the regulator!
Remove the rubber '0'ring (1) and push it over the end
of the nozzle so that it locates in the first corrugation.
Push the threaded end ot the Sureflex Pipe against
the end of the nozzle, then screw up the nut,
tightening the assembly with spanners to make a gas-
tight joint.
In both of the above instances, the other end of the
Sureflex Pipe should terminate in a 1/4" o.d.
extension piece. In order to connect this to a 1/8"
B.S.P. female threaded gas inlet of the appliance a
coupling which has a 1/8" B.S.P. male thread at
one end and a nut and 1/4" olive connection at the
other end to suit the 1/4" o.d. extension piece
(such as manufactured by Wade Couplings Ltd.
under their part number 4063/1 is needed.
When fitting the connection to the gas inlet of the
appliance by applying a fork-spanner, hold
counterpart to avoid straining and possibly
damaging.
The gas bottle (Propane) may only be used in an
upright position and particular care must be taken
every time the appliance is connected to the gas
bottle to ensure that there are no leaks, that the
tubing (rubber hose) is not under tension or kinked,
and that it is not in contact with hot surfaces.
The tubing and the gas bottle should always be
located in positions where they will not be tripped
over or otherwise inadvertently disturbed.
Before attempting to light the burner, every time
after connection, turn on the gas at the bottle and
check the gas connections for leaks by applying a
soap and water solution over them and watching for
bubbles, which would indicate a leak.
After testing dry off traces of detergent.
For your safety:
Do not check for leaks with a naked flame! Do not smoke while checking for leaks!

