background image

MXH94x / MXH95x Transparent Adapter User’s Guide –

 Dolphin Interconnect Solutions  


 Page 9 

Installation 

Step 1 - Unpack board 


The adapter card is shipped in an anti-static bag to prevent static electricity damage. The card should only be removed from the bag 

after ensuring that anti-static precautions are taken. Static electricity from your clothes or work environment can damage 
your PCI Express adapter card or your PC.  Always wear a grounded anti-static wrist strap while opening the PC and when 
the adapter card is removed from the anti-static bag. 
Unpack the adapter card from the anti-static bag using proper anti-static procedures. 

Step 3 - Configure the Board for Proper Operation 

Set the DIP switch settings for proper operation depends on the firmware. Please refer to the section Configuration and DIP Switches on 
page 11 for details. 


Step 4 - Install the Adapter Card 

Before installing the adapter card, make sure you are properly grounded to avoid static discharges that may destroy your computer or 

the adapter card. Ensure you are properly grounded before opening your computer or the anti-static bag containing the 
adapter card. 

Please follow your computer’s 

or expansion chassis manual on how to install a PCI Express card. 

 
The adapter card can only be installed into any PCI Express x16 physical slot. The adapter card supports PCI 

Express Gen1, Gen2, Gen3 and Gen4 signaling. The adapter card supports hosts using either spread spectrum or constant 
frequency clocking. The card implements clock isolation. 

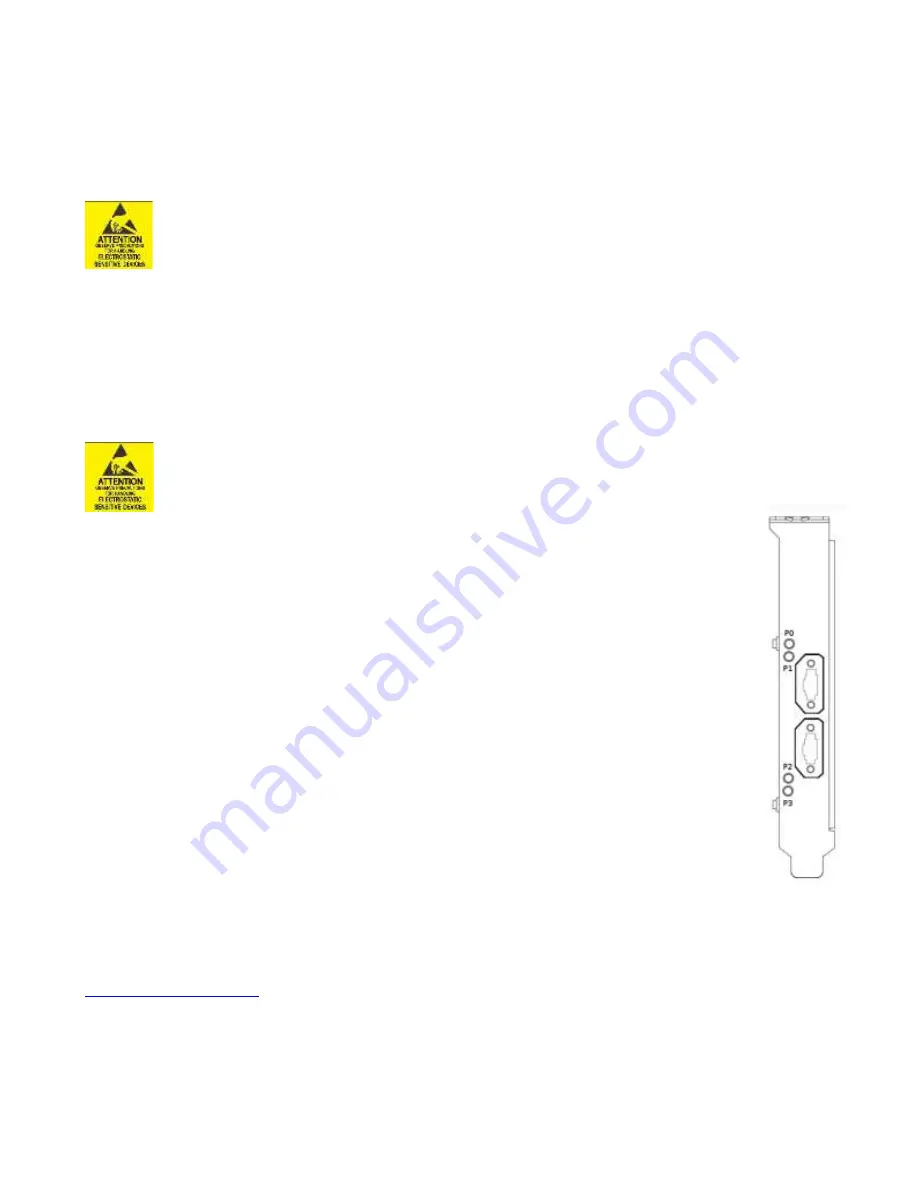
Step 5 - Installing and Removing Cables 

Installing and removing cables in NTB or Transparent Hot Add mode can be done while the systems are running. Hot 
plugging / removing cables are fully supported.  The fiber optic cable(s) are connected to the MPO connector(s) found on 
the PCIe bracket. The bracket will have one or two, single or dual MPO connectors depending on the board configuration. 
 

Connecting Cables 

Please carefully install the fiber patch cable connector into the connector housing on the adapter card.  To install the 
cable, remove the protective cover on both the cable and the card, match the cable house keying with the MPO 
connector on the adapter card and use light pressure to insert the connector until it is latched. Cables should always use 
strain relief to protect the connected equipment from excessive force on the cable. This is especially important for cables 
between racks. Please always save the protective covers for future use if the cable is disconnected from the card. 
 

Disconnecting Cables 

Please carefully pull the release tab to release the cable from the locking. Always replace the protective cover on both the 
card and the cable after disconnecting the cable. 

Step 6 - Installing the Dolphin Management Software 

The adapter card is com

pliant with Dolphin’s 

Board Management Software package for the MX product line. Please visit  


http://www.dolphinics.com/mx


to register and download the latest documentation and software.  It is recommended to follow the quick installation guide found on the 
web page above to install the software for your operating system. 
 

Note to PXH84x users: 

Summary of Contents for MXH94 Series

Page 1: ...MXH94x MXH95x Transparent Adapter User s Guide Dolphin Interconnect Solutions Page 1 Dolphin MXH94x MXH95x Transparent Adapter Users Guide Version 1 0 Date 20th January 2021...

Page 2: ...MXH94x MXH95x Transparent Adapter User s Guide Dolphin Interconnect Solutions Page 2...

Page 3: ...ADAPTER CARD 9 STEP 5 INSTALLING AND REMOVING CABLES 9 Connecting Cables 9 Disconnecting Cables 9 STEP 6 INSTALLING THE DOLPHIN MANAGEMENT SOFTWARE 9 STEP 7 VERIFY INSTALLATION LEDS 10 OPERATION 11 C...

Page 4: ...OT BE LIABLE FOR ANY INDIRECT INCIDENTAL SPECIAL OR CONSEQUENTIAL DAMAGES INCLUDING LOST PROFITS LOST DATA OR LOSS OF USE ARISING OUT OF ANY USE OF DOLPHIN S PRODUCTS SOFTWARE OR SERVICE PROVIDED DOLP...

Page 5: ...nt Hot Add Attaching an IO Expansion system after the server is booted Target mode The card is installed in an expansion chassis or backplane for Transparent IO expansion Lane One PCI Express Lane con...

Page 6: ...x16 2 x8 2 units 24 fiber MPO MXH945 4 x4 Transparent x16 2 x8 4 x4 4 units 12 fiber MPO MXH946 1 x8 Transparent x8 1 unit 24 fiber MPO MXH947 2 x4 Transparent x8 2 x4 2 units 12 fiber MPO MXH948 1 x4...

Page 7: ...ches Host clock isolation Automatic support for host running CFC or SSC mode VAUX powered board management controllers for flexible configuration and cable management Flash recovery option PFX Multi c...

Page 8: ...onnecting directly to the CPU for optimal IO latency Install the adapter card behind a PCIe switch in the IO system for optimal PCIe peer to peer performance e g between GPUs FPGAs Adapter Card Config...

Page 9: ...requency clocking The card implements clock isolation Step 5 Installing and Removing Cables Installing and removing cables in NTB or Transparent Hot Add mode can be done while the systems are running...

Page 10: ...wnload requires a password to log in The password will automatically be emailed to you if you follow the instructions found on the getting started document bundled with the adapter card If you fail to...

Page 11: ...n Figure 1 DIP Switch shows the DIP switch for the adapter card It is used to select the operational mode Please leave all undocumented DIP switches in the default position Table 2 DIP Switch settings...

Page 12: ...Transparent Target DIP ON DIP switch view A Transparent Target One x16 upstream port P1 P2 P3 P4 One x16 downstream port OPT 1 OPT 2 Transparent Use Cases The transparent adapter card may be used as...

Page 13: ...s you can connect the cable between any port Transparent Use Case B 1 Host Dual Expansion Configuration The host has an adapter card configured for Transparent Host operation and a direct x4 or x8 ca...

Page 14: ...serial number of the card i e MXH940 CC 012345 You can also get this information using lspci in Linux First identify the devices for the Dolphin Host card Then run lspci and identify the card It will...

Page 15: ...roduction number 0x0000000A 0000010 in decimal Support More information about the product support and software downloads at http www dolphinics com mx Please email pci support dolphinics com if you ha...

Page 16: ...for FireFly Gen4 v1 and FireFly Gen3 MXH94x BB MH95x BB Support for FireFly Gen3 and FireFly V2 Current version MXH94x CC MH95x CC Same as MXH94x BB MH95x BB optimized for volume manufacturing Planne...

Page 17: ...industry equipment installed in a standard PC EN 55032 EN 55024 Class A This does not ensure that it will comply with these standards in any random PC It is the responsibility of the integrator to ens...

Page 18: ...ng or abnormal working conditions Damages which result from violating the specified operating or storage temperatures and airflow Damages caused by acts of nature e g floods storms fire or earthquakes...

Reviews: