background image

11

3

4

E

To guarantee a troublefree operation of the oil pump the oil
guide groove (E/3) as well as the oil inlet bore in the guide bar
(E/4) must be cleaned in regular intervals.

Note:

After the saw has been turned off it is normal for residual chain
oil to drip from the oil feed system, the guide bar and the chain
for a time. This does not constitute a defect!

Place the saw on a suitable surface.

H

Holding the chain saw

Always grip each handle with the thumb and fingers
encircling the handle as shown in Fig. H.

Use this grip thumb

below handle!

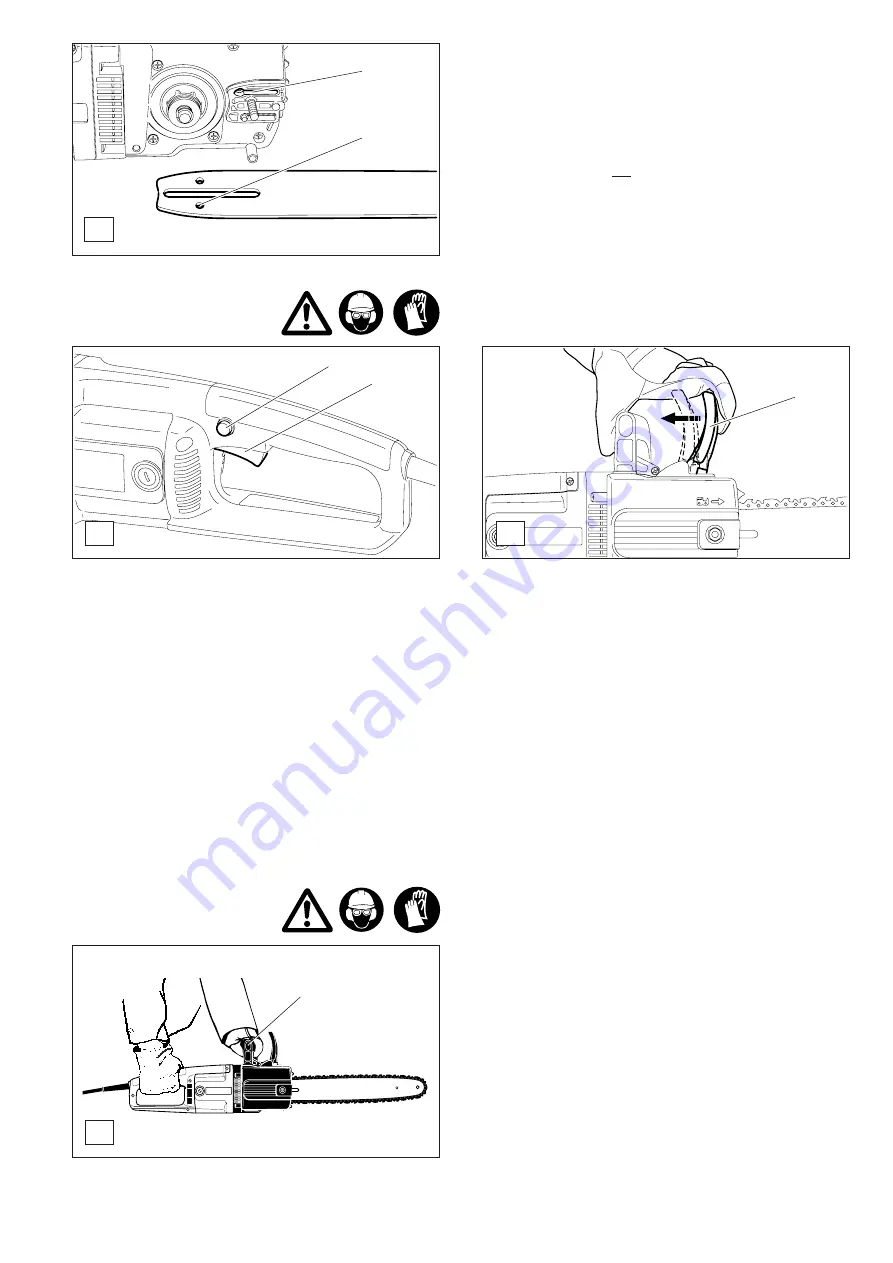
Switching on the motor

5

6

F

7

G

NOTE:

When the chain brake is actuated the power supply to the
motor will be cut off.

If the saw does not start when the ON/OFF switch (F/6) is
actuated, it will be necessary to release the chain brake.

-

Pull the hand guard (G/7) firmly in the direction of the
arrow until you feel it catch.

-

Plug in the saw.

-

When switching on the electric chain saw always hold
it with both hands
.

-

Take the back handle with the right hand and the tubular
handle with the left hand. Hold the handles tightly with your
thumbs facing your fingers. The bar and chain must not be
in contact with any object.

-

First depress the locking button (F/5) and then the power
switch (F/6). Then release the locking button (F/5).

-

Attention: The chain starts running immediately. Keep
the power switch depressed as long as the motor is to run.

CAUTION:

Never lock the power switch in the ON position.

Switching off the motor:

-

Release the power switch (F/6).

Summary of Contents for ES-151, ES-161, ES-171

Page 1: ...follow safety precautions in the Owner s and Safety Manual Improper use can cause serious injury Preserve this Manual carefully ATTENTION Suivez toujours les conseils de sécurité du présent manuel d emploi et de sécurité Une utilisation incorrecte de la tronçonneuse peut entraîner des blessures graves Conservez avec soin ce manuel Lisez et comprenez ce manuel ES 151 ES 161 ES 171 ...

Page 2: ... to the operator and or bystanders Table of contents Page Packing 2 Delivery inventory 3 Symbols 3 SAFETY INSTRUCTIONS 4 6 Use of extension cord 6 Chain saw nomenclature 7 PUTTING INTO OPERATION Mounting the guide bar and saw chain 8 Tightening the saw chain 8 Checking the chain tension 9 Chain brake 9 Saw chain oil 10 Refilling the oil tank 10 11 Switching on the motor 11 Holding the chain saw 11...

Page 3: ... 1 4 5 Read instruction manual and follow the warnings and safety precautions Particular care and attention Wear protective helmet eye and ear protection Pull out the power supply plug Pull out the power supply plug if the cable is damaged Chain brake released Chain brake actuated Caution kickback Forbidden Maximum permissible cut length Wear protective gloves WARNING To Reduce the Risk of Electri...

Page 4: ...ences Keep Children Away Do not let visitors contact chain saw or extension cord All visitors should be kept away from work area 4 Store Idle Chain Saw When not in use chain saws should be stored in a dry and high or locked up place out of the reach of children When storing saw use a scabbard or carrying case Don t Force Chain Saw It will do the job better and safer at the rate for which it was in...

Page 5: ...tion manual Have defective switches be replaced by authorized service center Do not use chain saw if the switch does not turn the saw on and off Do not operate a chain saw that is damaged improperly adjusted or is not completely and securely assembled 7 Be sure that the saw chain stops moving when the trigger is released Guard Against Kickback WARNlNG KICKBACK may occur when the nose or tip of the...

Page 6: ... power source with voltage greater than that specified for the tool can result in SERIOUS INJURY to the user as well as damage to the tool If in doubt DO NOT PLUG IN THE TOOL Using a power source with voltage less than the nameplate rating is harmful to the motor Use of Extension Cord If the extension cord is intended to be used outdoors the cord shall be marked with the suffix W A following the c...

Page 7: ...w chain in the cut along the top of the guide bar Kickback Rotational The rapid upward and backward motion of the saw which can occur when the moving saw chain near the upper portion of the tip of the guide bar contacts an object such as a log or branch Low Kickback Chain A chain that complies with the kickback performance requirements of ANSI B175 1 when tested on a representative sample of chain...

Page 8: ...ightener screw A 3 to the right clockwise until the saw chain rests against the bottom side of the guide bar see circle Continue to lift the guide bar end and firmly tighten the fastening nut E 2 by means of the universal wrench PUTTING INTO OPERATION Mounting the guide bar and saw chain Use the universal wrench delivered with the machine Put the electric chain saw on a stable surface and carry ou...

Page 9: ... will stop the chain through inertia if the kickback is sufficiently strong The chain will stop within a fraction of a second Chain brake H Engaging the chain brake braking If the kickback is strong enough the sudden acceleration of the guide bar combined with the inertia of the hand guard I 11 will automatically actuate the chain brake To engage the chain brake manually simply push the hand guard...

Page 10: ... will desiccate Various skin deseases may result In addition allergic reactions are known Eyes can be irritated by contact with oil If oil gets into your eyes immediately wash them with clear water If your eyes are still irrritated go to see a doctor C D Lubricating the saw chain In order to ensure sufficient lubrication of the saw chain there must always be enough oil in the tank Its contents 120...

Page 11: ...he motor will be cut off If the saw does not start when the ON OFF switch F 6 is actuated it will be necessary to release the chain brake Pull the hand guard G 7 firmly in the direction of the arrow until you feel it catch Plug in the saw When switching on the electric chain saw always hold it with both hands Take the back handle with the right hand and the tubular handle with the left hand Hold t...

Page 12: ... your footing and hold the chain saw firmly with both hands while the motor is running Felling a tree When bucking and felling operations are being performed by two or more persons at the same time the felling operation should be separated from the bucking operation by a distance of at least twice the height of the tree being felled Trees should not be felled in a manner that would endanger any pe...

Page 13: ... on both feet When possible the log shoutd be raised and supported by the use of limbs logs or chocks Follow the sim ple directions for easy cutting When the log is supported along its entire Iength as shown in Fig D it is cut from the top overbuck When the log is supported on one end as shown in Fig E cut 1 3 the diameter from the underside underbuck Then make the finished cut by overbucking to m...

Page 14: ...n the chain when the minimum cutter length has been reached at this point the chain must be replaced see the Extract from the spare parts list and Replacing the chain The depth of the cut is determined by the difference in height between the depth limiter round nose and the cutting edge The best results are obtained with a depth limiter depth of 025 0 65 mm CAUTION Excessive depth increases the ri...

Page 15: ... flat file F See Accessories for the order number Round off the front of the depth limiter G Cleaning the guide bar lubricating the sprocket nose CAUTION Protective gloves must be worn H Regularly inspect the bearing surfaces of the guide bar for damage and clean them with a suitable tool If the saw is used intensively it will be necessary to lubricate the return sprocket bearings regularly once a...

Page 16: ...r limit has not yet been reached put the brush back in the same position and screw the cover C 2 back on Run the saw briefly about a minute so the brushes can run in again C Cause no power supply cable defective chain brake actuated Mains fuse blown Carbon brushes worn down oil tank empty oil guide groove dirty Brake band worn down System total Carbon brushes Oil tank oil pump Brake Observation el...

Page 17: ... guide groove of the guide bar Electric chain saw Store safely in a dry place After a long storage time have the electric chain saw checked at a service center resi dual oil can become resinic and the valve of the oil pump clogged Service spare parts and guarantee Maintenance and repair The maintenance and repair work of modern electric motors as well as all safety related assemblies require quali...

Page 18: ...ormance of inappropriate repairs Cleaning servicing and adjustment works are not covered by the guarantee All repairs covered by the guarantee are to be performed by a DOLMAR service center Extract from the spare parts list CAUTION These accessories or attachments are recommended for use with your DOLMAR tool specified in this manual The use of any other accessories or attachments might present a ...

Page 19: ...type 091 091 091 Chain pitch inch 3 8 3 8 3 8 Max speed chain m s 13 3 13 3 13 3 Length of a cut inch cm 12 30 14 35 16 40 Dimensions with bar and chain length inch cm 30 3 77 32 2 82 34 2 87 Weight without bar chain kg 4 2 4 2 4 2 Space for notes ...

Page 20: ...se électrique DOLMAR et nous sommes convaincus que cet outil moderne satisfera à vos exigences Les tronçonneuses électriques DOLMAR se caractérisent de moteurs robustes et puissants ainsi que d une grande vitesse de chaîne garantissant ainsi une performance de tronçonnage excellente Nos tronçonneuses électriques disposent d un système de sécurité ample correspondant aux normes actu elles de la tec...

Page 21: ... et suivre les consignes de sécurité et d aver tissement Recommandations particulières Porter le casque les lunettes et acoustiques de protection Enlever la fiche de contact Enlever la fiche de contact en cas d endommagement du câble Frein de chaîne desserré Frein de chaîne activé Contrecoup kickback Interdit mm RE Y Longueur de coupe maximale autorisée Porter des gants de protection AVERTISSEMENT...

Page 22: ...yaux métalliques ou les clôtures Eloignez les enfants Interdisez à quiconque de toucher la tronçonneuse ou son cordon d alimentation Eloignez toute personne de votre zone de travail 4 Rangezconvenablementlatronçonneuselorsqu elle ne fonctionne pas Lorsqu elle ne fonctionne pas rangez la tronçonneuse en hauteur hors de portée des enfants dans un endroit sec et fermant à clé Utilisez une housse ou u...

Page 23: ...magée doit être convenablement réparée ou remplacée par un centre de service autorisé à moins que cela ne soit mentionné différemment dans le présent manuel Faites remplacer les interrupteurs défaillants par un centre de service autorisé N utilisez pas la tronçonneuse si l interrupteur ne permet plus de la démarrer et de l arrêter N utilisez pas une tronçonneuse endommagée mal réglée ou non assemb...

Page 24: ...ation électrique socle etc assurez vousquelevoltagedélivrécoïncide avec les spécification mentionnées sur la plaque signalétique de l outil L utilisateur peut subir des BLESSURESGRAVESsilevoltagedelasourced énergie est supérieur au voltage spécifié sur l outil En cas de doute NEBRANCHEZPASL OUTIL Unvoltageinférieur à la mention de la plaque signalétique est sans conséquence pour le moteur Utilisat...

Page 25: ...ur un dispositif qui selon sa sollicitation établit ou coupe l alimentation électrique du moteur de la tronçonneuse Poignéearrière lapoignéedesoutiensituéeàl arrière de la tronçonneuse Poignée avant la poignée de maintien située à l avant de la tronçonneuse Position normale de coupe les positions adoptées pendant les opérations de débitage et d abattage Protection de la poignée avant barrière stru...

Page 26: ... dans le logement voir photo agrandie Serrer légèrement l écrou de fixation E 2 à la main MISE EN ROUTE Montage du guide chaîne et de la chaîne Utiliser la clé combinée livrée avec la tronçonneuse électrique Poser la tronçonneuse électrique sur un support stable et procéder de la façon suivante pour monter la chaîne et le guide chaîne ATTENTION Porter obligatoirement des gants de protec tions pour...

Page 27: ... 23 le frein de chaîne se déclenche automatiquement en cas de contrecoup suffisamment fort par inertie de masse La chaîne de sciage est interrompue pendant une fraction de seconde Enclencher le frein de chaîne bloquer Lors d un choc de recul la rapide accélération du guide chaîne et l inertie de la masse du protège main I 11 provoquent l enclenchement automatique du frein de chaîne Lors d un encle...

Page 28: ...re des réactions allergiques sont connues Lorsque l huile entre en contact avec les yeux des irritations se manifestent Dans ce cas rincer immédiatement l oeil avec de l eau propre Si l irritation persiste consulter immédiatement un médicin 2 1 C D Lubrification de la chaîne Afin de lubrifier la chaîne d une façon suffisante il doit se trouver toujours assez d huile dans le réservoir La quantité m...

Page 29: ...auche la poignée tubulaire Empoigner les poignées fermement avec les pouces Le guide chaîne et la chaîne ne doivent pas être en contact avec d autres objets D abord appuyer sur le bouton de blocage F 5 puis appuyer sur l interrupteur de mise en marche d arrêt F 6 et relâcher le bouton de blocage F 5 Attention La chaîne se met immédiatement en marche Tenir l interrupteur de mise en marche d arrêt e...

Page 30: ... éviter le pincement de la chaîne ou du guide lorsque vous attaquerez la seconde coupe Contrôle de la frein de chaîne Le frein de chaîne doit être vérifié avant de commencer tous travaux Démarrer le moteur comme décrit prendre une position stable et poser la tronçonneuse sur le sol de façon à ce que le dispositif de sciage soit libre Bien tanier la poignée étrier d une main l autre main étant sur ...

Page 31: ... le tronc au moyen de branches de rondins ou de cales Suivez les instructions élémentaires de sciage Si le tronc est supporté sur toute sa longueur comme dans la Fig D la coupe se fera par le dessus coupe par le dessus Si le tronc est supporté par l une de ses extrémités seulement Fig E coupez sur 1 3 du diamètre par le dessous coupe par le dessous Terminez ensuite la coupe par le dessus Si le tro...

Page 32: ...elorsquelalongueurminimale de dent de rabotage est atteinte Une nouvelle chaîne de sciage doit être alors montée voir extrait de la liste des pièces de rechange et chapitre Nouvelle chaîne de sciage L écart entre le limiteur de profondeur nez rond et l arête de coupe détermine l épaisseur du copeau Les meilleurs résultats de coupe sont obtenus avec une distance du limiteur de profondeur de 025 0 6...

Page 33: ...ur à l avant G H Nettoyer le guide chaîne Regraisser l étoile de déviation ATTENTION Porter impérativement des gants de protection Les surfaces de roulement du guide chaîne doivent être régulièrement vérifiées pour voir si elles ne sont pas endommagées et nettoyées avec un outillage adapté En cas d utilisation intense de la tronçonneuse électrique il est nécessaire de regraisser régulièrement 1 x ...

Page 34: ...daptent Vérifier remplacer les balais de charbon ATTENTION Contrôler les balais de charbon à intervalles réguliers Une entaille sur le balais de charbon indique la limite d usure Nouvelle chaîne de sciage ATTENTION N utiliser que des chaînes et guide chaîne permises pour cette tronçonneuse voir extrait de la liste de pièces de rechange Cause sans alimentation électr câble défectueux frein de chaîn...

Page 35: ...ssures ou fissures En cas d endommagement faire réparer immédiatement par un atelier qualifié chaîne réaffûter régulièrement échanger à temps guide chaîne tourner après un certain temps pour user la surface de roulement d une façon régulière échanger à temps pignon faire échanger à temps par l atelier qualifié frein de chaîne faire contrôler régulièrement par un atelier qualifié Avant chaque chaîn...

Page 36: ... dûs à une alimentation en air de refroidissement pollué au carter UtilsationdepiècesderéchangeinappropriéesoudepiècesnonoriginalesDOLMARsiellessontàl originedel endommagement Utilisation de carburants inappropriés ou ayant été stockés trop longtemps Endommagement dûs aux conditions d utilisation prescrites par le distributeur louant l appareil Opérations de la part de personnes non qualifiées ou ...

Page 37: ...91 091 091 Ecartement pouces 3 8 3 8 3 8 Vitesse maxi de la chaîne m s 13 3 13 3 13 3 Longueur de coupe inch cm 12 30 14 35 16 40 Dimension avec guide et chaîne longueur pouces cm 30 3 77 32 2 82 34 2 87 Poids sans guide et chaîne kg 4 2 4 2 4 2 Page réservée aux notes ...

Page 38: ...38 ...

Page 39: ...39 ...

Page 40: ...40 Specifications subject to change without notice Changements sans préavis Form 995 702 113 6 05 GB F POWER PRODUCTS ...

Reviews: