Dodge Industrial, Inc.
1061 Holland Road
Simpsonville, SC 29681
+1 864 297 4800
All Rights Reserved. Printed in USA.
MN1614 04/22
*1614-0422*
© DODGE INDUSTRIAL, INC.
AN RBC BEARINGS COMPANY
10.
If changing to Shaft Position “L,” clean the bore in the
gearcase housing and install a new output bore plug in the
gearcase housing. Clean the bore in the bearing cover and
install a new output shaft seal in the bearing cover. Install
the plug and seal 1/16” below flush with the outside of the
gearcase or bearing housing.
11.
If changing to Shaft Position “R,” clean the bore in the
gearcase housing and install a new output shaft seal in
the gearcase housing. Clean the bore in the bearing cover
and install a new output bore plug. Install the plug and seal
1/16” below flush with the outside of the gearcase or bearing
housing.
12.
Remove and keep together the tapered bearing cup and
shims from the bearing cover and place them in the gearcase
housing bore. Place the tapered bearing cup and shims that
were previously removed from the gearcase housing and
place them in the bearing cover.
13.
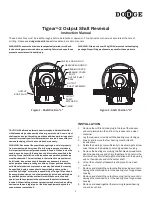
Wrap vinyl electrical tape around the entire output shaft
extension to protect the lip seal during assembly. Do not
extend the tape onto the portion of the shaft which the seal
contacts during operation.
14.
Apply a small amount of reducer oil drained in Step 1 to the
taped shaft extension to help slide the extension through the
output seal. If the reducer is being changed to Shaft Position
“R,” place the reducer housing on blocks to provide room for
the shaft extension. Insert the output shaft assembly, shaft
extension down, into the reducer housing. If the reducer
is being changed to Shaft Position “L,” insert the output
assembly, shaft extension up, into the reducer housing.
15.
Remove the original o-ring from the bearing cover and install
a new o-ring.
16.
Install the bearing cover onto the gearcase housing. If the
bearing cup and shims fall out of the bearing cover, apply a
liberal amount of oil to the bearing cup’s outside diameter and
reinstall the bearing cup and shims into the bearing cover.
The oil will hold the parts in the bearing cover.
17.
Install the four bearing cover bolts and lockwashers and
torque the bolts in a cross pattern to the following values:
Reducer
Size
Bolt Torque
(Inch–Pounds)
13
75
15
75
17
156
20
156
23
276
26
276
30
420
35
420
40
1320
47
1320
18.
Remove the vinyl electrical tape from the output shaft
extension and place the reducer with the fill and drain plug
hole facing up.
19.
Fill the reducer with the oil drained in Step 1. Install and
tighten the oil fill and drain plug. Standard temperature range
replacement lubricant is available from Dodge. Contact
Dodge Product Support for details.
CAUTION: Do not substitute or add any other kind of oil or
premature reducer failure may occur.
Figure 3 - Shaft Tape


