background image

22

Printer Installation

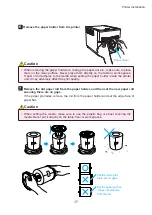
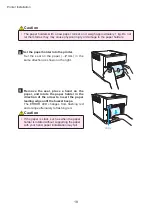
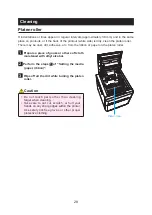
Paper scraps generated when the paper is cut are collected in the trash box. Be sure to 

empty the trash box when replacing the paper.

1

 Remove the printer unit’s trash box.

After removing the trash box, paper scraps 

may be stuck to the printer unit.

If this happens, remove the paper scraps.

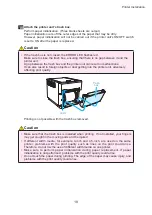
2

 Dispose of paper scraps.

(Several sheets of paper scraps may remain in 

the trash box.)

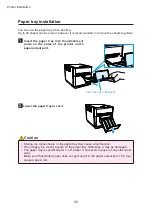
3

 Attach the printer unit’s trash box.


Caution

•  Do not remove the trash box during printing. Doing so may cause trouble.

•  When the trash box has been removed, do not touch the cutter on the upper part or 

you may be cut.

•  Troubles may occur if the printer is used when the trash box is full.

Disposing of paper scrap

Trash box

Trash

box

Teflon tape


Caution

•  Please do not remove the tape.

Summary of Contents for DP-QW410

Page 1: ... 2019 Dai Nippon Printing Co Ltd User Guide Version 1 0 0 DIGITAL PHOTO PRINTER DP QW410 2019120601 ...

Page 2: ...ctor Plug conforming to the proper ratings Voltage Ampere If you have questions on the use of the above Power Cord Appliance Connector Plug please consult a qualified service personnel or the distributor For the Customers in Europe This product shall not be used in the residential area This is a Class A product In a domestic environment this product may cause radio interference in which case the u...

Page 3: ...t type radioapparatuur DP QW410 conform is met Richtlijn 2014 53 EU De volledige tekst van de EU conformiteitsverklaring kan worden geraadpleegd op het volgende internetadres http www dnpphoto eu en home polski Dai Nippon Printing Co Ltd niniejszym oświadcza że typ urządzenia radiowego DP QW410 jest zgodny z dyrektywą 2014 53 UE Pełny tekst deklaracji zgodności UE jest dostępny pod następującym ad...

Page 4: ...thority to operate the equipment FCC statement This device complies with part 15 of the FCC Rules Operation is subject to the following two conditions 1 This device may not cause harmful interference and 2 this device must accept any interference received including interference that may cause undesired operation The identification by name address and telephone number of a responsible party located...

Page 5: ...l this product after purchase Copyright Copyrights trademarks or any other intellectual property rights whatsoever that pertain to documents programs or other items provided with this product are ascribed to Dai Nippon Printing Co Ltd or the respective other holders of rights Except in cases permitted by applicable laws these may not be duplicated or used without consent from Dai Nippon Printing C...

Page 6: ...mbling the paper tray 21 Disposing of paper scrap 22 Troubleshooting 23 Error display 23 Solving errors 24 The printer is jammed with paper 24 The paper cannot be pulled out toward you paper holder side 26 The ribbon is caught in the printer 26 Work was continued while the printer unit s ON OFF switch is OFF 27 The printer stopped with the paper partially cut 27 The power has been cut during print...

Page 7: ... possible levels of injury or damage due to misuse are categorized below as Warnings and Cautions according to the degree of danger involved Warning Accidents caused by failure to heed the warnings accompanying this symbol may lead to serious or fatal injury Caution Accidents caused by failure to heed the cautions accompanying this symbol may lead to physical injury or property damage Symbols The ...

Page 8: ... The DP QW410 weight 5 8 kg 12 76 lbs When moving it lift it in a way that avoids excessive physical stress Lifting recklessly or dropping the product may cause physical injury Place the product as close to an outlet as possible to be able to easily unplug the power cord in case of problem If there is dust on the plug clean it off thoroughly It may cause an electric shock or a short circuit If met...

Page 9: ...ting continuously for long periods in a small room be sure to ventilate the room properly If you intend to use the product on a transportation vehicle train truck ship etc please talk to a representative in advance When disposing of the product accessories packaging materials or media paper ribbon please abide by local waste removal ordinances For details contact your local government offices When...

Page 10: ...ug the power cord Always unplug the power cord before connecting or disconnecting the USB cable Avoid using a long USB cable or connecting it to any noise producing device If it is unavoidable use a shielded cable or twisted pair for each signal Use a shielded USB cable compatible with the USB 2 0 specifications Place the product near the outlet where the power cord can be unplugged easily to shut...

Page 11: ...ty damage Do not lift the printer by grasping the wrapping materials The materials may break and cause the printer to fall Do not put your fingers between the paper holders and spacers Otherwise you may get injured Checking the contents Printer unit Paper tray for 4 x 6 Paper holder Set in the printer 4 inch spacer Set in the paper holder Explanation booklet For Safe Operation Start up guide Power...

Page 12: ...op door Opening lever LEDs Vent Vent Vent Fan USB 5 0 V DC 2 0 A Power inlet OFF ON Front of the unit Printer Installation Caution Be careful not to hurt yourself or damage anything on the edges of the printer Name of components ...

Page 13: ...upplied into the printer power inlet 4 Plug the power cord into an outlet 5 Connect the printer unit s USB connector and the computer with a USB cable 6 Set the ON OFF switch of the printer unit and the power switch of the computer to ON Printer Installation Caution Use a shielded USB cable compatible with the USB 2 0 specifications Otherwise unexpected troubles may arise Connecting the power cord...

Page 14: ...dia when setting it inside the printer unit it may adversely affect the print quality Media ribbon paper When using 4 5 inch paper remove the spacers attached to the paper holder Removing the spacers 1 2 3 Spacer Size Paper Ribbon 4 inch Width 102 mm Width 109 mm 4 5 inch Width 114 mm Width 121 mm Caution Do not put your fingers between the paper holders and spacers Otherwise you may get injured ...

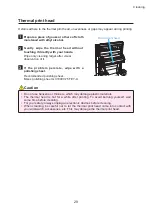
Page 15: ...ke care that a hand does not get caught in the gap between the back of the top door and the printer see the figure on the right Otherwise you may get injured The thermal head will be hot for some time after printing Do not touch the thermal head as there is a danger of burns When setting or removing the ribbon be careful not to let the thermal print head come into contact with your wristwatch acce...

Page 16: ... been removed do not touch the cutter on the upper part or you may be cut In order to facilitate color adjustment media type recognition and print quantity management an IC chip is included in the ink ribbon Note that a ribbon with an IC chip that has not been evaluated and approved may not function properly If correct data cannot be read from the IC chip an alarm will sound In such a case ink con...

Page 17: ...hen setting the media make sure to use the plastic bag or sheet covering the media Never put it directly on the table floor or work spaces Printer Installation Paper holder 6 Remove the paper holder from the printer Caution When removing the paper holders to change the paper roll etc make sure to place them on the clean surface Never place them directly on the table or work spaces If dust or dirt ...

Page 18: ...on the paper PULL in the same direction as shown on the right 9 Remove the seal place a hand on the paper and rotate the paper holder in the direction of the arrow to insert the paper leading edge until the buzzer beeps The ERROR LED changes from flashing red and orange alternately to flashing red LEDs Caution If the paper is slack such as when the paper holder is rotated without supporting the pa...

Page 19: ...of the paper may cause injury and problems with the print quality could arise Caution If the trash box is not closed the ERROR LED flashes red Make sure to close the trash box ensuring that there is no gap between it and the printer unit A gap between the trash box and the printer unit can result in malfunctions It can also result in foreign objects or dust getting into the printer unit adversely ...

Page 20: ...s of the printer unit s paper output port 2 Lower the paper tray to set it Paper tray installation Caution Storing too many sheets in the paper tray may cause a malfunction Do not apply too much strength on the paper tray Otherwise it may be damaged The paper tray is specifically for 4 x 6 paper It cannot store paper of any other print sizes Make sure that printed paper does not get caught in the ...

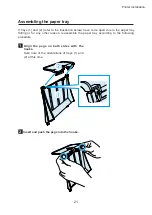
Page 21: ...ion below have come apart due to the paper tray falling or for any other reason reassemble the paper tray according to the following procedure 1 Align the pegs on both sides with the hooks Take note of the orientations of trays 1 and 2 at this time 2 Insert and push the pegs into the hooks ...

Page 22: ... remove the paper scraps 2 Dispose of paper scraps Several sheets of paper scraps may remain in the trash box 3 Attach the printer unit s trash box Caution Do not remove the trash box during printing Doing so may cause trouble When the trash box has been removed do not touch the cutter on the upper part or you may be cut Troubles may occur if the printer is used when the trash box is full Disposin...

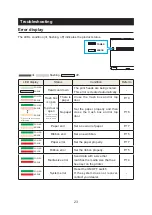
Page 23: ...19 POWER ERROR ERROR Flashes red and orange alternately No paper Set the paper properly and then close the trash box and or top door P 16 POWER ERROR Paper end Set a new roll of paper P 17 POWER ERROR Ribbon end Set a new ribbon P 15 POWER ERROR Paper error Set the paper properly P 17 POWER ERROR Ribbon error Set the ribbon properly P 15 POWER ERROR Media size error Send data with a size that matc...

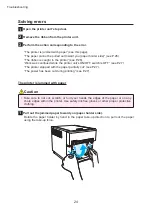
Page 24: ...r unit s ON OFF switch is OFF see P 27 The printer stopped with the paper partially cut see P 27 The power has been cut during printing see P 27 The printer is jammed with paper Solving errors 1 Pull out the jammed paper toward you paper holder side Rotate the paper holder by hand in the paper take up direction to pull out the paper using the take up force Caution Take care to not cut scratch or h...

Page 25: ...on when reaching into the printer unit If the jammed paper cannot be removed without using strong force contact technical support for further instructions Use of excessive force can damage the printer Take care to not cut scratch or hurt your hands the edges of the paper or on any sharp edges within the printer Use safety lint free gloves or other proper protective clothing Troubleshooting 2 Pull ...

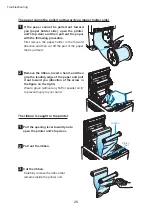
Page 26: ...der side 1 If the paper cannot be pulled out toward you paper holder side open the printer unit s top door and then pull out the paper with the following procedure First remove the paper holder in the forward direction and then cut off the part of the paper that is jammed 2 Remove the ribbon insert a hand and then grip the leading edge of the paper and pull it out toward you direction of the arrow...

Page 27: ...aper see P 24 Caution If the paper jam is not released do not forcefully pull out or tear off the paper Contact a service representative Pulling the paper with force may damage the cutter Caution Set the printer unit s ON OFF switch to ON before setting the paper again When the trash box is closed the printer unit performs paper initialization Any matter printed when the error occurred will be out...

Page 28: ...r on the platen roller 1 Prepare a piece of gauze or other soft cloth moistened with ethyl alcohol 2 Perform the steps 1 of Setting the media paper ribbon 3 Wipe off all the dirt while turning the platen roller Platen roller Platen roller Caution Do not touch parts other than cleaning target when cleaning Take care to not cut scratch or hurt your hands on any sharp edges within the printer Use saf...

Page 29: ...m persists wipe with a polishing sheet Recommended polishing sheet Mipox polishing sheet GC10000 75 FEY A Caution Do not use benzene or thinners which may damage plastic materials The thermal head is hot for a while after printing To avoid burning yourself wait some time before cleaning For your safety always unplug an electronic devices before cleaning When cleaning be careful not to let the ther...

Page 30: ...port Remove all Accessories and Attachments from the printer print media ink ribbon paper roll USB cable power cable and paper tray and store or transport them separately Please save the Print Head Protective Pad and do not throw away any packaging as you will need them to safely transport the printer Empty the trash box before transporting the printer Otherwise trash may enter the printer during ...

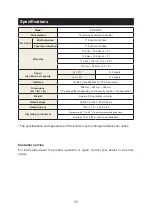
Page 31: ...B connector Dimensions W D H 208 mm 240 mm 198 mm The shape differs depending on the country region or the application Weight Approx 5 8 kg printer unit only Rated Voltage AC100 V to 240 V 50 Hz 60 Hz Rated Current 100 V 1 7 A 240 V 0 8 A Operating environment Temperature 5 C to 35 C in natural convection conditions Humidity 35 to 80 with no condensation The specifications and appearance of the pr...

Page 32: ......
Reviews: