


Digital Monitoring Products
V-OC810 Outdoor Video Camera Installation Guide
2
2. The Power LED will begin to flash when the camera is ready for WPS mode. Press the WPS button on the front of
the WAP for 3 seconds. The Security LED will flash to indicate that the WAP is sending a security key to the wireless
camera.
3. Within 1 minute of pressing the WPS button on the WAP, press and hold the WPS button on the back of the camera
for 1 second. The WPS button is a recessed button that can be pressed with a paperclip.
The LED just above the PIR detector on the front of the camera begins to flash orange to indicate that it is setting up
secure wireless communications. Once the camera and WAP are fully connected, the camera’s LED flashes green and
the WPS LED on the WAP turns on solid blue.
4. Repeat steps 1-3 for each outdoor camera you will be connecting at this site.
Note:
All cameras must be paired with the WAP individually.
The camera is now ready to be activated through vk.securecomwireless.com.
Option #3 Configuration - Wireless connection using a WPS supported router or WAP:
1. Plug in the power adapter to the camera, and to a power outlet. The
Power LED turns solid green when fully powered up.
2. For using your own WPS-enabled router, refer to the router’s instruction
manual to put the router into the mode of sending a security key.
3. Within 1 minute of sending a security key, press and hold the WPS
button on the back of the camera for 1 second.
The LED just above the PIR detector on the front of the camera
begins to flash orange to indicate that it is setting up secure wireless
communications. Once the camera and router are fully connected, the camera’s Network LED will flash green and
the WPS LED on the WAP turns on solid blue.
4. Repeat steps 1-3 for each camera you will be connecting to at this site.
Note:
All cameras must be paired with the WAP individually.
The camera is now ready to be activated through vk.securecomwireless.com.
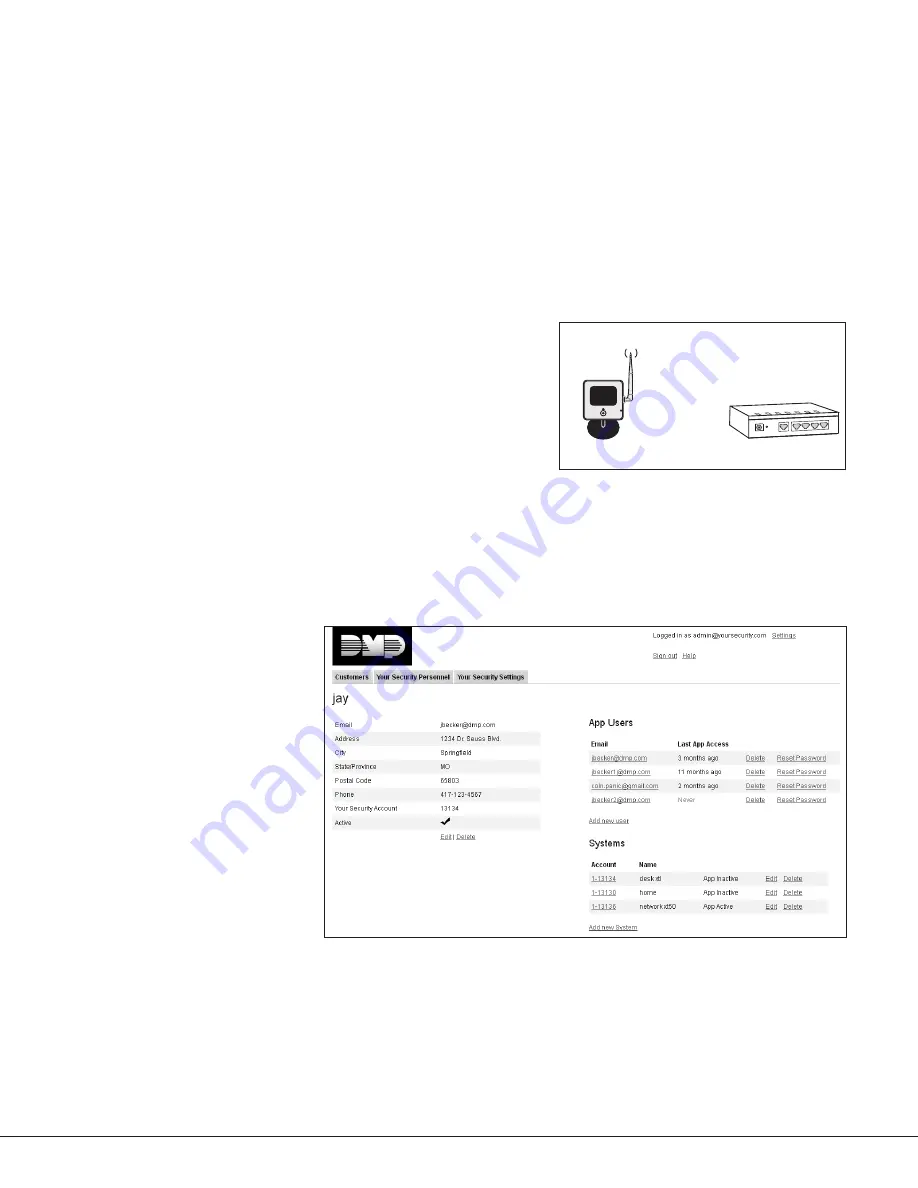
Activating a Camera through SecureCom Wireless
Once communication has been
established, a camera can be activated
at vk.securecomwireless.com
1. Login with your dealer login
information at vk.securecomwireless.
com and choose the correct customer.
2. Enable video on the customer’s
system by pressing on the edit button
to the right of the account number of
that system. See Figure 1.
This takes you to the system editing
screen (Figure 2). Enable video by
checking the video checkbox, and
clicking Save. The System Profile screen
will display.
3. From the System Profile screen,
press Add New Camera. The New
Camera screen (Figure 3) displays to
enter the following information:
Name:
The camera name that displays in the user’s app. This can be 16 characters long.
Server Name or MAC Address:
This information can be found on the back of the camera. If the MAC Address is
listed, the 12 characters that can be entered in this field. If the Server Name is listed, the 8 characters beginning
with SC can be entered in this field.
Time Zone:
Select the time zone of the camera location. This is used to indicate times of the clips.
WAN LAN4 LAN3
LAN2 LAN1
RESET
DC 3.3V
Ethernet Cable
Option One
Camera
DHCP Router
WAN LAN4 LAN3
LAN2 LAN1
RESET
DC 3.3V
Ethernet
Cable
DHCP Router
Camera
Wireless Access Point
Option Two
Camera
Option Three
WAN LAN4 LAN3
LAN2 LAN1
RESET
DC 3.3V
DHCP & WPS
Router
Figure 1: Customer Profile Screen


