background image

OPERATION

CD Player

7

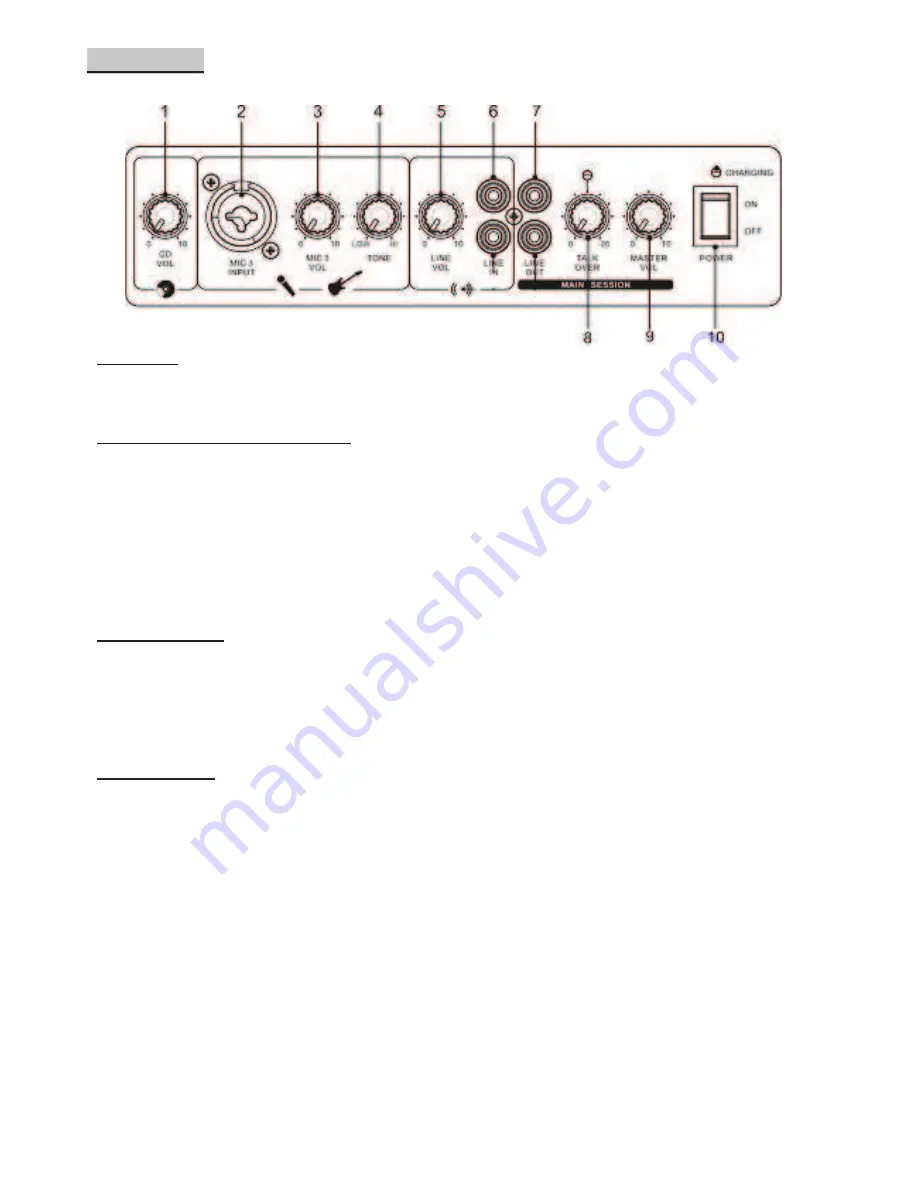
1.    CD Player Volume 

Turn this knob to adjust the CD Player volume, clockwise for louder volume 

Wired Microphone / Instrument

2.    Mic3 input (Combo Jack) 

This  combo  jack  can  take  either  balanced  XL

R  input  or  1/4”  unbalanced  input  for  wired 

microphone, guitar or line level instrument

3.    Mic 3 Volume   

Turn this knob to adjust the Mic 3 input volume,-clockwise for louder volume

4.    Mic 3 Tone   

Turn this knob to adjust Mic 3 input tone, clockwise for more treble, less bass and   
counterclockwise for more bass, less treble 

External Line-IN

5.    Line Volume 

Turn this knob to adjust the Line input volume, -clockwise for louder volume

6.    Line-level input (stereo RCA) 

Connect your external audio source (e.g. cellphone, Mixer) to this line-level input with a pair of 
unbalanced RCA cable 

Output control


7.    Line-Output (stereo RCA) 

This output is taken from the signal of master output but independent of master volume level. 
You may connect the other iVisa 500 BT or another active PA speaker to link them up. Or you 
may also connect a external recorder 

8.    TALKOVER 

This pot adjust the talkover attenuated rate. 
When talkover is on and signal on microphone (both wireless and wired) is significant, music from 
AUX, iPod , CD, Bluetooth, USB will be attenuated according to the attenuation rate set.

9.    Master Volume level 

Turn this knob to adjust the master output volume of the iVisa 500 BT, clockwise for louder   
volume

10. ON/OFF switch 

Turn this switch to turn ON/OFF the iVisa 500 BT.   
(Notes: For recharging the internal battery, the iVisa 500 BT needs to be turned ON) 


Summary of Contents for iVisa 500 BT

Page 1: ...1 iVisa 500 BT PORTABLE PA FOR iPod iPhone iPad USER MANUAL ENGLISH E1 E10...

Page 2: ...ceptacles and the point where they exit from the apparatus 10 Only use attachments accessories specified by the manufacturer 11 Use only with the cart stand tripod bracket or table specified by the ma...

Page 3: ...S FUNCTION DESCRIPTION 4 OPERATION 5 8 CD PLAYER 5 Wireless MIC 6 IPod iPhone iPad 6 Bluetooth MP3 6 Wired Mic Instrument 7 Line IN 7 Output 7 Remote Control 8 NOTES ON BATTERY 9 CONNECTION 9 SPECIFIC...

Page 4: ...ing 2 CD Player 3 Wireless Microphones Section 4 CD Section 5 Mic Instrument input Section 6 Heatsink 7 Battery Compartment 8 Easy GripHandle 9 iPod iPhone iPad section 10 USB Bluetooth section 11 Lin...

Page 5: ...ack 7 CD Power Press this button to turn ON OFF the power of CD player Please turn CD player to OFF when the CD player is not in use in order to save power NOTE This button is NOT main ON OFF of iVisa...

Page 6: ...ne echo level clockwise for more echo mix and counterclockwise for less echo mix 8 Wireless Microphone Volume Turn this know to adjust the overall Wireless Microphone volume clockwise for louder volum...

Page 7: ...our external audio source e g cellphone Mixer to this line level input with a pair of unbalanced RCA cable Output control 7 Line Output stereo RCA This output is taken from the signal of master output...

Page 8: ...Infra Red receiver Point the remote control to this window 3 MENU The menu control button for iPod iPhone iPad 4 Counter Clockwise rotation Counter clockwise rotation for iPod iPhone iPad iTune menu...

Page 9: ...Compartment Notes 1 When the unit has not been used for 2 months continually please connect it to AC and charge for 8 hours and charge for 48 hours at the first time using This protects the battery ca...

Page 10: ...ipment Applicable in the European Union and other European countries with separate collection systems This symbol on the product or on its packaging indicates that this product shall not be treated as...

Reviews: