background image

1

2

MAINTENANCE

45

Pump Belt

The pump belt is not adjustable. Replace the belt if it 
begins to slip from wear.

Replacing Pump Belt

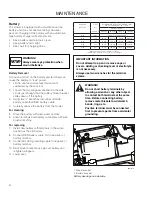
Park the mower on a level surface. Engage the 
parking brake and disconnect negative cable from 
battery. Jack or hoist the rear of the unit off of the 
ground to access the bottom of the unit.

Belt Removal/Installation

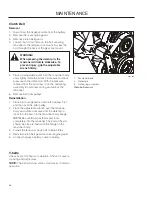
1.  Remove the skid plate and the left drive tire.
2.  With a ½" breaker bar and using the square 

opening in the idler arm, shift the arm counter 
clockwise to create slack in the belt.

3.  Remove belt from the engine and pump pulleys.
4.  To reinstall, reverse the above procedure using 

the belt routing diagram located on the left rear 
side of the hydraulic reservoir.

8065-077

1.  Belt routing decal
2.  Idler release placement

Pump belt removal

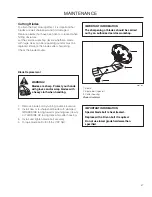
5.  Adjust belt tension by turning the eyebolt until 

there is approximately 

7

/

8

" -1" of threads showing 

outside the nut.

6.  Belt tension should be set to 60-70 lbs.
7.  Replace belt shields on both mandrel housings 

and secure with fasteners.

8065-054

Adjust belt tension

Summary of Contents for 966651601

Page 1: ...Form Number 115 381927 Rev B 2011 11 30 DX260D 966651601 Operator Manual Please read the operator s manual carefully and make sure you understand the instructions before using the machine...

Page 2: ...he information contained in these instructions Use only original parts for repairs The use of other parts voids the warranty Do not modify or install non standard equipment to the unit without consent...

Page 3: ...efore Starting 28 Starting the Engine 29 Jumper Cables Use 32 Running 33 Operating on Hills 34 Stopping the Engine 35 Mowing Tips 36 Moving Machine by Hand 37 MAINTENANCE 38 Engine and Radiator 38 Bat...

Page 4: ...d mind and body and must not be under the influence of any mind altering substance WARNING Engine exhaust some of its constituents and certain vehicle components contain or emit chemicals known to the...

Page 5: ...equipment and ensure that the machine is well anchored DO NOT operate this machine on public roadways Towing If machine is equipped with a tow hitch use extreme caution when towing Never allow childr...

Page 6: ...machine with the manufacturing number Engine Transmission Manufacturing Number The machine s manufacturing number can be found on the printed plate affixed to the right side in the engine compartment...

Page 7: ...xxxx xxxxx xxxx xxxxxxxxx xxxxxx xxxxxxxxx xx xxxxxxxx xxxx xxxxxx Used in this publication to notify the reader of a risk of personal injury or death particularly if the reader should neglect to foll...

Page 8: ...or s Manual Shut off engine and remove key before performing any maintenance or repair work Keep a safe distance from the machine Use on slopes no greater than 10 No passengers Whole body exposure to...

Page 9: ...e person Do not mow in reverse unless absolutely necessary Always look down and behind before and while backing Never direct discharged material toward anyone Avoid discharging material against a wall...

Page 10: ...involved in a large percentage of riding mower related injuries These operators should evaluate their ability to operate the riding mower safely enough to protect themselves and others from serious in...

Page 11: ...ch for holes ruts bumps rocks or other hidden objects Uneven terrain could overturn the machine Tall grass can hide obstacles Choose a low ground speed so that you will not have to stop while on the s...

Page 12: ...turn machine off if a child enters the area Before and while backing look behind and down for small children Never carry children even with the blades shut off They may fall off and be seriously inju...

Page 13: ...er or other appliance Before beginning to refuel minimize the risk of static electricity by touching a metal surface Never fill containers inside a vehicle or on a truck or trailer bed with plastic li...

Page 14: ...fety switches or other protective devices Do not change the settings of governors and avoid running the engine with overly high engine speeds If the engine runs too fast there is risk for damaging the...

Page 15: ...r relay to run the starter Never use the machine indoors or in spaces lacking proper ventilation The exhaust fumes contain carbon monoxide an odorless poisonous and lethal gas Stop to inspect the equi...

Page 16: ...not tow this machine it may cause damage to the drive system Load the unit onto truck or trailer by driving up ramps of suitable strength using a slow speed Do not lift The machine is not intended to...

Page 17: ...eplaced Before each use check for the correct torque on all bolts including those on the seat belt Check the ROPS structure for damage before each use ROPS bar is NOT intended for use in sub zero temp...

Page 18: ...ge net power output at specified rpm of a typical production engine for the engine model measured to SAE standard J1349 ISO1585 Mass production engines may differ from this value Actual power output f...

Page 19: ...s reduced and the machine turns to the right Zero turn can be achieved by moving one control backward behind the neutral position and carefully moving the other steering control forward from its neutr...

Page 20: ...ade switch Parking Brake The parking brake is found on the left of the machine Pull the lever backward to activate the brake and push forward to release it IMPORTANT INFORMATION The machine must stand...

Page 21: ...t operate unit by driving it at full throttle and the full forward position on both motion control levers Gradually turn in the tracking bolt on the right hand side until the unit noticeably starts dr...

Page 22: ...n when the engine has started For using accessory turn the key clockwise 8065 070 Ignition switch accessory Ignition Switch The ignition switch is placed on the control panel and is used to start and...

Page 23: ...on before the PTO will function Coolant Temperature If the coolant temperature reaches an unsafe level the light will illuminate for 30 seconds After 30 seconds the buzzer will sound and the PTO will...

Page 24: ...al unlocking the deck lift For transport push the lift pedal fully forward until the deck lift latches in the transport highest position 8065 017 1 Lift pedal 2 Release pedal Cut height selection peda...

Page 25: ...cessory connections and a 20 amp ATO ATC fuse for the ignition switch and safety interlock system The engine harness has two fuses located near the engine starter on the left side of the engine The en...

Page 26: ...Fill to bottom of filler neck Do not overfill Wipe off any spilled oil or fuel Do not store spill or use diesel fuel near an open flame 8065 007 Fuel tanks IMPORTANT INFORMATION It is recommended tha...

Page 27: ...ers forward to the neutral position and mower should stop moving To turn to the right While moving in a forward direction pull the right lever back towards the neutral position while maintaining the p...

Page 28: ...ll bar in the raised and locked position and use the seat belt There is no rollover protection when the roll bar is down If it is necessary to lower roll bar do not wear the seat belt Raise the roll b...

Page 29: ...nditions must be fulfilled before the engine can be started The blade switch for engaging the mower blades must be depressed The parking brake must be on Both steering controls must be in the locked o...

Page 30: ...ddle position 6 Move the steering controls outward to the locked outer neutral position 8065 071 Set the throttle 8065 108 Place controls in neutral position 5 Disengage the mower blades by pressing t...

Page 31: ...birth defects or other reproductive system damage The engine exhaust contains carbon monoxide which is an odorless colorless poisonous gas Do not use the machine in enclosed spaces 8065 004 Set the e...

Page 32: ...ND on the mower with the discharged battery away from the fuel tank and battery To remove cables reverse order Remove BLACK cable first from chassis and then from the fully charged battery Remove RED...

Page 33: ...tion N 3 Release deck height control by applying equal pressure to both pedals Push pedals again to lower deck to selected setting 4 Move throttle control to full throttle 5 Engage the mower deck by p...

Page 34: ...possible should be used before starting up or down hills Avoid stopping or changing speed on hills If stopping is absolutely necessary pull drive levers into the neutral position and push to the outsi...

Page 35: ...forward to the transport position 5 When the machine is standing still activate the parking brake by pulling the lever upward 6 Turn the ignition key to the stop position If the engine has been worke...

Page 36: ...The lawn becomes more even and the grass clippings more evenly distributed over the mown area The total time taken is not increased as a higher operating speed can be used without poor mowing results...

Page 37: ...ight side of each pump They are used to release the system so the machine can be moved by hand when not running Tilt the seat forward to access the pumps Use a 5 8 wrench or socket and ratchet Turn ea...

Page 38: ...lean under the mower deck Start the engine and blades listen for unusual sounds Check for damage Thoroughly clean around the engine Clean around belts belt pulleys Check the tire pressures Clean the f...

Page 39: ...ement 2 Check the caster wheels every 200 hours Replace the oil filter cartridge 2 Change anti freeze Check coolant levels Replace engine alternator belt Check the hydraulic oil in the oil tank Change...

Page 40: ...CHARGE 12 4V 75 20 min 35 min 48 min 90 min 12 2V 50 45 min 75 min 95 min 180 min 12 0V 25 65 min 115 min 145 min 280 min 11 8V 0 85 min 150 min 195 min 370 min Charging time depends on battery capaci...

Page 41: ...safety system before using the machine again Make sure the engine stops when the park brake is not engaged and the operator leaves the seated position Check that the engine stops if the mower blades...

Page 42: ...til the front nut is 1 8 to 3 16 from the brake bracket 10 Tighten the rear jam nut against the front nut 11 Tighten the nyloc nut against the spring and brake bracket until the gap set in Step 9 is c...

Page 43: ...justments with the unit turned off 1 Remove the bolts securing the drive levers to the control assembly 2 Position the drive lever at the desired height and reinstall the bolts but do not fully tighte...

Page 44: ...eys 5 Remove the belt guide hardware with a wrench and set belt guide aside 6 Remove the belt from around the electric clutch on the engine shaft 8065 045 Remove belt guide Deck Belt Installation NOTE...

Page 45: ...using the square opening in the idler arm shift the arm counter clockwise to create slack in the belt 3 Remove belt from the engine and pump pulleys 4 To reinstall reverse the above procedure using t...

Page 46: ...ch firmly 5 Place an adjustable wrench on the tensioner body and slightly rotate the wrench clockwise to relieve pressure on the detent pin With the pressure relieved from the pin press in on the nut...

Page 47: ...rpening Check the blade mounts Blade Replacement 1 Remove blade bolt by turning counterclockwise 2 Install new or re sharpened blade with stamped GRASS SIDE facing towards ground grass down or THIS SI...

Page 48: ...opposite side check that measurement is the same If adjustment is required loosen the locknut and adjust bolt up until both side to side measurements are equal Record measurement 3 Turn both outer bl...

Page 49: ...o avoid deck damage the anti scalp rollers must not be adjusted to support the deck The anti scalp rollers can be set in three positions Upper position 1 to 2 25 to 63 mm grass Middle position 2 to 4...

Page 50: ...when cleaning and washing Cleaning Regular cleaning and washing especially under the mower deck will increase the machine s life span Make it a habit to clean the machine directly after use after it i...

Page 51: ...high grade molybdenum disulphide grease For daily use the machine should be lubricated twice weekly Wipe away excess grease after lubrication It is important to avoid getting lubricant on the belts or...

Page 52: ...pose zerk Lubricate with a grease gun until the grease is forced out around the top washer Front Wheel Bearings Lubricate 3 4 strokes with a grease gun on each set of wheel bearings 8065 032 Lubricati...

Page 53: ...e pump 3 After the oil has drained wipe the filter base Do not fill above this level Minimum fill level Drain old oil filters of all free flowing oil prior to disposal Place used oil in appropriate co...

Page 54: ...s off the ground then repeated under normal operating conditions 1 Disengage the brake if activated 2 With the bypass valve open and the engine running at fast idle slowly move the directional control...

Page 55: ...ead battery Poor contacts on the battery terminal cable connections Fuse blown Ignition system faulty Fault in the starter safety circuit see Safety System in the Maintenance Section Engine runs rough...

Page 56: ...ot at all Parking brake on Bypass valve on pump open Drive belt for the transmission gears is slack or has come off Air in hydraulic system Mower deck not engaging Drive belt for the mower deck has co...

Page 57: ...or screws that may have become loose 3 Change the engine oil dispose of properly 4 Empty the fuel tanks or add a fuel stabilizer Start the engine and allow it to run until the injector is drained of f...

Page 58: ...WIRING DIAGRAM 58...

Page 59: ...203 225 305 250 339 370 502 7 8 378 513 591 801 11 8 782 1060 1410 1912 Grade 5 Minimum commercial quality lower quality not recommended Metric Standard Hardware Grade Grade 8 8 Grade 10 9 Grade 12 9...

Page 60: ...everse 0 7 mph 0 11 3 Km h Brakes Internal Hydraulic Front caster tires smooth tread 13 x 6 5 Flat Free Rear tires turf pneumatic 26 x 12 12 4 ply Tire pressures 15 PSI 103 kPa 1 bar 1 See the Engine...

Page 61: ...ustable Sprung Seat Suspension Hinged Arm Rests Yes Hour Meter Yes Blade Engagement Ogura Deck Construction 7 gauge Productivity 7 acres h 28 320 m2 h Dimension Weight 1680 lbs 762 kg Base Machine Len...

Page 62: ...the machine will fulfill the requirements This is also applicable to special requirements for any of the states California emission rules etc Do not remove any of these labels Certificates can also b...

Page 63: ...ustment Check Safety switch for the parking brake Safety switch for the mower deck Safety switch in the seat Safety switch in the steering controls Parking brake functionality and adjustment Driving f...

Page 64: ...ine oil Change the oil filter Check hydraulic oil level Inspect hydraulic hoses Inspect hydraulic belt Inspect hydraulic filter Check neutral position Check safety system Check seat belt Check ROPS Ch...

Page 65: ...heck engine oil level Check the tire pressures Check underside of deck Inspect deck pulleys Check clean the radiator s fins and debris screen Check safety system Check seat belt Check ROPS Check fuel...

Page 66: ...om mower Check engine oil level Check the tire pressures Check underside of deck Inspect deck pulleys Check clean the radiator fins Check safety system Check seat belt Check ROPS Check fuel system for...

Page 67: ...h Grease blade spindles Inspect spindle bearings Inspect deck belt and blades Inspect idler arm bearings Inspect deck idler pulleys Check hydraulic oil level Inspect hydraulic filter Inspect hydraulic...

Page 68: ...Check blade pitch Grease blade spindles Inspect spindle bearings Inspect deck belt and blades Inspect idler arm bearings Inspect deck idler pulleys Change hydraulic oil and filter Change anti freeze...

Page 69: ...sign 69 At Least Once Each Year Clean the radiator fins Replace the air cleaner s filter Change the engine oil Replace the engine oil filter Check adjust the cutting height Check adjust the parking br...

Page 70: ...SERVICE JOURNAL Action Date mtr reading stamp sign 71...

Page 71: ......

Page 72: ......

Reviews: