background image

Page  22

OPERATION INSTRUCTIONS

SIDE DISCHARGE OF THE CLIPPINGS:

In order to achieve optimum performance when side discharging the grass clippings, please read

and follow the tips listed below.

Additional information can be found in the troubleshooting guide.

1. Set engine speed control to the wide open or full setting.

2.

Do Not Attempt To Cut Grass When It Is Wet.

  Wet grass will clog the underside of the deck

and discharge area.

3. If the grass is tall, place the mower deck cut height lever in the top or second notch.  Initially

overlap cutting swaths instead of a full swath with each pass.  Some applications may require a

second cutting.

4.

Keep The Underside Of The Mower Deck Clean. 

 Frequent removal of dried grass and dirt will

allow the clippings to discharge correctly.

5.

Maintain Sharp Blades Throughout The Cutting Season.

GRASS HEIGHT SUGGESTIONS:

Correct mowing height can reduce weeds and disease by 50 to 80%

The following grass cut heights are based on adequate moisture conditions and normal thatch

buildup in a healthy lawn.  Some locations and applications may require slightly different cut

heights.  If in doubt, consult your local lawn professional for assistance.

                 Grass Types:

Best Cut Heights

Zoysia

2" - 2 1/2"

Blue Grass

1 1/2" - 3"

Fescue Blends

1 1/2" - 3"

St. Augustine (Mid South)

1 1/2" - 2"

St. Augustine (Deep South)

3" - 4"

Tifton Bermuda

1 1/2"

Centipede

1 1/2" - 2"

Common Bermuda

1 1/2" - 2"

Bahia/Argentina/Pensacola

2"

CAUTION  

    Be sure that deflector is properly installed

on the discharge chute

.

Summary of Contents for 1999 ZTR 4515B

Page 1: ...4500 SERIES 1999 Operator s Manual...

Page 2: ...start to use the mower read the operator s manual carefully and become completely familiar with the controls The information in this operator s manual applies to all Dixon ZTR 4500 Series Model Mowers...

Page 3: ...OLICY Page 8 SPECIFICATIONS Page 9 SEAT ADJUSTMENT Page 10 CONTROLS Pages 11 14 OPERATIONINSTRUCTIONS Pages 15 20 CARE AND MAINTENANCE Pages 21 31 STANDARD PARTS LIST Page 32 TROUBLESHOOTING Pages 33...

Page 4: ...nd understand this manual to prevent injuries TIP OVER BACK OVER BLADECONTACT SAFETY RIDINGLAWNMOWERS IFIMPROPERLYOPERATED CANCAUSESERIOUSINJURYORDEATH The most common causes of injury to the operator...

Page 5: ...r indicates an imminently hazardous situation which if not avoided will result in death or serious injury Warning indicates a potentially hazardous situation which if not avoided could result in death...

Page 6: ...in place Slow down before turning Never leave a running mower unattended Always turn off blades set parking brake stop engine and remove key before dismounting Turn off blades when not mowing Stop eng...

Page 7: ...the stability of the mower Keep all movement on the slopes slow and gradual Do not make sudden changes in speed or direction Avoid starting or stopping on a slope If tires lose traction disengage the...

Page 8: ...ep children out of the mowing area and under the watchful care of another responsible adult Be alert and turn mower off if a child enters the area Before and during backing look behind and DOWN for sm...

Page 9: ...fuel spillage Allow mower to cool before storing Stop and inspect the equipment if you strike an object Repair if necessary before restarting Never make adjustments or repairs with the engine running...

Page 10: ...WARRANTY 7 The following items are not covered by this warranty policy a Pick up and delivery charges for transportation of mower to and from an Authorized Dixon Dealer s place of business b Routinema...

Page 11: ...led Gasoline Vertical Shaft With Cast Iron Cylinder Sleeve Oil Pump With Integral Oil Filter Model 4516K 16 HP Kohler Command 16 4 Cycle Single Cylinder Overhead Valve Air Cooled Gasoline Pressure Lub...

Page 12: ...r up 2 Raise and push seat assembly forward 3 Loosen five nuts P N 3205 and slide seat forward or backward to desired position Retighten nuts P N 3205 DO NOT operate mower without seat adjustments pro...

Page 13: ...Page 13 CONTROLS DECK HEIGHT ADJUSTMENT LEVER CONTROL LEVERS PARKING BRAKE LEVER LIGHT SWITCH BLADE DRIVE SWITCH IGNITION SWITCH FRONT OF MACHINE THROTTLE CONTROL CIRCUIT BREAKER...

Page 14: ...brake before moving mower TRANSMISSION DRIVE SYSTEM Allows the mower to turn on its own axis Zero Turning Radius Each lever controls one side of the mower NOTE The pressure required to operate the mo...

Page 15: ...of desired direction to neutral To turn on mower s own axis zero turning radius stop and move one lever to reverse position and the other to forward position BRAKING To brake mower move both levers i...

Page 16: ...ical system is by 1 15 amp circuit breaker If circuit breaker trips push button to reset If this condition repeats consult dealer for inspection and repair MOWER DECK CUT HEIGHT LIFT LEVER Located to...

Page 17: ...rt or carrying only Mower usage requires that both hands be free to control individual levers DO NOT ATTEMPT operation of mower with any type of container or other object in either hand Towing Towing...

Page 18: ...ON position b Swing out control levers c Engage blade drive switch d Turn ignition switch to START Engine should not turn over or attempt to start SEAT SWITCH TEST a In a SAFE AREA away from bystander...

Page 19: ...position When engine starts release ignition key Key will return to Run position 4 Move throttle from Choke to desired speed position 5 Release parking brake 6 Swing levers in NOTE While mowing throt...

Page 20: ...pecially on first cuttings or if the lawn is heavily fertilized 4 Do Not Attempt To Cut Grass When It Is Wet Mulching performance will be very poor under wet grass conditions 5 Maintain A Sharp Blade...

Page 21: ...Underside Of The Mower Deck Clean Frequent removal of dried grass and dirt will greatly assist in bagging of the clippings 6 Maintain Sharp Blades Throughout The Cutting Season Some grass catching att...

Page 22: ...The Underside Of The Mower Deck Clean Frequent removal of dried grass and dirt will allow the clippings to discharge correctly 5 Maintain Sharp Blades Throughout The Cutting Season GRASS HEIGHT SUGGE...

Page 23: ...system belts and controls 2 Mower deck belts 3 Tire pressures 4 Tightness of all nuts and bolts 5 Battery fluid level 6 Engine Oil ENGINE For engine operating and maintenance information refer to the...

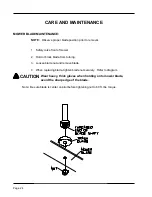
Page 24: ...t of mower 2 Hold or block blade from turning 3 Loosen blade nut and remove blade 4 When replacing blade tighten blade nut securely Refer to diagram Note Be sure blade is center on pilot before tighte...

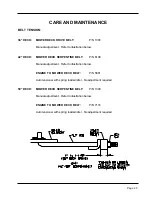
Page 25: ...NTINE BELT P N 6109 Manual adjustment Refer to illustration below ENGINE TO MOWER DECK BELT P N 5861 Auto tensioner with spring loaded idler No adjustment required 50 DECK MOWER DECK SERPENTINE BELT P...

Page 26: ...a smooth level surface with both levers in top speed position 3 Ifonesidenowdrivesslightlyfasterthantheother adjustleverstopwasherP N5760 on that side to reduce forward range of control lever If lever...

Page 27: ...n coupler counter clockwise until neutral is achieved clockwise for left side If right wheeliscreepingbackward turn coupler clockwise until neutral is achieved counterclockwise for left side d Tighten...

Page 28: ...and check to see if that measurement is the same If adjustment is required turn nut on one or both of the rear L rods until both measurements are equal 4 Turn each outer blade tip to align with the d...

Page 29: ...ter and washer from one end of deck support cross shaft Note location of remaining shim washers used between chassis and mower deck plates Slide shaft from chassis and mower deck 4 Remove hair pin cot...

Page 30: ...and mower deck plates Slide shaft from chassis and mower deck 4 Remove hair pin cotter and washer from each deck L rod Remove L rods from lift arms At this point deck will drop down 5 Carefully raise...

Page 31: ...ose to the valve will help direct the oil 3 Push the valve body in and twist to clear the detent notch 4 Pulling the valve body outward will start the flow of oil NOTE Refer to engine manufacturers re...

Page 32: ...92 932 Kohler Oil Filter P N 52 050 02 PLEASE DISPOSE OF USED OILS AT PROPER COLLECTION CENTERS PROTECT YOUR ENVIRONMENT Open Closed CHASSIS Number of grease zerks used 6 for 36 7 for 42 7 for 50 LOCA...

Page 33: ...periodically Clean above and below deck NOTE Allow mower to cool before washing If bearings are hot they will draw moisture inside as they dry and cause corrosion SERIAL NUMBERS The serial number is l...

Page 34: ...mission P N 5768 BRIGGS STRATTON FILTER PART NUMBERS Please refer to Briggs Stratton Engine Operators Manual for correct service intervals for engine oil changes and air filter maintenance Protect you...

Page 35: ...uce a quality cut The Troubleshooting Chart suggests practices and adjustments that may be helpful in improving cut quality Your Dixon ZTR dealer is also available to provide assistance to you Reduce...

Page 36: ...belt Replace spring Remove cause of seizure and lubricate Consult your dealer for repairs Replace belt Replace spring Remove cause of seizure and lubricate Consult you dealer for repairs REMEDY Neutr...

Page 37: ...RPM Contact your dealer for information REMEDY Circuit breaker disengaged Dead Battery Poor connections on battery Battery water low Wrong battery installed in mower Engine electrical system not funct...

Page 38: ...UMBER MOWER SERIAL NUMBER PURCHASED FROM OWNER INFORMATION DATE OIL CHANGED DATE ENGINE TUNED DM Address Name DIXONINDUSTRIES INC A BLOUNT International Inc Co PO BOX 1569 COFFEYVILLE KS 67337 0945 31...

Page 39: ...s Part No 5863 0798 DIXON INDUSTRIES INC A BLOUNT International Inc Co PO BOX 1569 COFFEYVILLE KS 67337 0945 316 251 2000 The Engine Exhaust from this product contains chemicals known to the State of...

Reviews: