background image

44

Chapter 2: Camera Configuration

Event - Motion Detection

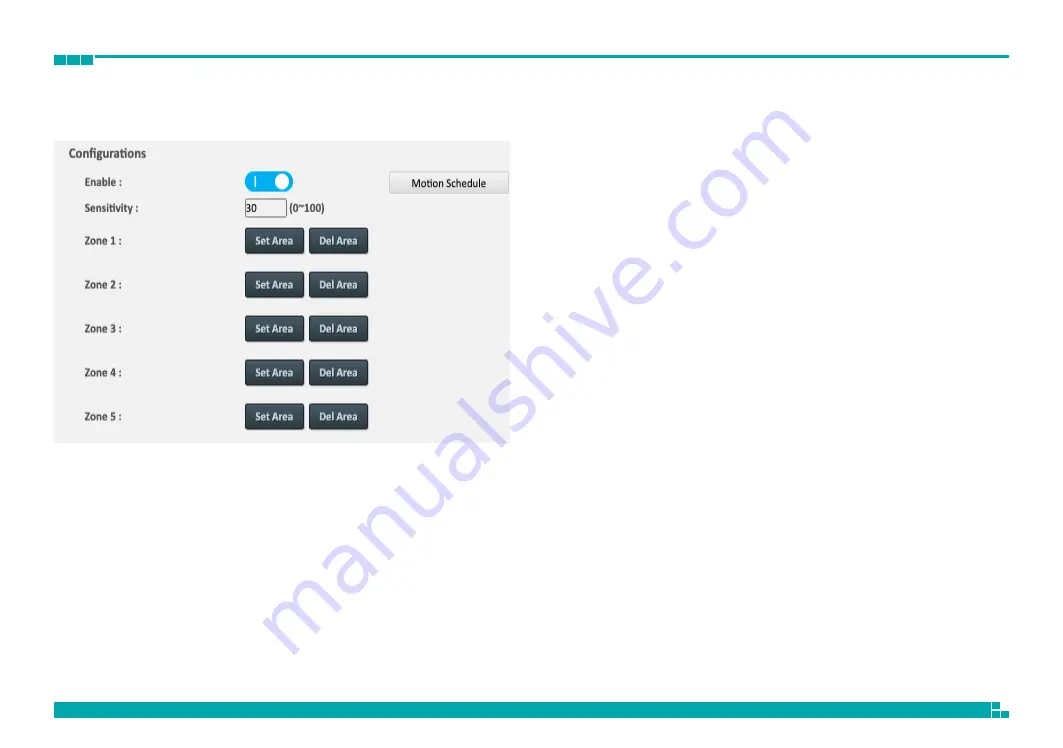
Motion Configurations

This section configures which area of the live video will be monitored for 
detecting motion.

Enable

Enables or disables motion detection function.

Sensitivity

Configures the sensitivity of motion detection, the range is 0 to 100.

Zone1 to Zone5 Setup

Configures the type of area layout to use for motion detection. You can 
configure up to 5 zones. The instructions below illustrate how to set up 5 
zones.

1. To create zone 1, on the live video screen, select the area to set the 

zone by holding down the mouse button and drag to make a rectangular 
square, release the button once the desired area is covered.

2. Press the 

Set Area

 button in zone 1 to set this area as motion zone 1.

3. Repeat the above steps to create motion areas for zones 2 to 5.

To delete an area, find the motion zone number you would like to remove,
and press the 

Del Area

 button.

Summary of Contents for NBR126PA

Page 1: ...IR Outdoor Bullet Camera NBR126PA NBR526PA User Manual Note The manual is subject to change without notice Part Number 00125525921_190116 ...

Page 2: ...rientation 18 Digital Processing 18 Image ROI 20 Configurations 20 Image Privacy Zone 21 Configurations 21 Image Overlay 22 Overlay 22 Text Size 22 Network Basic 23 IPv4 Settings 23 System Settings 23 IPv6 Settings 23 Basic Cont 24 RTMP Settings 24 Link Speed 24 Network FTP 25 Configurations 25 Network SSL 26 SSL Configurations 26 Certificate 26 Network 802 1x 27 802 1x Configurations 27 SNMP Conf...

Page 3: ...ing Schedule Settings 46 Event Audio Detection 47 Audio Detection Configurations 47 Event Network Loss Detection 48 Network Loss Detection Configurations 48 Event FTP Upload 49 FTP Upload Handler Configurations 49 Remote Server 49 SMTP Notification Configurations 50 Trigger Event 50 SMTP Server 51 Receipient List 51 Network Storage Configurations 52 Trigger Event 52 Receipient List 52 Login Certif...

Page 4: ...1 Chapter 1 Product Introduction Chapter 1 Product Introduction Overview Cable Camera ...

Page 5: ...three times the total weight of the bracket and IP camera 1 Use the 4 flat head screws to fix the metal adapter plate to the wall mount bracket 2 Put the installation sticker on the surface wall or ceiling of where it will be installed 3 Take out the screws on the bracket and put them into the expansion bolts to fix the bracket on the surface wall or ceiling 4 Remove the base of the camera Use scr...

Page 6: ...ver back and use a hex key wrench to secure the 3 screws Make sure all the parts of the camera are installed securely 6 Adjust the direction of the camera to the desired field of view 7 Put desiccant and stick it on the internal black plastic base ...

Page 7: ...ault IP address of the camera and then press the Enter button 3 You will be prompted with a pop up window asking for login information type in Admin default login name and 1234 default password 5 If no video is displayed on the screen please make sure you have VLC Media Player installed on the computer If not please download and install Note It is recommended to use Chrome internet browser to get ...

Page 8: ...he to focus far objects and to focus near objects The focus can also be adjusted through the slider bar Micro Focus Control Adjusts the camera s focus when the focus in Focus Control is not enough Move the zoom slider bar left or right to adjust the focus level Zoom Position Focus Control Snapshot Takes a image snapshot from the camera you will be prompted to store the image file onto the computer...

Page 9: ...6 Chapter 2 Camera Configuration Configuring the Camera s Setting 1 To configure the camera s setting click on the Setup button on the main Setup ...

Page 10: ...e on the left hand side for Streaming Video Audio Image Exposure Basic Settings ROI Privacy Zone Overlay Network Basic FTP SSL 802 1x SNMP Firewall LDAP DDNS RTSP Bonjour Upnp System Date Time Maintenance User Management Homepage Layout Event Alarm Handler Motion Detection Tampering Alarm Audio Detection Network Loss Detection FTP Upload SMTP Notification Network Storage Relay Handler SD Record Ha...

Page 11: ...acy Zone Overlay Network Basic FTP SSL 802 1x Firewall LDAP DDNS RTSP System Date Time Maintenance User Management Homepage Layout Event Alarm Handler Motion Detection Tampering Alarm Audio Detection Network Loss Detection FTP Upload SMTP Notification Network Storage Relay Handler SD Record Handler TCP Notify Video Analytics Object Detection Video Configuration Menu ...

Page 12: ...for Smart GOP Frame Rate Adjusts the frame rate of the video stream the range is 1 60FPS for NTSC Video System and 1 50FPS for PAL Video System refer to System Maintenance Video System The stream will be off if 0 is selected Max Dynamic GOP Configures the GOP length of the stream the range is 1 255 Users can enter the value or adjust it through the slider bar Dynamic GOP Enables or disables Dynami...

Page 13: ...rol Configures the Rate Control mode as CBR constant bit rate or CVBR constrained variable bit rate for the stream Frame Rate Adjusts the frame rate of the video stream the range is 1 60FPS for NTSC Video System and 1 50FPS for PAL Video System refer to System Maintenance Video System The stream will be off if 0 is selected Max Dynamic GOP Configures the GOP length of the stream the range is 1 255...

Page 14: ...ity Configures the video quality of the stream The options are High Mid and Low Frame Rate Adjusts the frame rate of the video stream the range is 0 30FPS The stream will be off if 0 is selected Save Save button to apply the configurations click on this button once all the settings are confirmed for the new changes to take effect Video Configuration Cont ...

Page 15: ...68 Users can enter the value or adjust it through the slider bar Audio Input Gain Volume input quality adjustment for audio in of the camera Configures the Audio Input gain of the stream the range is 0 21 Users can enter the value or adjust it through the slider bar Audio Output Gain Volume output quality adjustment for audio out of the camera Configures the Audio Output gain of the stream the ran...

Page 16: ...l and BLC cannot be edited Only Exposure Time can be edited the range is 1 3 1 71428 Iris Control The available options are Auto 0 100 in increments of 10 Adjustment Adjusts the weighting from 0 100 Users can enter the value or adjust it through the slider bar Exposure Time Control The available options are OFF 1 30 1 15 and 1 7 5 Exposure Time The range is 1 3 1 71428 It can only be edited when L...

Page 17: ...function if the camera is exposed to bright backlight glare or high contrast lighting Local Contrast Adjusts the contrast level from 0 100 Users can enter the value or adjust it through the slider bar AWB Mode Auto White Balance Mode White balance allows the camera to produce more accurate colors under different lighting conditions The Auto setting is Auto White Balance which automatically adjusts...

Page 18: ... Schedule and Light Sensor Wide IR Control Select the IR control mode to use The available options are Auto High Mid Low and OFF Tele IR Control Select the IR control mode to use The available options are Auto High Mid Low and OFF IR Cut Control Select the IR cut control mode to use The available options are Auto Force Day and Force Night Save Save button to apply the configurations click on this ...

Page 19: ...ile8 profile9 and profile10 S Press S for a particular weekday to set up a 24 hour schedule automatically Configure the scheduled time by holding down the mouse button and clicking the time block to enable the schedule settings on the selected time Profile Rename Rename the Profile of your choice Click the save button for the rename to take effect Profile Access Select the Save Profile to save cur...

Page 20: ... All Import Select the Import button to import the Profile Data of your choice all of the profiles Save Save button to apply the configurations click on this button once all the settings are confirmed for the new changes to take effect Exposure Cont ...

Page 21: ...quakes Sharpness Adjust Configures the sharpness of the image the range is 0 100 with 0 being the lowest sharpness Enter the values or adjust the bar to increase or decrease the values The default value is 50 Saturation Adjust Configures the color saturation of the image the range is 0 100 with 0 being the lowest saturation Enter the values or adjust the bar to increase or decrease the values The ...

Page 22: ...just Configures the overall hue of the image the range is 0 100 Increasing the value will adjust the image hue towards red Decreasing the value will adjust the image hue towards blue The default value is 50 Restore Settings to Defaults Discards all the settings applied to the image and reset to the default settings Default All Image Settings Discards all the settings applied to the image and rever...

Page 23: ...ROI zones that can be configured zone 1 zone 5 Switch to ON to enable ROI function The default is OFF 3 Set the image quality of the ROI in the Level drop down menu the options are Low Medium or High 4 Select the area to set the ROI by holding down the mouse button and drag to make a rectangular square release the button once the desired area is covered 5 Press the Set Area button for the setting ...

Page 24: ...one function The default is OFF 2 Select the area to set the privacy zone by holding down the mouse button and drag to make a rectangular square release the button once the desired area is covered 3 Press the Set Area button for the setting to take effect The masked area will be filled with black and the label Mask will be seen on the video stream 4 Press the Del Area button or select OFF to delet...

Page 25: ...ys the current date time Camera Name Displays the device name Camera Name Date Time Displays the device name and date time Custom Text A customized text can be specified here There are 4 content positions Top Left Top Right Bottom Left and Bottom Right to display the camera name current date time and text overlay Text Size There are three available options of the Text Size The available options ar...

Page 26: ...ateway primary and secondary DNS server address System Settings HTTP Port Configures the HTTP port number of the web configuration menu HTTPS Port Configures the HTTPS port number of the web configuration menu Hardware Address Unique MAC address for each camera device IPv6 Settings Enables or disables IPv6 function To manually input an IP address enable IPv6 and input the address prefix default ro...

Page 27: ...on RTMP Settings Enables or disables RTMP function Enter website link if necessary Link Speed Speed and Duplex The available options are Auto 100Mbps Full Duplex 100Mbps Half Duplex 10Mbps Full Duplex or 10Mbps Half Duplex Basic Cont ...

Page 28: ...s inserted You can access files in the SD card attached to the IP camera Password Specifies the FTP login password to access the IP camera Max Connection Specifies the maximum number of FTP connections the IP camera can support Save Save button to apply the configurations click on this button once all the settings are confirmed for the new changes to take effect ...

Page 29: ...ly Optional Support for http https Required Support for https only Certificate Select Certificate Install Method Provides options to install a new CA certification Save Save button to apply the configurations click on this button once all the settings are confirmed for the new changes to take effect ...

Page 30: ...tocols to enable 802 1x function The available protocols are EAP MD5 EAP TLS EAP TTLS or EAP PEAP After the protocol has been selected manually configure the username password and other required information Save Save button to apply the configurations click on this button once all the settings are confirmed for the new changes to take effect ...

Page 31: ...ap messages SNMP V3 Enables or disables SNMPv3 support User Configures the SNMPv3 username Authentication Mode Configures the Authentication mode The options are None MD5 andmSHA Privacy Configures encryption for SNMPv3 The options are DES and AES Trap Configuration Specifies the destination IP address to send SNMP trap messages Download MIB Download MIB file for SNMP Save Save button to apply the...

Page 32: ...p down menu to specify the type of filtering rule applied to the IP address entered Address1 to Address8 The IP address and associated protocol TCP UDP or None to filter can be entered here A total of 8 IP addresses can be added to the list Save Save button to apply the configurations click on this button once all the settings are confirmed for the new changes to take effect ...

Page 33: ...figuration Network LDAP LDAP Configurations Enable Enables or Disables the LDAP function Save Save button to apply the configurations click on this button once all the settings are confirmed for the new changes to take effect ...

Page 34: ...figuration Network DDNS DDNS Configurations Enable Enables or Disables the DDNS function Save Save button to apply the configurations click on this button once all the settings are confirmed for the new changes to take effect ...

Page 35: ...onfigures the port number for stream 1 to stream 3 The range is 554 1025 65535 Transfer Method The available options are Average or Real Time Stream 1 to Stream 3 Enables or disables RTSP unicast for stream 1 to stream 3 The RTSP port number and pathname for each stream can be configured here Default URL Path of Stream 1 to Stream 3 Stream 1 rtsp cameraIP stream1 Stream 2 rtsp cameraIP stream2 Str...

Page 36: ...stream to start multicast streaming without using RTCP Video IP Configures the multicast address to stream video Video Port Configures the port number of the video stream Audio IP Configures the multicast address to stream audio Audio Port Configures the port number of the audio stream Meta IP Configures the multicast address for the html meta Meta Port Configures the port number of the html meta ...

Page 37: ...address of the video stream TTL Configures the time to live threshold of the multicast datagram before it is discarded by the router Save Save button to apply the configurations click on this button once all the settings are confirmed for the new changes to take effect ...

Page 38: ...35 Chapter 2 Camera Configuration Network Bonjour Bonjour Configurations Enable Enables or Disables the Bonjour function ...

Page 39: ...36 Chapter 2 Camera Configuration Network Upnp Upnp Configurations Enable Enables or Disables the Upnp function ...

Page 40: ...rieval Manual Select this option to configure the NTP server address manually for date and time synchronization Sync with computer time Manually synchronize with the current computer date and time Manually setting Manually define the date and time The format is yyyy mm dd or hh mm ss Time Zone Setting Time Zone Select the time zone relevant to your location in the drop down menu Save Save button t...

Page 41: ...e To update the camera s firmware click on the Browse button and locate the firmware image file once the file is selected press the Upload button During update please do not disconnect the network cable reset or power off the IP camera as you may damage the device Reboot Camera Click this button to reboot the camera Reset to Default Click this button to restore all the camera s setting back to fac...

Page 42: ...e to the computer as a text file Backup Download Now Downloads the current camera settings to a backup file Restore Update and Restore Click on the Browse button and locate the backup file once the file is selected press the Update and Restore button to restore camera settings Video System Options to switch between NTSC or PAL video system The camera will restart and reset to default after switchi...

Page 43: ...or s authorization Re type Password Retype the same password to confirm User List Displays user accounts available on the camera Press New User to add a new account and set up the authorization level of this user from the following User Information Press Give Up to delete the new user if you do not want to set up continually To delete an account press the Delete User button ...

Page 44: ...trol read write over every configuration menu item Views Only has access read to the live view of the camera main screen User Name Username must be at least 1 and up to 16 characters Password Password must be at least 1 and up to 16 characters Re type Password Retype the same password to confirm Save Save button to apply the configurations click on this button once all the settings are confirmed f...

Page 45: ...ion allows users to set up a customized logo GIF JPG or PNG for main page The available options are Default or Customer Click on the Choose File button and choose the logo file once the file is selected press the Upload button to upload the logo Enter a website link if necessary ...

Page 46: ... holding down the mouse button and clicking the time block to enable the schedule settings on the selected time A light blue color on the time block indicates that the alarm schedule is enabled while a light grey color indicates that the alarm schedule is disabled Alternatively you can manually enter numbers to configure the hours and minutes from start to end for all weekdays Save Save button to ...

Page 47: ...yout to use for motion detection You can configure up to 5 zones The instructions below illustrate how to set up 5 zones 1 To create zone 1 on the live video screen select the area to set the zone by holding down the mouse button and drag to make a rectangular square release the button once the desired area is covered 2 Press the Set Area button in zone 1 to set this area as motion zone 1 3 Repeat...

Page 48: ...king the time block to enable the schedule settings on the selected time A light blue color on the time block indicates that the alarm schedule is enabled while a light grey color indicates that the alarm schedule is disabled Alternatively you can manually enter numbers to configure the hours and minutes from start to end for all weekdays Save Save button to apply the configurations click on this ...

Page 49: ...ttings automatically Configure the scheduled time by holding down the mouse button and clicking the time block to enable the schedule settings on the selected time A light blue color on the time block indicates that the alarm schedule is enabled while a light grey color indicates that the alarm schedule is disabled Alternatively you can manually enter numbers to configure the hours and minutes fro...

Page 50: ...r Threshold Configures the threshold of audio detected the range is 0 32768 with 0 being the lowest Enter the values or adjust the bar to increase or decrease the values The default value is 16107 Audio Volume Shows the volume of the audio detected Save Save button to apply the configurations click on this button once all the settings are confirmed for the new changes to take effect ...

Page 51: ... Loss Detection Network Loss Detection Configurations Enable Enables or disables network loss detection function Save Save button to apply the configurations click on this button once all the settings are confirmed for the new changes to take effect ...

Page 52: ... Object Detection Trigger Scheduled Remote Server Host Address Specifies the host name or IP address of the FTP server Port Specifies the port number of the FTP server Username Specifies the login username for the FTP server Password Specifies the login password for the FTP server Image Destination The available options are Single Folder or Sub Folder Save Save button to apply the configurations c...

Page 53: ...d the SMTP server address that the camera will connect to The options are Trigger Alarm Detection Trigger Motion Detection Trigger Tempering Detection Trigger Object Detection Trigger Audio Detection Message Specifies the message content Subject Specifies the subject of the message Attach JPEG Snapshot Enables or disables email delivery of trigger event snapshots Save Save button to apply the conf...

Page 54: ...mail server Port Number Specifies the port number of the SMTP mail server Username Specifies the login username for the SMTP mail server Password Specifies the login password for the SMTP mail server Specifies the SMTP server authentication mode the options are NO_AUTH SMTP_PLAIN LOGIN and TLS_TLS Receipient List Specifies the email address to send the email when an event is triggered by Alarm Mot...

Page 55: ...ect to The options are Enable Trigger Alarm Detection Enable Trigger Motion Detection Enable Trigger Tampering Detection Enable Object Detection Enable Audio Detection Enable Trigger Scheduled Receipient List Network Storage Status Displays the current connection status with the network storage server not_mounted or ok Network Address Specifies the IP address of the network storage server Share Sp...

Page 56: ...er All the video recordings or snapshots from event triggers will be uploaded to the network storage server After the setting is complete the Network Storage Status field will display ok Remove Delete the previous setting or set up a new one After the setting is removed the Network Storage Status field will display not_mounted Save Save button to apply the configurations click on this button once ...

Page 57: ...rm out will be triggered Trigger Motion Detection When a motion detection event is detected the Alarm out will be triggered Trigger Tampering Detection When a tampering alarm event is detected the Alarm out will be triggered Trigger Object Detection When an object detection event is detected the Alarm out will be triggered Trigger Audio Detection When an audio detection event is detected the Alarm...

Page 58: ...ection Enable Trigger Network Loss Detection Enable Trigger Scheduled Available If an SD card is installed this section will display information on the availability of the SD card Usage If an SD card is installed this section will display the percentage of the total storage used Format SD Card Formats the SD card all data stored on the SD card will be erased if this option is used Status Displays ...

Page 59: ... 2 Camera Configuration Overwrite Enables or disables SD card overwrite Record Type Configures the recording method to record the stream on to the SD card The options are Video or Snapshot SD Record Handler Cont ...

Page 60: ...n When a signal is detected from Alarm in the Alarm out will be triggered Trigger Motion Detection When a motion detection event is detected the Alarm out will be triggered Trigger Motion Zone 1 5 Detection When a motion event detection in a specified zone is detected the Alarm out will be triggered ...

Page 61: ...ing is detected from Alarm in the Alarm out will be triggered Trigger Object Detection When an object detection event is detected the Alarm out will be triggered Trigger AudioZone 1 5 Detection When an audio detection is detected the Alarm out will be triggered TCP Notify Cont ...

Page 62: ...ssing Zone Object Counting Zone Intrusion Loitering and Object Left Removed Object Counting Counts objects Detect mode options that available are One way or Two way Line Crossing Detects objects that cross a virtual line Detect mode options that available are One way or Two way Zone Object Counting Counts objects that move into a user specified area Detect mode options that available are Inside or...

Page 63: ... specified area beyond a specified time Left click and drag to set a specified area Right click and drag to erase a specified area The range of sensitivity is 0 100 Loitering time is the amount of time an object must be in the area to trigger the event The minimum loitering time range is 1 100 sec Wrong way Continuously monitors a specified area to detect objects that is going on the wrong way The...

Page 64: ...nt Object Left Continuously monitors a specified area to detect objects that have been left The range of sensitivity is 0 100 Object Removed Continuously monitors a specified area to detect objects that have been removed The range of sensitivity is 0 100 ...

Page 65: ...king the time block to enable the schedule settings on the selected time A light blue color on the time block indicates that the alarm schedule is enabled while a light grey color indicates that the alarm schedule is disabled Alternatively you can manually enter numbers to configure the hours and minutes from start to end for all weekdays Save Save button to apply the configurations click on this ...

Page 66: ...um Width Configures the maximum width of the detection area Adjust the bar to increase or decrease the maximum width of the detection area Maximum Height Configures the maximum height of the detection area Adjust the bar to increase or decrease the maximum height of the detection area Sensitivity Configures the sensitivity of the detection area with the value of 0 255 Background Weight Configures ...

Page 67: ...ables or disables Push HTTP Message to this camera Host Address To manually input the host address Push Type Configures the push type of Push HTTP Message to this camera Push Type options are Event and Period Accumulation Enables or disables the accumulation of Push HTTP Message to this camera ...

Reviews: