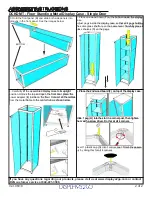
3. Hold the front panel (B) and slide both side panels into
grooves in the front panel. See the images below:
4. Carefully lift the assembled display case to its upright
position. Unlock the top and open the front door, place the
power adapter (E) inside on the floor. Connect all the cables
from the metal frame to the center hub as shown below.
5. Place one wood board (F) at the bottom inside the display
case.
Adjust pegs inside the display case so that all 4 pegs holding
the same glass shelf are on the same level. Carefully place 4
glass shelves (D) on the pegs.
6. Place the 2nd wood board (F) on top of the display case.
6. Place the 2nd wood board (F) on top of the display case.
BOTTOM
Insert 1 plastic cap (G) into 1 corner post. Finish the assem-
bly by doing this for all 4 corners.
Slide 1 peg (H) into the slot in a corner post, then tighten
them with a screw driver. Do this at all 4 corners.
Slide 1 peg (H) into the slot in a corner post, then tighten
them with a screw driver. Do this at all 4 corners.
Ver. 08/18
If you have any questions regarding our products, please visit us at www.displays2go.com or contact
D2G customer service at 844-221-3388.
2 of 2
DCKDMT - Floor Standing Metal Display Case - Single Door


