


BasiC Controls
Ω
or
≈
button
Rotate blocks clockwise
ç
or
√
button
Rotate blocks counter-clockwise
≤
on the directional
buttons
Drop block faster
∫
or
ñ
on the
directional buttons
Move block either left or right
÷
Pause Screen
To change the basic control configuration, go to the
Options Menu and choose Button Configuration.
starting Up
Set up your PlayStation
®
2 computer entertainment
system according to the instructions supplied with your
system. Check that the system is turned on (the on/standby
indicator is green). Press the OPEN button to open the disc
cover. Place the
Lumines Plus
disc with the label side facing
up in the disc holder, and then close the disc cover. Attach
game controllers and other peripherals as appropriate.
Follow the on-screen instructions and refer to this manual
for information on using the software.
Memory Card (8MB)(for playstation®2)
To save game settings and progress, insert a memory
card (8MB)(for PlayStation
®
2) into MEMORY CARD slot 1
of your PlayStation
®
2 system. You can load saved game
data from the same memory card or any memory card
(8MB)(for PlayStation
®
2) containing previously saved
games. For
Lumines Plus
, the maximum number of save
files is 10 for each memory card.
getting started
Electronic Template: Interior Manual Page, Version 6.0
(DOC-000564)
For illustration purpose only. Use electronic template for specifications.
Do not alter, change or move items in template unless specifically noted to do so.
NOTE: Turn off “Notes” and “Measurements” layers when printing.
File name: PS2InteriorManualPages.eps
Rev 11/03
Rev 12/05
1/8" BLEED ZONE
1/16" SAFETY ZONE
4.5"
9.0"
4.5"
7.1875"
button
button
button
button
directional
buttons
left analog stick
(L3 button
when pushed down)
SELECT button
ANALOG mode button
START button
right analog stick
(R3 button
when pushed down)
L2 button
L1 button
R2 button
R1 button
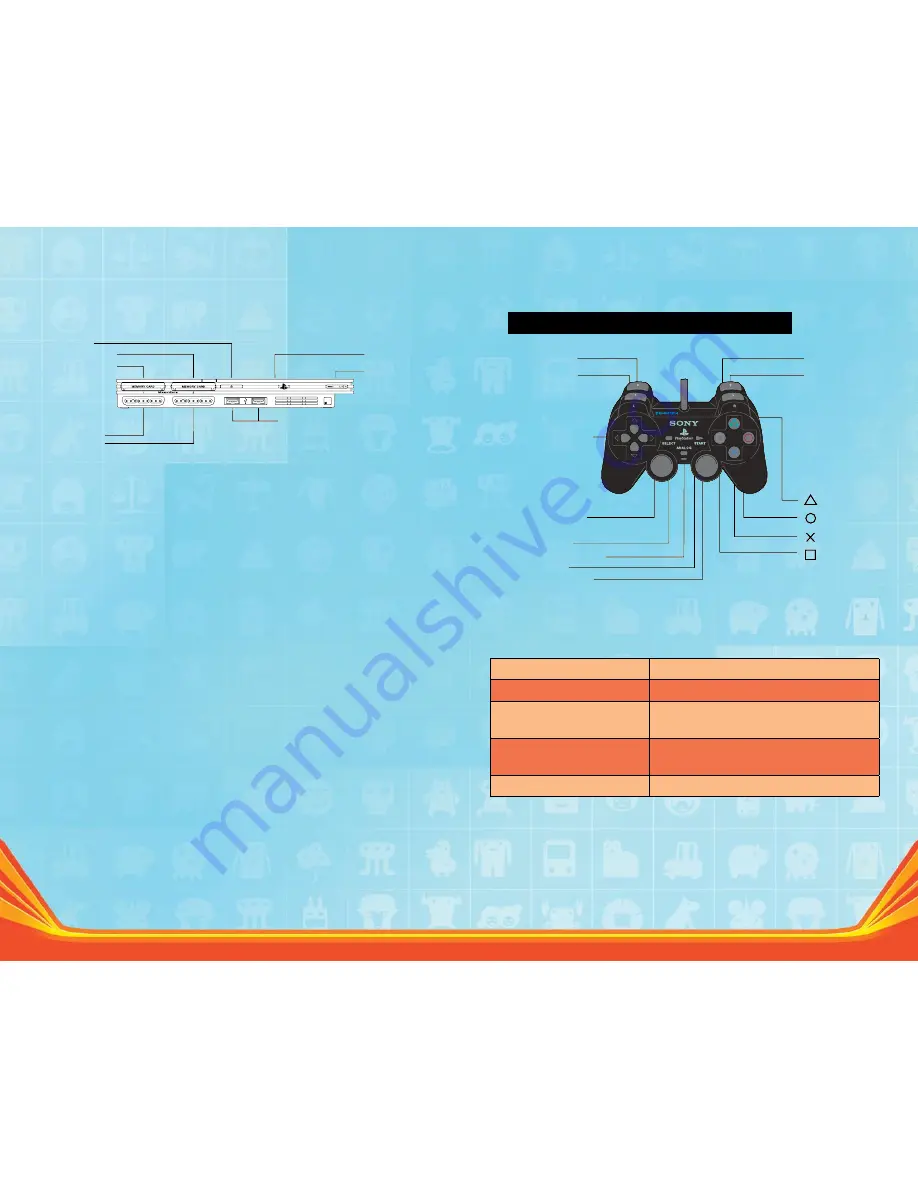
DUALSHOCK
®
2 ANALOG CONTROLLER CONFIGURATIONS
Set up your PlayStation
®
2 computer entertainment system according to the
instructions in its Instruction Manual. Make sure the MAIN POWER switch
(located on the back of the console) is turned ON. Press the RESET button. When
the power indicator lights up, press the OPEN button and the disc tray will
open. Place the (SOFTWARE TITLE HERE) disc on the disc tray with the label
side facing up. Press the OPEN button again and the disc tray will close.
Attach game controllers and other peripherals, as appropriate. Follow on-
screen instructions and refer to this manual for information on using the
software.
GETTING STARTED
*
STARTING UP
open button
on/standby/
reset button
IR receiver
USB connectors
disc cover
controller port 1
controller port 2
memory card slot 1
memory card slot 2
Electronic Template: Interior Manual Page, Version 6.0
(DOC-000564)
For illustration purpose only. Use electronic template for specifications.
Do not alter, change or move items in template unless specifically noted to do so.
NOTE: Turn off “Notes” and “Measurements” layers when printing.
File name: PS2InteriorManualPages.eps
Rev 11/03
Rev 12/05
1/8" BLEED ZONE
1/16" SAFETY ZONE
4.5"
9.0"
4.5"
7.1875"
button
button
button
button
directional
buttons
left analog stick
(L3 button
when pushed down)
SELECT button
ANALOG mode button
START button
right analog stick
(R3 button
when pushed down)
L2 button
L1 button
R2 button
R1 button
DUALSHOCK
®
2 ANALOG CONTROLLER CONFIGURATIONS
Set up your PlayStation
®
2 computer entertainment system according to the
instructions in its Instruction Manual. Make sure the MAIN POWER switch
(located on the back of the console) is turned ON. Press the RESET button. When
the power indicator lights up, press the OPEN button and the disc tray will
open. Place the (SOFTWARE TITLE HERE) disc on the disc tray with the label
side facing up. Press the OPEN button again and the disc tray will close.
Attach game controllers and other peripherals, as appropriate. Follow on-
screen instructions and refer to this manual for information on using the
software.
GETTING STARTED
*
STARTING UP
open button
on/standby/
reset button
IR receiver
USB connectors
disc cover
controller port 1
controller port 2
memory card slot 1
memory card slot 2
02
03
Summary of Contents for Puzzle Fusion: Lumines Plus for PlayStation 2
Page 1: ...N0565...