background image

Connecting the Battery

1.

  Connect the red connector from the battery to the red connector from  

  the pedal.
 

Note:

 The connectors from the gear box to the pedal is connected at  

  the factory.

connector 

from pedal

fuse

battery

connector 

from battery

1

9

Summary of Contents for Princess Scooter KT1003TG

Page 1: ...may vary Made in China The owner s manual contains assembly use and maintenance instructions The Disney Princess Scooter must be assembled by an adult who has read and understands the instructions in...

Page 2: ...Scooter your child will have fun and enjoyment for years to come Features on the vehicle include lights and melodies forward reverse and a rechargeable battery Please call us at Kid Trax Toys Consume...

Page 3: ...he Drive Wheel 6 Attach the Left Rear Wheel 7 Attach the Rearview Mirrors 8 Attach the Handlebar 8 Connecting the Wires 9 Gear Box Connection 9 Attaching the Seat 10 Charging the Battery 12 Battery Re...

Page 4: ...part near a moving part or wear loose clothing while using the vehicle Always wear shoes when using the vehicle Using the vehicle near streets motor vehicles drop offs such as steps water swimming poo...

Page 5: ...ld and anyone who may ride the Quad An adult must always supervise a child that is riding the Quad Children under 3 years should not be allowed to use the vehicle Always sit in the seat when using the...

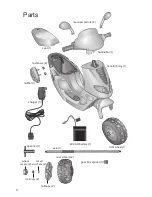
Page 6: ...wheel 1 seat 1 charger 1 spanner 1 6V 4AH battery 1 rear wheels 2 handlebar 1 hubcaps 2 axle 1 Scooter body 1 wheel covers 2 locknuts 2 small washers 2 gear box spacer 1 rearview mirrors 2 muffler 1 f...

Page 7: ...into the fork until the locking tabs engage into the fork holes on both sides of the wheel 3 Be sure the front wheel is locked into the fork 4 Push the splash guard tabs into the bushing slots on both...

Page 8: ...through the Scooter body axle holes Note The left side of the axle is the end that has the wielded spacer Attach the Muffler 1 Turn the Scooter body over 2 Align the two muffler screws with the two ho...

Page 9: ...Place the locknut on the axle and firmly tighten with the spanner 5 Line up the wheel cover tabs with the hubcap slots Press the wheel cover onto the hubcap Attach the Drive Wheel 6 spanner hubcap dr...

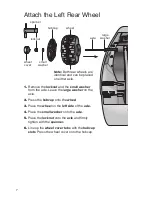
Page 10: ...Remove the locknut and the small washer from the axle Leave the large washer on the axle 2 Press the hubcap onto the wheel 3 Place the wheel on the left side of the axle 4 Place the small washer onto...

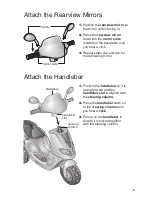
Page 11: ...eat steps one and two for the remaining mirror Attach the Handlebar 1 Position the handlebar so it is facing forward and the handlebar slot is aligned with the steering column 2 Press the handlebar do...

Page 12: ...1 Connect the red connector from the battery to the red connector from the pedal Note The connectors from the gear box to the pedal is connected at the factory connector from pedal fuse battery conne...

Page 13: ...ing the Seat 1 Align the seat tab with the seat slot 2 Lower the seat into place Be sure that it is properly positioned 3 Turn the locking screw clockwise until the lock is engaged 10 seat tab seat sl...

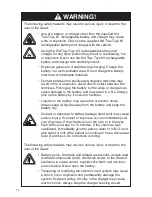
Page 14: ...shock Always keep all liquids away from the battery and keep the battery dry Contact or exposure to battery leakage lead acid may cause serious injury If contact or exposure occurs immediately call yo...

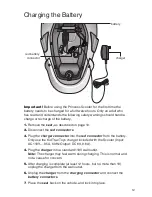
Page 15: ...the red connector from the battery Only use the Kid Trax Toys charger included with the Scooter Input AC 118V 0 5A 60Hz Output DC 6V 0 6A 4 Plug the charger into a standard 118V wall outlet Note The...

Page 16: ...age to the battery and void the warranty Battery Storage Do not leave the battery connected in the vehicle for long period of times while not being used This may drain the battery completely and cause...

Page 17: ...d dispose the battery 1 Remove the Scooter seat as described on page 10 2 Disconnect the red battery connectors 3 Loosen the battery strap holding the battery in 4 Carefully lift the battery Depending...

Page 18: ...r of the Princess Scooter Contact or exposure to battery leakage lead acid may cause personal injury If contact or exposure occurs immediately call your physician If the chemical is on the skin or in...

Page 19: ...and evenly distributed 2 Press the Forward Reverse Stop switch to the desired action 3 Press on the foot pedal to move the scooter 4 To stop movement release pressure on the foot pedal Sound Press the...

Page 20: ...n plastic or nylon parts No lubrication is required Store the vehicle indoors or cover it with a tarp to protect it from the wet weather Keep it away from sources of heat such as stoves and heaters Cl...

Page 21: ...fuse has tripped Reset fuse see Maintenance General Wheel nuts are loose Tighten wheel nuts see Maintenance General Battery connector or wires are loose Check that the battery connectors are firmly p...

Page 22: ...und and firm surfaces see User Requirements and Safety Warnings Vehicle needs a push to go forward Poor contact of wires or connectors Check that battery connectors are firmly plugged into each other...

Page 23: ...list of available replacement parts Wheels Wheel covers Hardware bag for wheel assembly Hardware bag for steering assembly Seat 6 volt battery Charger 20 Problem Possible Cause Remedy 6V Battery will...

Page 24: ...required and shipping charges are the responsibility of the consumer Warranty Limitations This warranty does not include damages which arise from accident misuse abuse neglect or other causes not aris...

Page 25: ...nty Some states do not allow limitations as the exclusion or limitation of incidental or consequential damages so the above limitation may not apply to you This warranty gives you specific legal right...

Page 26: ...y questions or comments please contact us at In U S A 2010 Pacific Cycle Inc 4902 Hammersly Rd Madison WI 53711 Customer Service 877 741 6154 customerservice kidtraxtoys com www kidtraxtoys com Contac...

Reviews: