TherMiser TME operation
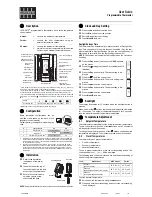
To ensure you follow the instructions correctly, please refer to the diagram below to familiarise yourself
with the layout and meaning of each of the on-screen icons.
1. Time and time interval setting
2. Advanced settings
Press the time key to scroll between hour/minute/day
of the week.
In each mode press the or to adjust the time
(24hr) & day (1-7). Note: Mon = 1, Sun = 7.
The time and day will now be set.
Press so that the screen is off
Then press and hold + together. The unit enters the
menu at Status 1: “SEN” and in Function 00 (flashing).
To adjust the settings press or
To move through menu Items 1-7 press the button.
See the menu below
To prevent tampering and adjustment of the TherMiser unit, unit, press for 5
seconds appears. To unlock, press for 5 seconds flashes then disappears.
Manual Override . Press or to override current target temp. appears
and if heat required. Automatically resets to program mode at next time interval.
Press and hold for 5 seconds; screen displays ‘loop’
(programming mode) then:
A. press screen displays “12345”
B. (up) Once Screen displays “123456”
C. (up) twice Screen displays “1234567”
NOTE: In any of the above modes press to select the time
interval setting and target temperature; see 1.3.
Press again to enter the 1st time period/temperature setting
(Good morning) factory default is (06:30 and 22°C).
Press again and the ON time hour starts flashing
(default: 06:30), press or to adjust the hour.
Press again and the ON time minute starts flashing
(default: 06:30), press or to adjust the min.
Press again and the target temp starts flashing
(default: 22°C), press or to set target temp.
Press again to enter into the 2nd time period/temperature
setting (leave for school/work) repeat the steps above
to set, or
Press again to enter into 3rd time period/temperature
setting and repeat as above.
Repeat through all of the remaining periods.
1.1
SETTInG THE TIME (FACToRy DEFAULT (00:00)
1.2
TIME InTERVAL AnD TEMERATURE AUTo ConTRoL SETTInGS
1.3
SETTInG THE on/oFF TIME AnD TEMPERATURE
Menu
no
Icon
FuncTIon
oPTIonS
FAcToRY
SeTTInG
1
SEN
Controls sensor inputs
00: Built-in temp sensor only
01: External temp sensor only
02: Built in temp and External
Skirting Temp Sensor
Note: If no external sensor fitted,
“ERR” message displays, unit will
not function
00
2
OSV
Upper limit
of external/
ThermaSkirt sensing
temp,
5~99°C
42°C
3
DIF
Differential
hysteresis between
off and on again of
external temp.
1~9°C
2°C
4
SFH
Room temperature
upper limit
5~99°C
35°C
5
SVL
Room temperature
lower limit
5~99°C
5°C
6
ADJ
Calibrates tem of unit to
the room, compensating
for external factors.
-5~+5°
0°C
7
FRE
Frost protection
00: Frost protection OFF
01: Frost protection ON. 5°C
00
8
PON
Power on memory
00: Auto memory, no power
01: NO power = no memory
00
9
FAC
Factory reset
Adjust using until“00”
then press to restore
factory settings
00
2.1
EnTERInG InTo ADVAnCED SETTInGS MEnU*
2.2
LoCK SCREEn/MEnU
2.3
LoCK SCREEn/MEnU
*
These are advanced settings and should be adjusted with caution.


