G
H
I
J
04
01
08
22
K
1”
1 1/4”
1 3/4”
3 1/2”
06
A
B
C
D
E
F
14
02
16
4”
10
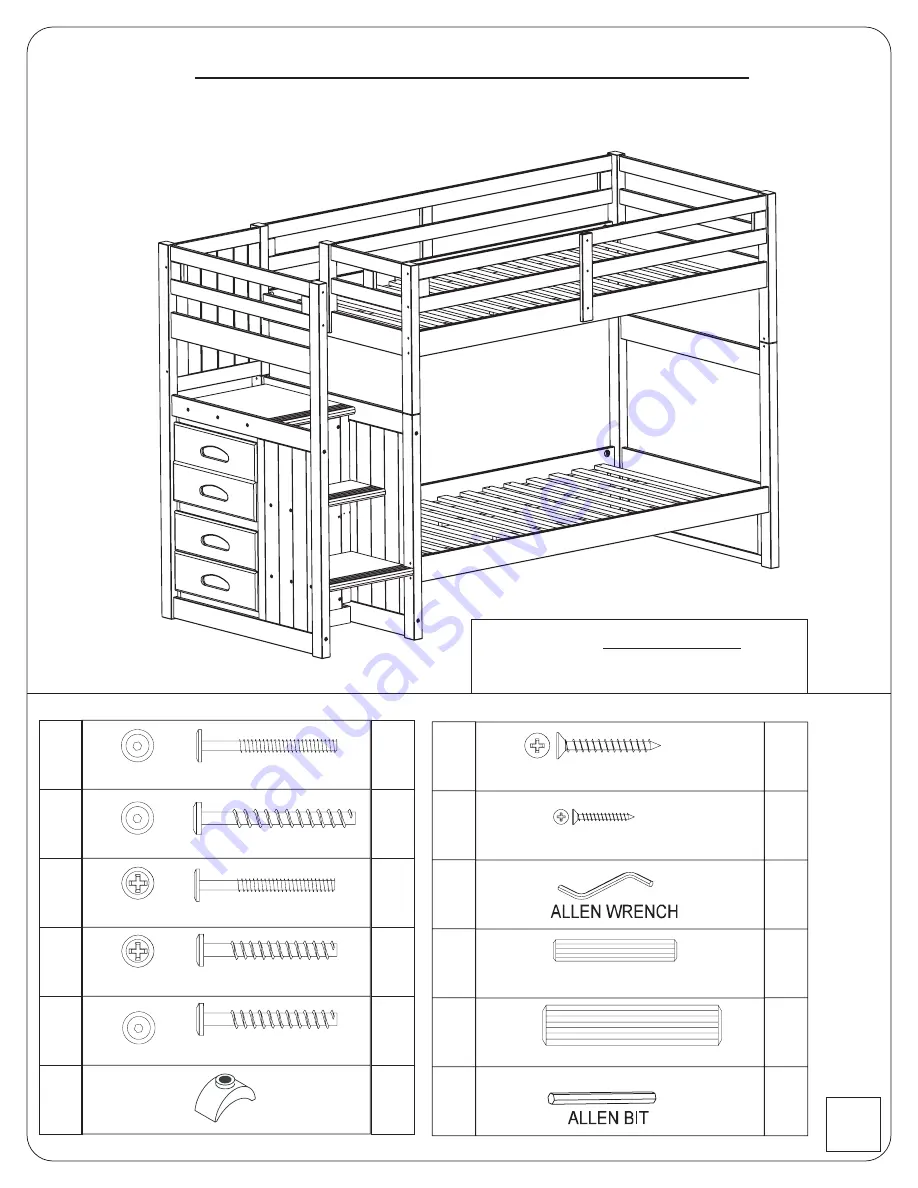
Stair Stepper Bed Left Side Facing
*For Right side facing go to page 10
L
Tool required
Number 3 Phillips screw driver
Page
Page 1: ...hat the guardrail ladder and other components are in their proper position free from damage and that all connectors are tight 7 Do not allow horseplay on or under the bed and prohibit jumping on the bed 8 Always use the ladder for entering and leaving the upper bunk 9 Do not use substitute parts Contact the manufacturer or dealer for replacement parts 10 Use of a nightlight may provide added safet...
Page 2: ...08 22 K 1 1 1 4 1 3 4 3 1 2 06 A B C D E F 14 04 02 16 3 1 2 4 02 3 1 2 3 1 2 10 3 1 2 Stair Stepper Bed Left Side Facing For Right side facing go to page 10 L 01 Tool required Number 3 Phillips screw driver 01 Page ...
Page 3: ...02 01 03 08 08 05 04 04 06 06 07 07 07 18 09 10 11 12 13 14 15 16 17 05 J 04 04 05 05 J J J J J J No dowel on this side Top bed rails No dowel on this side Bottom bed rails 02 Page ...
Page 4: ...Important note If you want the Stair on the right side please go to page 10 B B B B REMINDER 3 Back post Front post B 10 09 14 B B B Install tall posts Back Check stamp under the post Front Tall posts located in rail box 3 Check stamp under the post 03 Page ...
Page 5: ...4 B B B B 5 A A A A F F F F F F F F C C C C K K K K 12 Phillips head screw use screw driver 04 Page ...
Page 6: ...6 7 02 03 05 05 A A A A A A A A F F F F F F F F A A F F No dowel on this side 05 Page ...
Page 7: ...8 9 G G G G G G 08 08 E E E E E E E E G G G G G G Setup Top Bed Install Slat kit Always start assembling slat kit flush with cleat 06 Page ...
Page 8: ...10 11 H H H H H H H H Drop Top Bed in Place 07 Page ...
Page 9: ...12 G G G G D D E E 13 Install Back Panel Use Phillips head screw on this side Mount magazine rack 08 Page 13 ...
Page 10: ...14 Shown With Optional Full Extension Kit 15 Install Bottom Slat Kit G G G G G G OPTIONAL Pre Assembled 3 Drawer Unit Simply Slide Under The Bunk 09 Page ...
Page 11: ...To Install stair case on the right side follow these steps Remove shipping block Remove both post and transfer it to this side Install tall post B B B B B B B Remove Drawers 14 12 10 B B B B Page ...
Page 12: ...Remove Magazine Rack Slide Chest out Turn chest around and slide it back in Slide Drawers back in 11 Page ...
Page 13: ...nstall Slat kit and guard rail support Insert Magazine Rack back in and screw it in place Make sure that the opening is on the right side as shown G G G G G G G G G G G G Always start assembling slat kit flush with cleat 12 Page ...