consult a sleep professional for the desired
change in air pressure.
2.
Humidifier: begin with highest humidification
level.
3.
Set the air flow parameters for your PAP
machine as recommended by a sleep
technician or other sleep professional.
Very important: lower maximal air pressure as
suggested in paragraph 1.
If possible choose mask setting type to: oral,
intra oral or full face mask.
If available, cancel air pressure resistance
control or if not possible set it to the minimal
resistance.
4.
At first, activate the humidifier at its highest
level. After a few hours you may gradually
change humidification levels to best suit your
needs.
5.
You may adjust the Straps as needed until the
mask is comfortably positioned (centered to the
lips). Do not fasten the straps tightly because
it will create air leaks and it is not required.
6.
You may experience more salivation when you
start using the SomnuSeal but the amount will
decrease when you get used to it. You may also
see more salivation when you sit up. Salivation
will decrease drastically when you lie down.
Before going to sleep
1. Make sure the humidifier is full of water and turn
it on five minutes before you start using the
SomnuSeal™.
2. Activate the PAP machine after making sure its
tube is properly connected.
3. Connect the SomnuSeal Air Vent to the PAP
machine’s tube.
4. Connect the Strap Connector to the main Body
of the mask by pushing the Connector towards
the main Body and turning it until you hear a soft
click. Make sure that the “up” marking on the
strap connector is placed upwards.
NOTE: There is only one correct way to connect
the two pieces - the protruding triangle on the
mask’s Body must align with the socket in the
Strap Connector.
5. Attach the Strap Connector to the SomnuSeal
Air Vent, (by now the SomnuSeal air vent should
already be connected to the PAP machine’s
tube) by pushing the SomnuSeal Air Vent
towards the Strap Connector and turning it.
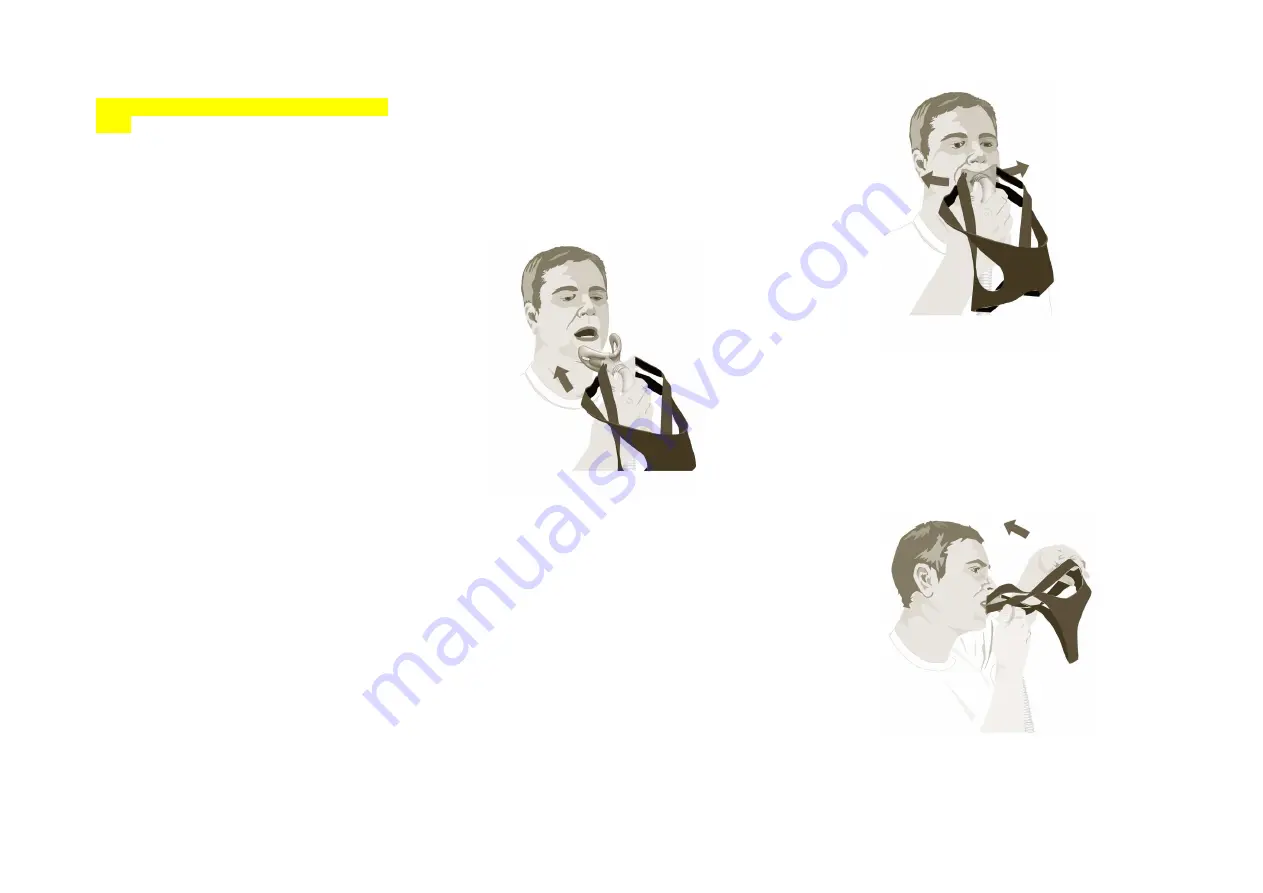
6. Lie down where you intend to sleep and place
the Body of the mask in your mouth between
your teeth and lips (in front of the teeth).
NOTE: The arrow pointing up, which you can
see on the inner part of the mask, indicates the
mask’s top part. Also make sure that the “up”
marking on the strap connector is also placed
upwards. Make sure they are positioned
correctly before you insert the mask into your
mouth.
7. The mask will easily adjust itself to your mouth
structure. Simply move it slightly left and right
with your lips or with a hand holding the mask.
8. Place the straps as shown in the following
figures. It is recommended that the part that
should encompass the nape will be moved first.
Fasten the straps lightly until the main Body of
the mask is centered to your lips and no part of
the straps pulls more tightly than the others.
If air leaks from your lips during use, be sure that
the main Body of the mask is placed in the
center of your mouth.
Please note that in low air pressures the straps
are used to stabilize the mask in contrast to
traditional masks that use the straps to create a
seal and therefore are tightened forcefully.
CIRCLIFE


