background image


Rev. 111005.1


Page 25


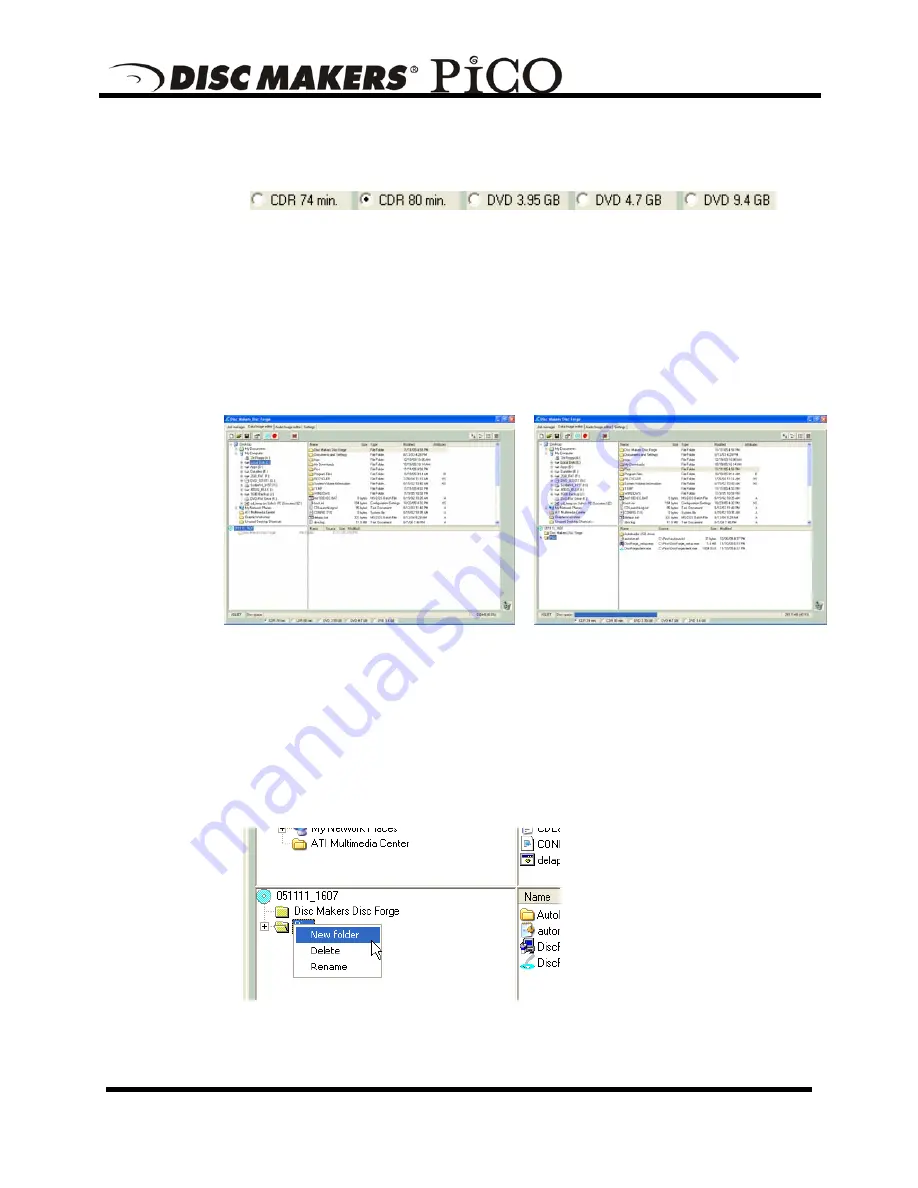
Selecting Disc Capacity 

Along the bottom of the lower panes is a series of radio button options that 
are used to select the capacity of the disc you are creating  


Click

 the radio button corresponding to the capacity of the discs loaded 

into the Pico. 

Adding Files and Folders 


Click

 the desired file or folder in the top left or right pane (source) and 

hold down the mouse button. 

  Drag the file or folder over the disc icon in the lower left pane 

(fig. 1)


and release the mouse button. 


(fig. 1)


(fig. 2)


  The files in the lower right pane represent the contents of the disc being 

created 

(fig. 2)

Creating, renaming, and removing Folders 

• 

In the bottom left pane, first 

click

 at the point you wish to insert a 

folder, or on the folder to be renamed or removed, then 

Right-Click

 on it 

and select the desired operation. 


You can also delete content by: 

Summary of Contents for Pico MAC

Page 1: ...User s Guide Rev 111005 1...

Page 2: ...malfunctions caused by misuse negligence accident or alteration nor is Disc Makers Inc responsible for consequential damages related to the use of this equipment This warranty is made in lieu of any o...

Page 3: ...MAKING COPIES 15 STARTING THE DISC FORGE APPLICATION 15 THE DISC FORGE APPLICATION 18 STARTING THE DISC FORGE APPLICATION 18 DISC FORGE APPLICATION LAYOUT 20 Reviewing and changing the settings 20 Se...

Page 4: ...ND REMOVING SUBINDEXES 36 SAVING THE CURRENT AUDIO DISC IMAGE 37 To create a physical audio disc image file IMG 37 LOADING AN EXISTING SCRIPT FILE 38 JOB MANAGER TAB 39 THE PRODUCTION PROCESS 40 CREAT...

Page 5: ...Your Disc Makers Pico duplication system is professionally designed and manufactured to give you years of trouble free operation To avoid accidental damage to your new duplication system please read...

Page 6: ...USB 2 interface cable Disc Forge software Pico Manual CD What you will also need Compatible host PC High quality CD or DVD media Recommended PC requirements Client PCs should meet or exceed these mini...

Page 7: ...5 and 75 degrees Fahrenheit or between 18 and 23 degrees Celsius Place the Pico on a solid steady work surface and allow sufficient room for all incidental work materials Provide at least three inches...

Page 8: ...size posts large and small Place the pillars with similar posts diagonally across from each other into the corresponding holes Installing input bin The input and output bins serve as the containers t...

Page 9: ...o desired media type Front View 1 Robotic Arm 2 Status indicator Green Ready Yellow Burning Red Error 3 Output Bin 4 CD DVD Burner 5 Input Bin 6 Rejects Pico discards rejects over the top of 3 Output...

Page 10: ...er cable to the power supply Then connect the power cord from the power supply to the wall outlet C A U T I O N Always use properly grounded receptacles or severe damage to your system may result The...

Page 11: ...le on the Pico Installation CD Select the file x Autoloader USB driver AutoLoader Inf where x is the drive letter of the disc drive in which you have put the Install CD After the driver installation i...

Page 12: ...u remove the old version first To install Disc Forge software Insert the Pico software CD into one of the drives on the Pico drive tower Click on Start Run In the Open text box type D DiscForge_setup...

Page 13: ...5 1 Page 12 Click NEXT to continue If you accept the terms of the license agreement select I accept then click NEXT to continue Click NEXT to continue or CHANGE to install to a location other than the...

Page 14: ...Rev 111005 1 Page 13 Click INSTALL to continue Please wait while the Pico software is copied to your hard drive...

Page 15: ...Rev 111005 1 Page 14 Installation is complete Click FINISH...

Page 16: ...ge Icon The Disc Forge application screen will now be displayed Place some blank CDs or DVDs into the input bin followed by the master CD or DVD you wish to copy If the master is a DVD you must use DV...

Page 17: ...then click NEXT You will now be prompted Enter the desired number of copies in the Quantity box When you satisfied with your selections click NEXT Use the default Job Name or enter your own such as a...

Page 18: ...e Job Manager TAB will now show the status of the job you just started The Pico will now load the master disc into the drive Once read in successfully it will accept the master disc to the output bin...

Page 19: ...follows From the desktop of the computer click the Disc Forge icon The Disc Forge application screen will now be displayed When first started you are in standard Standard mode is best suited for thos...

Page 20: ...Rev 111005 1 Page 19 Click on and three new TABs will be revealed You may toggle between these modes simply by enabling and disabling the Advanced Authoring Tools...

Page 21: ...s Tabs Job Manager This is where jobs are started The status of all jobs pending in progress and completed are displayed here Data Image Editor On this TAB you can pre master a data CD or DVD as well...

Page 22: ...the following screen will be displayed Application Temp Folder To choose an application temp folder click the Browse button to the right of the Application TEMP folder field This folder is a temporar...

Page 23: ...To choose a default folder for your jobs click the Browse button to the right of the Saved Jobs default folder field A job is simply When creating a new job this will be the default folder that the P...

Page 24: ...ats Creating a data disc image To create a data disc image Click the Data Image Editor tab The screen will now read The Data Image Editor tab is divided into four panes The top left pane lists all of...

Page 25: ...real image files CD Image properties Allows you change some of the disc properties such as volume label publisher data preparer as well as the desired file system Create CD image ISO Creates a real di...

Page 26: ...folder in the top left or right pane source and hold down the mouse button Drag the file or folder over the disc icon in the lower left pane fig 1 and release the mouse button fig 1 fig 2 The files in...

Page 27: ...image is created A finished disc created from dynamic content will contain the files and folders that exist in specified locations at the time the job is submitted for recording rather than when the d...

Page 28: ...producing unique or projects with dynamic content and when the source data will always be available to the Pico A physical image file ISO for CD UDF for DVD is an exact replica of the final disc and c...

Page 29: ...enter the name of the publisher Data Preparer Optionally enter the name of the person who prepared the disc Copyright File Optionally enter the file name that provides copyright information about the...

Page 30: ...ry where you want to save the physical image file Enter the name for the physical image file and click the Save button Loading An Existing Script File Once a data disc image script file has been saved...

Page 31: ...Image Editor tab is divided into four panes The top left pane lists all the names and icons of the disk drives available to the Pico as well as files and folders on the currently selected disk drive...

Page 32: ...t Audio CD layout to an image script file ISC CD Image properties Unlike with data discs the properties button audio discs allows you to optionally change only the disc s UPC code Create CD image Crea...

Page 33: ...s SHIFT allows you to select a range of contiguous tracks while CTRL allows you to selectively pick multiple tracks As additional tracks are added drag and drop them in at the desired insertion point...

Page 34: ...The INTERNATIONAL STANDARD RECORDING CODE ISRC is an optional 12 character descriptor that identifies a specific track on an audio CD Each track can have its own unique ISRC consisting of 2 alphanumer...

Page 35: ...e ISRC line and click the OK button Valid codes start with two letter country code followed by ten digits To change a Copy Prohibit flag Right click the desired audio track in the lower left pane and...

Page 36: ...ence indicator you wish to edit in the lower left pane and select Edit Click the up and down indicators to increase or decrease the duration of the silence minutes seconds frames Click the OK button T...

Page 37: ...insert subindexes in a track Click on the desired track to highlight it then right click subindex 01 in the subindex column and then click the Insert button The screen will now read Click the up and...

Page 38: ...n ISC extension Image Scripts may be easily edited later while physical images cannot and must be regenerated To save an audio disc image script file Click the Save button on the toolbar The screen wi...

Page 39: ...button Loading An Existing Script File Once a data disc image script file has been saved it can be modified at a later date To load an existing script file Click the Load CD layout ISC button on the...

Page 40: ...ted discs their assigned priority as well as the names of their associated disc image and label files The middle pane is the ACTIVE JOBS window that lists all the jobs currently in process by Pico Inf...

Page 41: ...co will then advance to the next job in the queue according to its priority Note Any rejected discs have failed to record properly and should not be used Creating a job In order to produce copies you...

Page 42: ...pleted Test When checked the discs in the submitted job will not be recorded Archive Read in When checked an existing disc is saved to the hard drive as a physical image file for later recording Relay...

Page 43: ...l not need to copy this master again you can read copy in one step by starting a COPY job and selecting MASTER DISC as described in the next section 1 Select the Archive only button as seen in fig 1 2...

Page 44: ...Rev 111005 1 Page 43 Next 4 The Job parameters will then be displayed Give your job a name and select a priority 5 Click Finish and the Pico will run the job fig 3 fig 4...

Page 45: ...aster and copy the contents to as many discs as are indicated in the quantity box If the Pico detects another master during the copy process the Pico will reject the additional master You may also sel...

Page 46: ...Rev 111005 1 Page 45 select a priority 8 Click Finish and the Pico will run the job fig 4...

Page 47: ...result will be copies of each master placed in to the input bin s 1 Select the Relay mode job button as seen in fig 1 2 Click Next 3 Select the Operations and options for the relay mode job 4 Click N...

Page 48: ...Rev 111005 1 Page 47 7 The Job parameters will then be displayed Give your job a name and select a priority 8 Click Finish and the Pico will run the job...

Page 49: ...100 Base T network supporting Microsoft TCP IP protocol Installing the client software The Disc Forge network client a file named DiscForgeclient exe was copied to your hard drive during installation...

Page 50: ...n and available on the network The client software will NOT work unless the Pico is running as it functions as job server If you copied the client software to your desktop click on the DiscForgeclient...

Reviews: