background image

19

Reboot interface

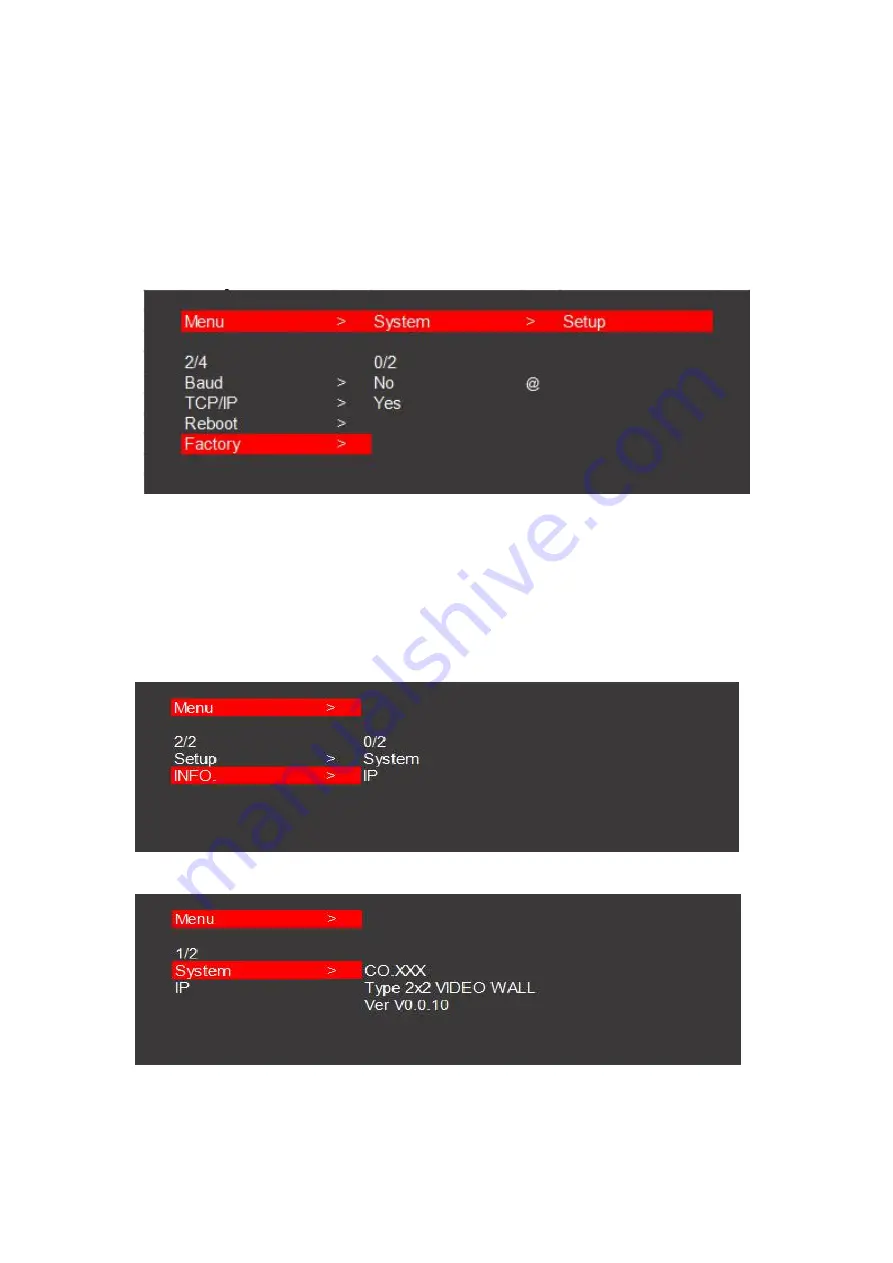
7.4.4 Factory reset

Press the "Left/Menu" on the panel to enter the "Factory" menu,

Press the "Up" or "Down" on the panel to select "Yes" or "No" , then press the "Enter

" to confirm,

The selected one has a "@" to mark.

Factory reset interface

7.4.5 System information

Press the "Left/Menu" on the panel to enter the "INFO" menu,

Press the "Enter " to check the current setting of the device,

It Contains "System" and "IP"specific information.

\

Info interface

System information

Summary of Contents for 20101782

Page 1: ...puts Operating Instructions Dear Customer Thank you for purchasing this product For optimum performance and safety please read these instructions carefully before connecting operating or adjusting this product Please keep this manual for future reference Best nr 20101782 ...

Page 2: ...trol 14 7 3 1 Audio input setting 14 7 3 2 Audio output setting 15 7 4 System Setting By Panel Control 16 7 4 1 Baud rate 16 7 4 2 TCP IP setting 16 7 4 3 Reboot 18 7 4 4 Factory reset 19 7 4 5 System information 19 7 5 Web Control 20 7 5 1 Interface introduction 21 7 5 2 Video wall setting 23 7 5 3 Mirror 24 7 5 4 Rotate 25 7 5 5 Edge 25 7 5 6 Format 26 7 5 7 EDID 26 7 5 8 Audio output setting 27...

Page 3: ...3 MAINTENANCE 32 PRODUCT SERVICE 32 ...

Page 4: ...nges in the hardware packaging and any accompanying documentation without prior written notice 3 SPECIFICATIONS Operating Temperature Range 0 to 40 C 32 to 104 F Operating Humidity Range 5 to 90 RH no condensation Input Video Signal 0 5 1 0 volts p p Input DDC Signal 5 volts p p TTL Video Format Supported Ultra HD TV FHDTV 4K 30hz 1080P Audio Format Supported LPCM 16bit 24bit 44 1KHz 48KHz Input p...

Page 5: ...to the main menu short press to back to previous menu 6 Enter Right Short press to enter the sub menu if there is no sub menu short press it to confirm the setting selection 7 Firmware port Use usb cable to upgrade firmware 8 IR Receive the IR signal from the remote controller to control the device 9 Power Turn on or turn off the power Note 1 Long press Up and Down together for 5 seconds can modif...

Page 6: ...6 5 DVI input port 6 HDMI input1 7 HDMI input2 8 HDMI loop output 9 S PDIF port 10 Analog Stereo port 11 HDMI output1 to HDMI output4 6 CONNECTING AND OPERATING 2x2 Video Wall Cascade 4x3 Video Wall ...

Page 7: ...ntroller 4 Control the device by Panel button Remote RS232 Command Web GUI 7 CONTROL INSTRUCTION 7 1 Remote Control 8 1 1 Power on off 2 Mute 3 Source switching 4 Switch signal source of IN1 TYPE C 5 Switch signal source of IN2 DVI 6 Switch signal source of IN4 HDMI 2 7 Switch signal source of IN3 HDMI 1 8 Menu 9 UP Down Left Menu Right Enter OK Right Enter 10 Display and hide OSD menu 11 Return t...

Page 8: ...s and it can only switch one input source to all output channels when the input and output are both connected to the device 2 No operation for 20S the OSD interface turns off press any button to wake it OSD interface OSD video menu 7 2 1 Video Switching Press Menu on the panel to enter the Switching menu Press Up Down to select the input Press Menu Enter to confirm or back to the previous menu The...

Page 9: ...evious menu the selected one has a to mark Preset Including 11 kinds of common scenes such as 2x2 3x1 4x1 1x4 and so on Set Up H_NUM represents the total amount of display on the horizontal axis V_NUM represents the total amount of display on the vertical axis Cascade represents which cascading level the device is support 25 layers in total Port Map represents each display corresponding to which H...

Page 10: ...r the same cascade layer can be connected to any output port in this layer 2 The position of Map1 to Map4 in the same cascading layer is stable no matter how the output ports arrayed the rule for Port Map is from left to right from top to bottom as showed in the above picture Preset video wall mode ...

Page 11: ...the previous menu Normal represents default mode without mirror function Only X represents horizontal mirror Only Y represents vertical mirror X and Y equals to rotation 180 degree Mirror interface 7 2 4 Rotate Press the Left Menu on the panel to enter the Rotate menu Each output image support 180 degree rotation select Yes or No to set up The selected one has a to mark ...

Page 12: ... press Enter to confirm The selected one has a to mark X represents the margin setting between the horizontal displays each image is divided into 302 units Y represents the margin setting between the vertical displays each image is divided into 302 units The default margin of booth horizontal and vertical display screen is 3 5mm frame size ...

Page 13: ... to enter the Format menu Format including 4K30 1080P 60 720P 60 2560x1440 1920x1200 1366x768 and Auto for each output or all outputs to choose by Pressing the Up or Down button press Enter to confirm the selection the selected one has a to mark Default is Auto format ...

Page 14: ...e panel to select press the Enter to confirm the selection the selected one has a to mark EDID including 4k30hz and 1080p 60 for each input or all inputs to choose Default is 4k30hz EDID interface 7 3 Audio Setting By Panel Control 7 3 1 Audio input setting Press the Left Menu on the panel to enter the Audio menu ...

Page 15: ... 0 Support digital audio 5 1 channel only when input is HDMI Audio input setting interface 7 3 2 Audio output setting Press the Left Menu on the panel to enter the Audio menu Press the Up or Down on the panel to select press the Enter to confirm the selection the selected one has a to mark For each output or all outputs there is Mute and Delay to choose The default settings is Unmute and Delay 30m...

Page 16: ...ress the Up or Down on the panel to select then press the Enter to confirm The selected one has a to mark It contains 4 kinds of Baud rate including to choose Baud rate interface 7 4 2 TCP IP setting Press the Left Menu on the panel to enter the TCP IP menu Press the Up or Down on the panel to select then press the Enter to confirm The selected one has a to mark ...

Page 17: ...m 2 After confirming the IP address press the up and down keys to select Apply and press the ENTER to enter and select YES to check whether the modification is successful 3 Note 1 The operation steps of IP MASK GW DNS setting are basically the same 4 The above parameters can be modified manually under static DHCP otherwise it cannot be modified 5 The modified parameters need to conform to the netw...

Page 18: ...dress Gateway address DNS Interface 7 4 3 Reboot Press the Left Menu on the panel to enter the Reboot menu Press the Up or Down on the panel to select Yes or No then press the Enter to confirm the selected one has a to mark ...

Page 19: ...nel to select Yes or No then press the Enter to confirm The selected one has a to mark Factory reset interface 7 4 5 System information Press the Left Menu on the panel to enter the INFO menu Press the Enter to check the current setting of the device It Contains System and IP specific information Info interface System information ...

Page 20: ...achine control simultaneously Control without network When the host computer is connected to a computer without network through the TCP IP port the host computer is consistent with the control computer network segment It can be controlled by direct connection when the network segment is inconsistent the network segment should be same for the control computer as the host computer Default IP address...

Page 21: ...consistent with that of the connected LAN it also need to open the DHCP and enter the related IP address to control 7 5 1 Interface introduction Status display instructions 1 Click the navigation bar above then enter the corresponding operation interface 2 Do not click continuously Click again after the setting is successful If the setting is invalid please click the button again ...

Page 22: ...ace Note a This web has cookies when the password and account are correct while the browser is not closed If the user refresh the page again it will log in automatically b After changing the IP account or password when you log in again please use the new IP account and password to log in again Operating instructions Take the default IP address login as an example 1 IP configuration IP configuratio...

Page 23: ...ax screen amount in the vertical direction is 10pcs 7 The max cascade layer amount is 25 layers 8 Note The parameters can be set up by clicking the or key in the Output column and mouse clicking to select the input The selected one has blue color Operating instructions Eg1 Select TYPE C port as input source to make a 2x2 video wall by 1pcs device TV 1 4 are connected to output port 2 4 1 3 for map...

Page 24: ...g operation of device 1 Operation Steps of device2 4 In the Output section of the second device select the Horizon as number 2 Vertical as number 3 and the Equipment Cascade as number 1 5 Select the input port as the HDMI Loop out of the device1 then click apply 6 In the Video Map column of device click and select the output ports to out3 and out4 respectively according to TV 5 6 and then click ap...

Page 25: ...e or rotate all output images at once Operating instructions Click on the ON OFF button to adjust 7 5 5 Edge Interface introduction The default edge of booth horizontal and vertical display screen is 3 5mm frame size each image is divided into 302 units Operating instructions Click on the button on both Horizontal and Vertical to adjust ...

Page 26: ...ht format section including 4K 30Hz 1080P 60Hz 720P 2560x1440 1920x1200 1366x768 and AUTO Operating instructions Eg Select all output format as 4k 30HZ Click on the ALL button in the output section first then select the 4K30 button in the format section click Apply to confirm 7 5 7 EDID Interface introduction The interface is to set up the EDID for each input port or all the input at once ...

Page 27: ...Select the EDID need to be copied in the EDID section and click Apply to complete the setting 7 5 8 Audio output setting Interface introduction The interface is used to switch and delay the audio of one output or all outputs The bottom is blue when the audio is turned on and the bottom is white after mute click All to quickly select the output the blue border indicates The output port is connected...

Page 28: ...2 7 5 10 Network interface Interface description It used to set up and display the basic information including IP MAC address Net mask address gate way address and DHCP Operating instructions MAC address can only be displayed cannot be modified Static IP Default DHCP OFF Dynamic IP click the DHCP button to open the DHCP The following IP address and other information can not be modified but current...

Page 29: ...structions Click on each function button to achieve its function as shown in the figure above the bottom of the selection is blue 7 5 12 Password Interface description It use to change the login password You can only change the current login account password Default account passwords admin Operating instructions When you Change your account and password it can support only 5 15 digits alphanumeric...

Page 30: ...ondary parameters are the same as the first 3 A space should be added between the instruction header first level parameters and attribute parameters Pleas check the instruction sheet for property parameters Note indicates that this parameter is not used For RS232 command details pls refer to the document in CD 9 FIRMWARE UPDATE 9 1 MCU update Open the software UART_ISP exe on the PC select the cor...

Page 31: ... UART_ISP exe on PC select the correct port and baud rate 115200 enter F0_01 _ represents space in the port then select the program xxxx bin in the path and click update to complete the upgrade Note Pls reboot the device after GUI update ...

Page 32: ...checks to confirm that the unit is in proper working condition WARRANTY If your product does not work properly because of a defect in materials or workmanship our Company referred to as the warrantor will for the length of the period indicated as below Parts 2 Year Labor 90 Days which starts with the date of original purchase Limited Warranty period at its option either a repair your product with ...

Page 33: ...e modification or service by anyone other than a Factory Service center or other Authorized Servicer or damage that is attributable to acts of God 2 THERE ARE NO EXPRESS WARRANTIES EXCEPT AS LISTED UNDER LIMITED WARRANTY COVERAGE THE WARRANTOR IS NOT LIABLE FOR INCIDENTAL OR CONSEQUENTIAL DAMAGES RESULTING FROM THE USE OF THIS PRODUCT OR ARISING OUT OF ANY BREACH OF THIS WARRNTY As examples this e...

Reviews: