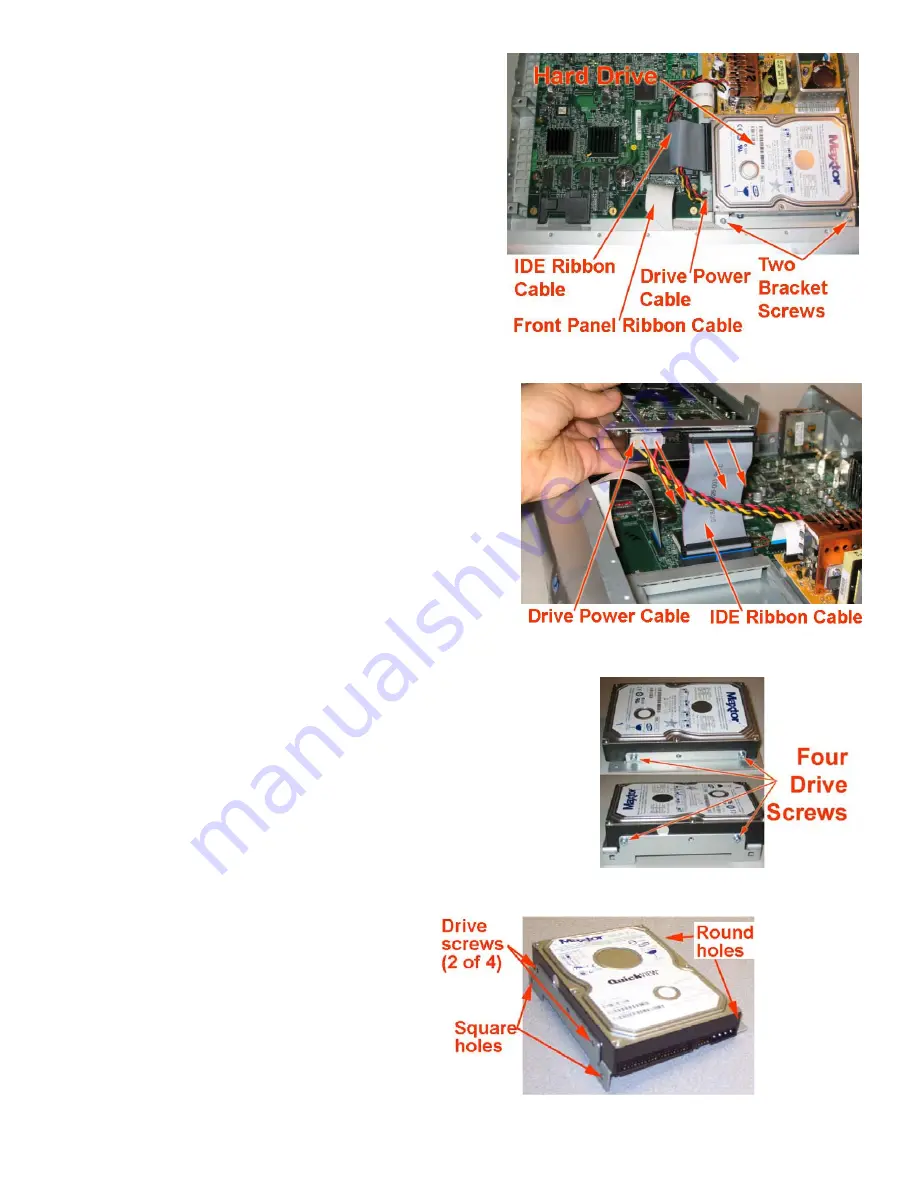
Using your Torx screwdriver, unscrew and remove the two bracket screws that
connect the hard drive bracket to the lower bracket (part of the bottom of the
unit). These screws are located at the front-right of the TiVo. As you look down
into the TiVo, you will see the two screw heads. Set these bracket screws aside.
You will be using them again later.
NOTE: Be very careful not to dislodge the front panel ribbon cable. If you do,
simply push it back in place. NEVER power on your TiVo with this cable even
slightly dislodged.
3.
REMOVE THE POWER CABLE AND IDE RIBBON CABLE FROM THE DRIVE
Situate yourself in front of the TiVo. With your left hand, push the drive/bracket
back slightly toward the power supply and then turn it upside down, rotating it to
the left, as shown in the picture at the right.
While holding the drive bracket in your left hand (being careful not to touch the
components on the drive itself), use your right hand to remove the power cable and
IDE cable from the hard drive. These can sometimes stick, so you might have to
wiggle the power cable a bit. NOTE: If this method of removing the cables is
difficult for you, you can instead remove the cables at the end of step 2. However,
you MUST be VERY CAREFUL of the front panel ribbon cable. If this cable is
dislodged even slightly and you power on your TiVo. You can cause permanent
damage.
Leave the other end of the IDE ribbon cable connected to the TiVo.
4.
REMOVE THE EXISTING DRIVE
Take note of the direction of the drive that you are removing from the bracket. You will be
installing the new drive onto the bracket in the same direction.
Unscrew the four Torx screws that connect the hard drive to the hard drive bracket. Keep these
four drive screws handy; you will re-use them in the next step.
Note: Your factory drive may appear different than the one pictured.
5.
CONNECT THE NEW HARD DRIVE TO THE DRIVE BRACKET
Using the four screws you just removed from the factory drive and
bracket, connect the new drive to the drive bracket. Be sure to
orient the drive as shown in the picture.


