background image

S

SE

ET

T  P

PA

AR

RE

EN

NT

TA

AL

L  G

GU

UIID

DA

AN

NC

CE

E

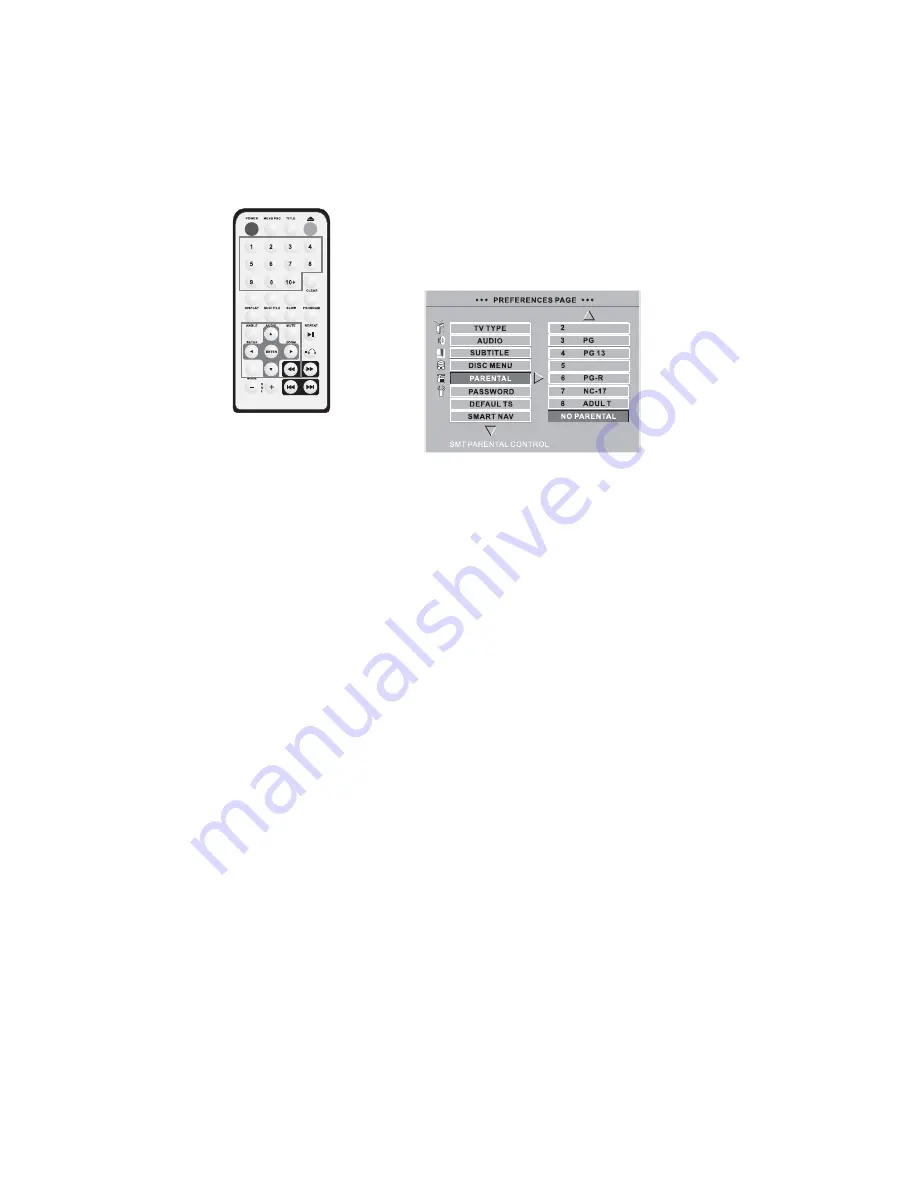
The following procedure set the PG guides for DVD discs.
1. Make sure there is no disc in the player.
2. Press the SETUP button to display the Setup Menu
screen.

3. Press the (

S

/

T

) buttons to highlight Preferences, then

press the ENTER button. The Preferences Menu displays.
4. Press the (

S

/

T

) buttons to highlight Parental, then

press the ENTER button. The sub-menu displays on the
right hand side of the screen.
5. Press the (

X

) button to enter the right-hand side of the

submenu.
6. Press the (

S

/

T

) buttons to highlight Parental level

required and press ENTER.
7. The player will ask you for the password. The factory
default password is 3308.
8. Enter the password using the numeric keys.
9. Press SETUP to exit the menu.

2

26

6

© 2004 Directed Electronics, Inc.  

Summary of Contents for DV2602

Page 1: ...D DE EL LS S D DV V2 26 60 02 2 D DV V2 26 60 05 5 2004 Directed Electronics Inc N83220 50 09 04 O O W W N N E E R R S S G G U U I I D D E E I IN NS ST TA AL LL LA AT TI IO ON N G GU UI ID DE E PREVIOUS NEXT PLAY PAUSE STOP F R F F ...

Page 2: ...construction This warranty does not cover the elimination of externally generated static or noise or the correction of antenna problems or weak television reception damage to tapes video games software cam corders discs speakers accessories or vehicle electrical systems cosmetic damage or damage due to neg ligence misuse abuse failure to follow operating instructions accidental spills or customer ...

Page 3: ...er Connection 13 Disc Player Power Receptacle 13 Amplifier Connections 14 TV Antenna Connection 14 Basic Operation 15 Play 15 Mute 16 Eject Power Off 16 Remote Sensor 16 Other Operating Features 17 Playback with Menu 17 Fast Forward 17 Fast Backward 17 Slow Play 18 Skip Next Chapter Track 18 Skip Prev Chapter Track 18 Select Track 18 Display Track List 19 Repeat Play 19 Subtitle Language 19 Progra...

Page 4: ...Display 30 Previous Chapter Track 30 Enter 30 Up Down Left Right 30 Number Buttons 31 10 Button 31 Clear 31 Setup 31 Stop 31 Subtitle 31 Audio 31 Mode 31 Volume 31 Glossary 32 Troubleshooting 32 No Sound 32 Disc will not Play 32 Remote Control 32 Distorted Image 32 Player Controls 33 Specifications 33 Disc Cleaning 34 4 4 2004 Directed Electronics Inc ...

Page 5: ...pliance with local vehicle rules and regulations S Sh ho oc ck k h ha az za ar rd d do not open the case of this product There are dangerous voltages within the unit There are no user serviceable parts within the unit N NO OT TE ES S This device complies with Part 15 of FCC rules Operation is subject to the following two conditions 1 This device may not cause harmful interference and 2 this device...

Page 6: ...patible with the following disc formats DVD SVCD Video CDRom CDRom DVCDRom CD R MP3 CD with JPEG files Capable of reading 12 cm diameter discs RCA input jack for other optional A V sources such as video game or camera Digital coaxial audio output Memory of last location on disc when switching between modes Parental lock With power off to unit the user can eject a loaded disc by simply pressing the...

Page 7: ... cl lu ud de ed d DV2602 or DV2605 Remote control Remote IR sensor 2 AAA size batteries Mounting slide bracket Frame bezel Power cord with fuses Removal key RCA Input cable TV Antenna DV2605 only 2004 Directed Electronics Inc 7 7 ...

Page 8: ...ursor Keys 14 Next 5 Disk load unload slot 15 Previous 6 LED indicator DV2602 16 Stop VFD or LCD Display DV2605 17 Play Pause 7 Remote Sensor 18 Menu setup 8 Backward 19 Mode 9 Forward 20 Eject 10 Audio R Auxiliary Input VFD Vacuum Fluorescent Display DV2605 PREVIOUS NEXT PLAY PAUSE STOP F R F F DV2602 8 8 2004 Directed Electronics Inc ...

Page 9: ...R Re ea ar r P Pa an ne el l 1 RF In DV2605 only 5 Remote Sensor Input 2 Video 6 S Video 3 Audio L 7 Digital Coaxial audio 4 Audio R 8 Power Connection DV2602 DV2505 2004 Directed Electronics Inc 9 9 ...

Page 10: ...er 15 Clear 3 Number keys 16 Slow 4 Subtitle 17 Program 5 Display 18 Mute 6 Audio 19 Repeat 7 Angle 20 Zoom 8 Setup 21 Play Pause 9 Enter 22 Stop 10 Cursor keys 23 Backward 11 Mode 24 Forward 12 Volume 25 Previous 13 Title 26 Next 1 10 0 2004 Directed Electronics Inc ...

Page 11: ... ct ti io on ns s N NO OT TE E Shut off all power to the disc player and the TV set before con necting cables The disc player sends signal output simultaneously to both the S Video and Video outputs o on nl ly y one of these can be connected use o on ne e of the connection diagrams below Both the audio outputs Digital Coaxial and the L R Audio can be con nected however the disc player will deliver...

Page 12: ...N NE EC CT TI IO ON N Use the 3 5mm AC adapter cord to connect the disc player to an optional AC DC power adapter to allow operation from household electrical service AC DC ADAPTER 110V 60Hz 3 5mm AC ADAPTER CORD OPTIONAL S VIDEO WHITE RED TV SET PREVIOUS NEXT PLAY PAUSE STOP F R F F TV SET OR DVD PLAYER INPUTS YELLOW WHITE RED 1 12 2 2004 Directed Electronics Inc ...

Page 13: ...ff If a disc was playing the player will remember the position of the playback at the time of shut down When the disc player is turned on again the disc will continue play from the point at which it was shut down If the disc player is off a disc can be ejected by momentarily pressing the Power button on the front of the player The disc will eject and a few seconds later the player will automatical...

Page 14: ...CT TI IO ON NS S T TV V A AN NT TE EN NN NA A C CO ON NN NE EC CT TI IO ON N N NO OT TE E The following is only for disc player model DV2605 F CONNECTOR ANTENNA AMPLIFIER YELLOW WHITE RED COAXIAL CABLE OUTPUTS 1 14 4 2004 Directed Electronics Inc ...

Page 15: ...r disc slot with the label side up The disc will slide in automatically 4 Press PLAY PAUSE The player will identify the disc format and display the for mat on the monitor After a few seconds the disc will play automatically If a disc title or menu displays on the screen you can use the cursor S T W X buttons or the number key pad on the remote control to pick the title or menu selection While the ...

Page 16: ... slot Remove the disc 2 Press POWER to turn off the disc player Turn off power to all connected equipment R RE EM MO OT TE E S SE EN NS SO OR R If the disc player needs to be mounted in a remote inac cessible location connect the Remote Sensor to the disc player at the rear of the unit Mount the Remote Sensor in a viewable position for access by the remote control Point the remote control at the s...

Page 17: ...have a sub menu You can use the cursor S T W X buttons to highlight the sub menu selec tion and then press ENTER again F FA AS ST T F FO OR RW WA AR RD D While a disc is playing by pressing the FF button the play ing speed will increase Each press of the FF button will increase the speed by one more shift maximum of 4 increases The 5th press of the FF button returns the disc to normal playing spee...

Page 18: ...E EV V C CH HA AP PT TE ER R T TR RA AC CK K While a disc is playing press the PREV button to skip back to the previous chapter or track S SE EL LE EC CT T T TR RA AC CK K There are different ways of selecting a track these are 1 Press NEXT or PREV to skip to the next or the previous track 2 For discs with numbered tracks enter the track number directly using the number keys If the screen displays...

Page 19: ...While playing press REPEAT to select different segments of a disc 1 For DVD disc press REPEAT once to repeat the chapter Press REPEAT again to repeat the title Press REPEAT a 3rd time to exit repeat feature 2 For non DVD discs when PBC is off press REPEAT to repeat the track Press REPEAT again to repeat the entire disc Press REPEAT a 3rd time to exit repeat feature S SU UB BT TI IT TL LE E L LA AN...

Page 20: ...3 and lastly track 6 enter 5 3 6 If the wrong number is entered press CLEAR to erase that entry 4 Press PLAY and the selected chapters tracks are played D DI IS SP PL LA AY Y P PL LA AY YI IN NG G T TI IM ME E A AN ND D S ST TA AT TU US S N NO OT TE E The format of the information displayed is subject to the type of disc 1 Press DISPLAY button 2 The screen will aternately display the current elaps...

Page 21: ... PLAY PAUSE button to start play N NO OT TE E It may be necessary to press the PLAY PAUSE button twice to start play There are 2 types of disc play modes 1 With menu mode 2 Without menu mode The factory default setting is without menu mode Refer to this manual on the setup of the disc player for addition al information on changing the playing mode In the first play mode after a disc is inserted in...

Page 22: ...o play the previous or next track on the disc Pressing STOP while playing returns you to the menu screen T TV V D DV V2 26 60 05 5 1 Press MODE once The player will go to TV mode 2 Press SETUP and select Auto Search from the menu 3 Press the X button The player will automatically scan for and remember found TV channels 4 Press the S T buttons to select a TV channel for viewing You can also select ...

Page 23: ...ress the S T buttons to adjust the balance level between 12 and 12 S SY YS ST TE EM M S SE ET TT TI IN NG GS S Press the SETUP button to display the system setup menu at DVD mode Press the S T buttons to highlight the desired option Press ENTER to display the sub menu for that option In the sub menu press the X buttons to enter the right hand side of the sub menu Press the S T buttons to move the ...

Page 24: ...the right hand side of the screen Press the S T buttons to highlight either Normal PS Normal LB or Wide Press the ENTER key to select that item 3 Use the S T W X buttons to move the highlight to Main Page then press the ENTER button to return to the main menu 4 Use the S T W X buttons to move the highlight to Exit Menu then press the ENTER button to exit the menu Three different screen ratio 16 9 ...

Page 25: ...etup Press the ENTER button 2 Use the the S T W X buttons and highlight Audio Output Press the ENTER button 3 Press the X button to enter the right hand side of the sub menu 4 Press the S T buttons to highlight SPDIF RAW OR SPDIF PCM then press the ENTER button 5 Press the SETUP button to exit the setup menu N NO OT TE E If you are not going to use the coaxial audio out put set the audio output to...

Page 26: ...The Preferences Menu displays 4 Press the S T buttons to highlight Parental then press the ENTER button The sub menu displays on the right hand side of the screen 5 Press the X button to enter the right hand side of the submenu 6 Press the S T buttons to highlight Parental level required and press ENTER 7 The player will ask you for the password The factory default password is 3308 8 Enter the pas...

Page 27: ...TER button The Preferences Menu displays 3 Press the S T buttons to highlight Subtitle then press the ENTER button The sub menu displays on the right hand side of the screen 4 Press the X button to enter the right hand side of the submenu 5 Press the S T buttons to highlight the language desired and press ENTER 6 Press SETUP to exit the menu 2004 Directed Electronics Inc 2 27 7 ...

Page 28: ... ENTER 6 Press SETUP to exit the menu R Re em mo ot te e C Co on nt tr ro ol l F Fu un nc ct ti io on ns s This section defines the operation of each of the buttons on the remote control Most of the functions have been described earlier in this manual P PL LA AY Y P PA AU US SE E When the player is in Stop Pause Slow play Fast Forward or Fast Reverse you can press the button to resume normal playb...

Page 29: ...e option menu included on the disc subject to the type of disc Press this key to shift the PBC state For a DVD SVCD disc when PBC is off while playing back you should first press the STOP button then press PBC to open N NE EX XT T C CH HA AP PT TE ER R T TR RA AC CK K While playing a DVD press this key to skip to the next chapter While playing a SVCD or other formatted disc press this key to skip ...

Page 30: ...press this button to play the disc at a slower speed in either the forward or reverse direction the audio will go off Each press will decrease crease the speed On the 5th press normal playback speed resumes D DI IS SP PL LA AY Y Press this button to display the current elapsed playing time or the remain time P PR RE EV VI IO OU US S C CH HA AP PT TE ER R T TR RA AC CK K While playing a DVD press t...

Page 31: ...e disc player for the particular video units installed and disc format S ST TO OP P Press this button once to pause the playback the player remembers the position on the disc at which playback was stopped Press this button twice to completely stop the player S SU UB BT TI IT TL LE E Press this button to display the text of the disc on the screen Each press will dis play the text in a different lan...

Page 32: ...e Some DVDs have multiple recordings of the same scene which the user can select the viewing angle T Tr ro ou ub bl le es sh ho oo ot ti in ng g N NO O S SO OU UN ND D Check all cabling and wiring for loose connections Make sure that the disc player and any associated equipment is being oper ated correctely Ensure that the disc player system settings are correct D DI IS SC C W WI IL LL L N NO OT T...

Page 33: ...2 0 micro laser video audio disc CD DA common music laser CD MP 3 audio disc CD R CD RW Video format MPEG1 MPEG2 PCM Dolby Digital DTS Audio format MPEG1 MPEG2 PCM Dolby Digital DTS analog stereo Signal output Video signal NTSC or PAL Video 1 0 Vp p Audio mixed stereo 0 65 Vrms Output interface RCA A V outputs high resolution system S video out put coaxial digital output Voltage DC 12V Power Consu...

Page 34: ...e solvents such as ben zine thinner or conventional record cleaners as they may mar the surface of the disc N No ot te e A disc may become somewhat scratched although not enough to make it unusable depending on how it is handled and conditions in the usage environment These scratches are not an indication of any problem with the disc player 3 34 4 2004 Directed Electronics Inc ...

Page 35: ...stickers or make scratches on discs Do not warp discs A disc should always be kept in its case when not in use to prevent damage Do not place discs in the following places 1 Direct sunlight 2 Dirty dusty and damp areas 3 Near car heaters 4 On the seats or dashboard 2004 Directed Electronics Inc 3 35 5 ...

Page 36: ... consumers with the finest vehicle security car stereo products rear seat entertainment and accessories available The recipient of more than 20 patents in the field of advanced electronic technology Directed is ISO 9001 registered Quality Directed Electronics products are sold and serviced throughout North America and around the world Call 8 80 00 0 2 27 74 4 0 02 20 00 0 for more information abou...

Reviews: