background image

18

© 2002 Directed Electronics, Inc 

Your Viper Audio power amplifier needs to be adjusted carefully to achieve maximum
performance. These are some guidelines to follow when fine-tuning the amplifier.

„

For full-range and simultaneous stereo/mono bass applications, the crossover
selection switch should be set to FLAT. If the amplifier is driving your subwoofers,
set the switch to LPF, and for mid-bass/midrange output, set to HPF.

„

The crossover frequency control needs to be adjusted to suit your particular system.
For subwoofer applications, try to keep the setting low enough to prevent the
image smearing (you should not be able to hear male voices from the subwoofer)
but not so low as to create a gap between the subwoofer and the mid-
bass/midrange speakers. For mid-bass/midrange settings, try to keep the setting
low enough to keep your sound stage in front of you, without overdriving the
speaker. It will be to your advantage to spend some extra time with this adjust-
ment, listening to familiar music or system set-up discs to achieve the kind of
musical reproduction that you prefer.

„

The gain adjustment allows you to set proper signal match for clean, quiet ampli-
fier operation. For full-range and simultaneous stereo/mono bass applications,
start by playing some music you are familiar with. With the gain adjustment on
the amplifier in the middle of its rotation, bring up the volume on your head unit
to the 3/4 volume setting or until you start to hear distortion or clipping. If you
hear distortion before you reach the 3/4 volume setting of your head unit, reduce
the gain setting on the amplifier and start to raise the head unit volume again.
When you can listen to the music at or slightly above 3/4 on your head unit
without audible distortion, slowly raise the gain of the amplifier until distortion is
heard, then back off the gain until the distortion is not audible. This setting will
allow you to reach full output with all but the quietest of source material, while
avoiding excessive noise in the system.

„

For systems using the Remote Sub Level Adjustment, increase the subwoofer gain
on the amplifier by 25% and set the Remote Sub Level knob to the center position
after making all system gain and filter adjustments. This will give the Remote Sub
Level Control a wider range of adjustment to the subwoofer output. 

„

The same procedure should be used for adjusting the amplifier when the on-board
crossover is set to LPF or HPF, but you will also have to take into consideration the
effect that gain adjustment has on system frequency response and imaging.
Again, plan on spending some time with music that you know, getting the gain
and crossover settings the way you like. Test discs and analyzers may help with this
process, but in the end it's your ears that count - listen to the music!

CROSSOVER SETTINGS AND GAIN ADJUSTMENT

Summary of Contents for 1100D5

Page 1: ...models 1100d5 ...

Page 2: ...2 2002 Directed Electronics Inc ...

Page 3: ... quality audio reproduction Directed Audio power amplifiers come with a two year limited warranty if installed by an authorized Directed dealer If not installed by an authorized dealer Directed Audio power amplifiers are covered by a one year parts and labor limited warranty Be sure to retain your original sales receipt and refer to the warranty section of this guide for full details about your co...

Page 4: ...ct improper service or other causes not arising out of defects in materials or construction ALL WARRANTIES INCLUDING BUT NOT LIMITED TO EXPRESS WARRANTY IMPLIED WARRANTY WARRANTY OF MERCHANTABILITY FITNESS FOR PARTICULAR PURPOSE AND WARRANTY OF NON INFRINGEMENT OF INTELLECTUAL PROPERTY ARE EXPRESSLY EXCLUDED TO THE MAXIMUM EXTENT ALLOWED BY LAW AND DIRECTED NEITHER ASSUMES NOR AUTHORIZES ANY PERSO...

Page 5: ...offset reverse polarity and short circuit protection with status LED Top mounted controls are easily accessed for system tuning Dual continuously variable 12 dB octave two way active crossovers ch 1 4 Continuously variable 24 dB octave low pass crossover sub channel Switchable 30Hz 24 dB octave subsonic filter and phase invert switch sub channel Remote subwoofer level control and switchable 8 dB b...

Page 6: ...our power connection within eight to ten inches of the battery terminal Use a fuse or circuit breaker rated slightly more than the on board fuse s of the amplifier s The gauge of power wire used should take into account the total current draw of the system and the length of wire used IASCA and other auto sound competition organizations have charts available for this you can also find a chart in th...

Page 7: ...te size surface area is what counts soldering the terminals after crimping is also recom mended 10 Due to the high frequency MOSFET switching power supply filtering the power cable is not generally required remember that the amp can t deliver full output if the power supply is restricted Proper grounding of the signal source is mandatory for the amplifier to reach its performance peak If the RCA i...

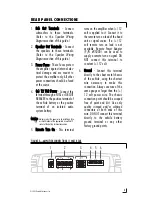
Page 8: ...t sends an out of phase signal to a 600d slave amplifier when connected in the External Synced Bridged combination Refer to the Combined Amplifiers section of this guide 6 S St ta at tu us s L LE ED Ds s The Power LED will light GREEN to indicate the amplifier is on and operating normally The GREEN LED will turn off and the Protection LED will light RED when the amplifier has shut itself down due ...

Page 9: ...battery W WA AR RN NIIN NG G Always protect this power wire by installing a fuse or circuit breaker of the appropriate size within 12 inches of the battery terminal connection 5 R Re em mo ot te e T Tu ur rn n O On n This terminal turns on the amplifier when 12 volt is applied to it Connect it to the remote turn on lead of the head unit or signal source If a 12 volt remote turn on lead is not avai...

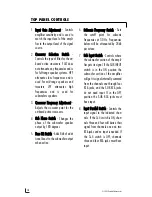
Page 10: ...bwoofer speaker output by 180 degrees 5 B Ba as ss s E EQ Q S Sw wiit tc ch h Adds 8db of addi tional boost to the subwoofer output when active 6 S Su ub bs so on niic c F Fr re eq qu ue en nc cy y S Sw wiit tc ch h Sets the cutoff point for subsonic frequencies at 30 Hz Frequencies below will be attenuated by 24db per octave 7 S Su ub b IIn np pu ut t S Sw wiit tc ch h Controls where the subwoofe...

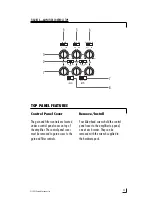
Page 11: ...RE 3 AMPLIFIER CONTROLS TOP 2 1 6 3 5 7 8 4 Control Panel Cover The gain and filter controls are located under a control panel cover on top of the amplifier The control panel cover must be removed to gain access to the gain and filter controls Remove Install Four Allen head screws hold the control panel cover to the amplifier top panel one at each corner They can be removed with the wrench supplie...

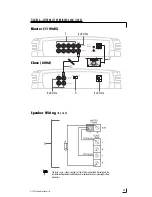
Page 12: ...SPEAKER WIRING DIAGRAMS 12 2002 Directed Electronics Inc Five channel operation top view Three channel operation top view ...

Page 13: ...l speaker combination Refer to Parallel Synced Gain section of this guide for amplifier and speaker connection diagrams External Synced Bridged The External Synced Bridged combination includes a master amplifier and a slave amplifier In this master slave combination the master amplifier s pre amp controls remain active and the slave amplifier s pre amp is bypassed This allows the master amplifier ...

Page 14: ...ect an RCA cable between the SYNC OUT RCA jack of the 1100d5 and the SLAVE IN RCA jack of the slaved 600d as shown in Figure 5 4 S Slla av ve e M Ma as st te er r S Sw wiit tc ch h Set the slave master switch of the 600d to the slave position This will put the I O RCA jack in the SLAVE IN mode so it will accept the audio signal from the 1100d5 s sync out RCA jack 5 S Su ub bw wo oo of fe er r S Sp...

Page 15: ... 3 4 SUB 1 4 OUT SUB OUT SYNC OUT BRIDGE OUT R L SLAVE MASTER REMOTE POWER PROTECTION 1 Do Not Use 4 Do Not Use 2 Do Not Use Master 1100d5 Slave 600d 3 5 Speaker Wiring top view N NO OT TE E The dual and subout terminals of the 600d are paralleled internally and the combined load impedance should be taken into consideration when connecting multiple subwoofers ...

Page 16: ...ave master switch of the 600d to the slave position This will put the I O RCA jack in the SLAVE IN mode so it will accept the audio signal from the 1100d5 s sync out RCA jack N NO OT TE E There is only one master when syncing amplifiers 5 S Su ub bw wo oo of fe er r S Sp pe ea ak ke er r C Co on nn ne ec ct tiio on n In this amplifier combination the Subwoofer output terminals of both amplifiers d...

Page 17: ... paralleled internally and the combined load impedance should be taken into consideration when connecting multiple subwoofers INPUT I O R L SLAVE MASTER REMOTE SLAVE IN SYNC OUT BRIDGE OUT SUB LEVEL MIN MAX 1 2 3 4 SUB 1 4 OUT SUB OUT SYNC OUT BRIDGE OUT R L SLAVE MASTER REMOTE POWER PROTECTION 1 Do Not Use 4 Do Not Use 2 Do Not Use Master 1100d5 Slave 600d 3 ...

Page 18: ...t on the amplifier in the middle of its rotation bring up the volume on your head unit to the 3 4 volume setting or until you start to hear distortion or clipping If you hear distortion before you reach the 3 4 volume setting of your head unit reduce the gain setting on the amplifier and start to raise the head unit volume again When you can listen to the music at or slightly above 3 4 on your hea...

Page 19: ...nel driven into 1 ohm from 20 250 Hz with less than 0 6 THD 14 4 VDC Dynamic power rating IHF 202 Standard at minimum load Directed model 1100d5 Ch 1 4 Sub Ch 75 275 watts watts 125 400 watts watts 250x2 600 watts watts Signal to Noise Ratio Greater than 95 dB Ch 1 4 80dB sub Frequency Response 20 20 000 Hz 0 5 dB Ch 1 4 Damping Factor 4 ohm Greater than 100 Ch 1 4 50 sub Crossover Ch 1 4 Switchab...

Page 20: ...d electronic technology Directed is ISO 9001 registered Directed is committed to delivering world class quality products and services that excite and delight our customers Directed Electronics Inc Vista California 92083 www directed com Directed is a proud member of Quality Directed products are sold and serviced throughout North America and around the world Call 800 274 0200 for more information ...

Reviews: