

2.0
F
EATURES
This high-performance DirectConnect
®
digital to analog converter has
many features that enable it to perform in a superior manner. Among
those features you will find:
Easy to operate: Install in seconds with no extensive configuring
Converts coaxial
(S/PDIF
) or optical
(Toslink)
digital audio signals to analog
L/R audio
Supports sampling rates at 32, 44.1, 48 and 96 KHz
Provides electromagnetic-noise-free transmission
Supports 24-bit S/PDIF incoming bit stream on left and right channels
5 volt DC@2A power supply included
3.0
P
ACKAGE
C
ONTENTS
Before attempting to use this DirectConnect® unit, please check the packaging
and make sure the following items are contained in the shipping carton:
DirectConnect
®
Digital to Analog Audio Converter
5 Volt DC Power Adapter
User's Manual
Note: Please retain the original packing material in case you need to return the unit. If you
find any items missing, contact DirectConnect
®
immediately (800.531.3224). Please have the
model number, serial number, and invoice available for reference when you call.
4.0
C
ONNECTION AND
O
PERATUION
Before installation, please make sure all devices you wish to connect have been
turned off.
1) Connect the digital audio source device
(Output Source)
to the DirectConnect
®
Digital to Analog Converter using appropriate optical
(Toslink)
or coaxial
(RCA type)
cables.
(Cables are optional)
* Please refer to connection diagram section below.
2) Connect the A/V Receiver or Amplifier
(Input Source)
to the Digital to Analog
Converter using appropriate RCA-type R&L cable
(Cable is optional)
3) Insert DC side of 5 volt power supply into this product and then connect the AC side
of the power supply into the wall outlet
(ideally the AC power should be surge suppressed and filtered)
Note:
When connected to the optical
(Toslink)
and Coaxial
(RCA type)
cables at the
same time, the product will give priority to the Toslink input.
Attention:
Insert / remove cables gently
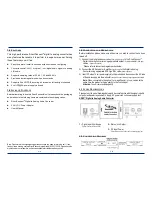
4.1
P
ANEL
D
ESCRIPTIONS
Please study the panel drawings below and become familiar with the signal input(s),
output(s) and power requirements. Apply AC power via 5 volt power supply last.
HDMI™
Digital to Analog Audio Converter
1
–
Digital Input from Source
2
– Stereo
(RCA)
Output
Optical (Toslink) or Coaxial (RCA)
3
– DC Input Power
Please Note: Apply AC power via 5 volt power supply last
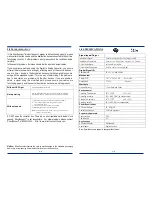
4.2
C
ONNECTION
D
IAGRAM
4 / 8
5 / 8