background image

Part 1 - Remote Setup

13

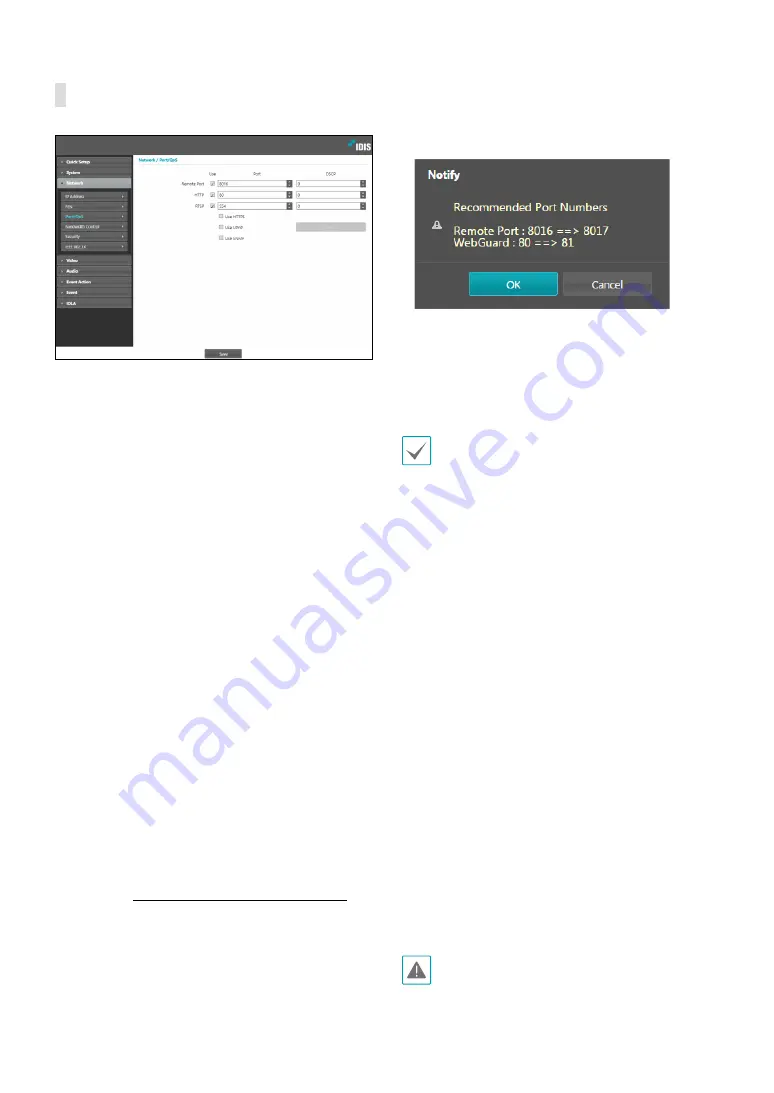
Port/QoS

 •

Use/Port

: Enable/disable ports and designate 

corresponding port numbers. 

Remote Port

 and 

IDIS 

Web / HTTP

 ports are enabled by default and cannot 

be disabled. By enabling IDIS Web and RTSP ports, you 
will be able to use the IDIS Web program or a media 
player that supports RTSP (Real-Time Streaming 
Protocol) service to connect to the camera. When 
the HTTP port is enabled, you can run the camera’s 
Remote Setup. If this option has been changed, click 

Save

 to apply the current settings, and then restart 

Remote Setup. If you do not restart Remote Setup, the 
changes afterwards will not be applied.

 •

DSCP

: Designate each port’s QoS (Quality of Service) 

level using DSCP values. Assigning QoS levels 
prioritizes the ports for network bandwidth use. 
Higher the DSCP value, higher the QoS level and thus 
higher on the network bandwidth allocation priority 
list. Use 

0

 if you do not want to assign a QoS level. The 

network environment must support DSCP in order 
for this feature to function properly. Contact your 
network administrator for more details. 

 •

Use HTTPS

: Select this option to apply https protocol-

based security on IDIS Web.

 •

Use UPnP

: If the camera is connected to the network 

via an IP router (or NAT), select this option to connect 
to the camera without setting up port forwarding. 
The IP router (or NAT) must be enabled with UPnP in 
order for this feature to function properly. For more 
information enabling UPnP on your IP router (or NAT), 
refer to the 

IP router or NAT’s operation manual

Click

 Check

 to test the current port settings. 

A confirmation message will appear if all the 
selected ports are available for use. If not, a list of 
recommended port numbers will be shown.

Click

 Apply

 to use the recommended port numbers.

 •

Use SNMP

: Select this option to enable SNMP (Simple 

Network Management Protocol).

 • In a WAN environment, it is recommended that you 

use the UPnP function if you record video by using 
the FEN function or FEN connection is not smooth. 
Otherwise, monitoring or recording might not be 
smooth depending on the network environment.

 • Each port number must be unique.
 • It is not allowed to use the same port number for 

more than one function.

 • You can connect to the camera using a media player 

that supports RTSP service and monitor its video 
feed. If the camera is connected to the network via 
an IP router (or NAT) or is behind a firewall, you must 
open the ports. (All ports if using UDP protocol and 
RTSP ports if using TCP protocol) This feature may 
not be supported by al media player. In addition, 
video display on certain media players may not be 
smooth depending on the network status, video 
streaming compression method used, and/or the 
resolution setting. Connection methods are as 
follows:


Via PC

: Launch the media player (such as VLC) 

and then enter 

rtsp://ID:Password@IP Address: 

RTSP Port Number/trackID='Stream Number'


(Stream Number: 1 if Primary, 2 if Secondary, and 
3 if Tertiary). (e.g.: rtsp://admin:@10.0.152.35:554/
trackID=1 (User: admin, Password: None, Camera 
IP Address: 10.0.152.35, RTSP Port Number: 554, 
Stream: Primary))

 • Port numbers of the remote program must be 

updated whenever the camera's port numbers are 
changed.

 • ONVIF protocol may not function if using HTTPS.

Summary of Contents for IDIS DC-T4537HRXA

Page 1: ...Powered by Network Camera Operation Manual DC T4537HRXA...

Page 2: ...explanation about some functions may not be incorporated The manufacturer is not responsible for any problems resulting from the use thereof The information contained herein is subject to change with...

Page 3: ...le system This will prevent damage to the equipment due to lightning and power line surges If thunder or lightning is common where the equipment is installed use a surge protection device 10 Overloadi...

Page 4: ...sposal please separate this from other types of wastes and recycle it responsibly to promote the sustainable reuse of material resources Household users should contact either the retailer where they p...

Page 5: ...FEN 12 Port QoS 13 Bandwidth Control 14 Security 14 IEEE 802 1X 15 Video 15 Camera 16 Streaming 19 MAT 20 Privacy Masking 21 OSD 21 Audio 22 Input Output 22 Event Action 23 Alarm out 23 Email 24 Remo...

Page 6: ...e of Contents 6 IDLA 32 Object Detection 35 Intrusion 36 Loitering 37 Line Crossing 38 Face Detection 39 Advanced 40 Part 2 IDIS Web 41 Web Live Mode 43 Web Search Mode 45 Part 3 Appendix 47 Index 47...

Page 7: ...mote Setup screen IDIS Discovery connects to the default browser during remote setup so please use a supported browser as the default browser System settings can also be changed using a remote program...

Page 8: ...MAC Address Indicates the MAC address of the camera Miscellaneous ONVIF Protocol Select to enable ONVIF protocol use However ONVIF Protocol is available only to users belonging to the standard user g...

Page 9: ...r SSL settings have been changed click Save to apply the current settings and then restart Remote Setup If you do not restart Remote Setup the changes afterwards will not be applied Date Time Date Tim...

Page 10: ...or group There is no default password for the Administrator group s admin user Standard groups Administrator Operator and User cannot be edited or deleted Authorities assigned here apply identically t...

Page 11: ...k you are using If this option has been changed click Save to apply the current settings and then restart Remote Setup If you do not restart Remote Setup the changes afterwards will not be applied Man...

Page 12: ...Server If network settings have been changed click Save at the bottom of the setup window to save the changes and then setup the FEN Inquire with your network administrator for the FEN Server s IP add...

Page 13: ...ration manual Click Check to test the current port settings A confirmation message will appear if all the selected ports are available for use If not a list of recommended port numbers will be shown C...

Page 14: ...e All Remove individual or all IP addresses from Allow List or Deny List SSL Select this option to enable SSL Secure Sockets Layer Enabling this option applies SSL protocol protection on data transmit...

Page 15: ...P Type Choose a network connection authentication method Selected method must be identical to the authentication method used on the authentication server EAPOL Version Choose EAP authentication s vers...

Page 16: ...strength of 3DNR 3D Noise Reduction A higher 3DNR value reduces background noise in a low light environment but it may cause afterimage lag of moving objects White Balance Configure White Balance set...

Page 17: ...dule Slow Shutter Activate Slow Shutter The electronic shutter s speed will decrease to the specified level under low lighting conditions to allow more light in and therefore produce brighter images W...

Page 18: ...itions Nighttime Mode Daytime Mode Disables or enables the IR cut filter Auto Allow the system to enable disable IR Cut Filter automatically Schedule Sets up the IR cut filter schedule The IR cut filt...

Page 19: ...reaming Target Bitrate Kbps Set the target bitrate When Quality is set to Manual you can configure the value of the target bitrate If not the set value of the target bitrate for each Quality appears B...

Page 20: ...ptive Transmission feature during video transmission and recording Sensitivity Set the motion detection sensitivity Higher values will result in more sensitive motion detection Inactivity Period Set t...

Page 21: ...acy mask Click Delete to remove the selected privacy mask OSD Select OSD to indicate Texts and Date Time information Text Size Select the size of the text Color Select the color of the text Transparen...

Page 22: ...codec Input Select an option and then an audio input source microphone or line in Adjust the volume Output Select an option and then adjust the volume Cameras do not feature built in audio amplifier u...

Page 23: ...ctions Alarm out Select Alarm Out to enable alarm out Dwell Time Designate the alarm out duration When an event occurs alarm out will be generated for the specified duration Schedule Specify the alarm...

Page 24: ...L STARTTLS If using an SMTP server requiring an SSL or STARTTLS connection select SSL or STARTTLS option Authentication Enter a user ID and password if user authentication is required by the SMTP serv...

Page 25: ...a jpg image of the event detected image is uploaded to the Primary Server If the upload to the Primary Server fails the file will be uploaded to the Secondary Server Upload to the Secondary Server wi...

Page 26: ...g the Upload Path or Base File Name you cannot use special characters such as and The resolution of FTP upload image can change depending on the resolution setting applied under Video Streaming Set sp...

Page 27: ...an record up to 60MB of video Using high resolution quality and frame rate settings can cause the recording to exceed the 60MB limit and stop before the end of the specified recording duration Post Ev...

Page 28: ...lect the Image Attachment option to attach a jpg image of the event detected to the email Remote Callback Select this option to send a message to a remote system and then select which system to send t...

Page 29: ...motion detection blocks Motion Ignoring Interval With Motion Ignoring Interval configured no event log or notification is generated for motions detected during a period of time following a motion dete...

Page 30: ...erval With Audio Ignoring Time configured no event log or notification is generated for audio detections taking place during a period of time following an audio detection event Event Action Select an...

Page 31: ...g the defined time range will not be assumed as events Event Action Select a tampering detection event alert action Alarm Out Select if you wish to generate an alarm out Send Email Select if you wish...

Page 32: ...nd a message to a remote system when the SD memory card is inserted removed and then select which system to send the message to Disk In Out Select to check if the SD memory card has been inserted remo...

Page 33: ...e image size The minimum size supported for reliable detection is 120 x 68 pixels or higher 1920x1080 resolution 1 If the object is a human 2 If the object is a car or a bike The following conditions...

Page 34: ...Object Detection Intrusion Loitering Line Crossing and Face Detection to operate properly the following must be applied The function of the IDLA may cause errors in actual measurements In the followi...

Page 35: ...g a period of time following a object detection event Use Ignoring Time Define the event ignoring time Object detections taking place during the defined time range will not be assumed as events Event...

Page 36: ...ification is generated for intrusion detected during a period of time following an intrusion Use Ignoring Time Define the event ignoring time Intrusions taking place during the defined time range will...

Page 37: ...o event log or notification is generated for loitering detected during a period of time following a loitering event Use Ignoring Time Define the event ignoring time Loiterings taking place during the...

Page 38: ...terval With Line Crossing Ignoring Interval configured no event log or notification is generated for line crossing detected during a period of time following a line crossing event Use Ignoring Time De...

Page 39: ...event ignoring time Face detections taking place during the defined time range will not be assumed as events Event Action Select a face detection event alert action Alarm Out Select if you wish to gen...

Page 40: ...et the value for recognizing the object found in the image Daytime Nighttime Threshold Adjust the day night threshold Face Engine Set the value for recognizing the face found in the image Daytime Nigh...

Page 41: ...ame registered to the FEN Server Or http web idisglobal com it is required to enter the camera IP address when logging in If the camera uses the FEN feature you can enter the FEN name registered to th...

Page 42: ...or the status bar is hidden Tools Internet Options Security Custom level Allow websites to open windows without address or status bars Enable Launching a new version of IDIS Web for the first time ca...

Page 43: ...YPE 1 to print the current video screen using a printer connected to the computer 6 Click TYPE 1 to save the current video screen as an image file 7 Click TYPE 1 to configure rendering mode and OSD se...

Page 44: ...mission TYPE 1 icon appears on the corresponding camera screen Aspect Ratio Change the aspect ratio of the video displayed on the screen Fit to Screen Fit the video to the size of the camera screen Fi...

Page 45: ...e locale 4 Click TYPE 1 to view the video in full screen Press the ESC key on the keyboard to return to the previous screen 5 Click TYPE 1 to print the current video screen using a printer connected t...

Page 46: ...st Forward TYPE 1 Play by Frame backwards TYPE 1 Play by Frame forwards TYPE 1 Rewind TYPE 1 Go to Last TYPE 1 Play Pause Click TYPE 1 to designate recent recordings you wish to search and then jump t...

Page 47: ...Time 9 DSCP 13 F FEN Name 12 FEN Server 12 Frame Rate 19 I IDIS Web port 13 IPFiltering 14 M MAT 20 N Network Bandwidth Limit 14 O ONVIF Protocol 8 Q Quality 19 R Remote Port 13 Resolution 19 RTSP Por...

Page 48: ......

Page 49: ...IDIS Co Ltd For more information please visit at www idisglobal com...

Reviews: