background image

8

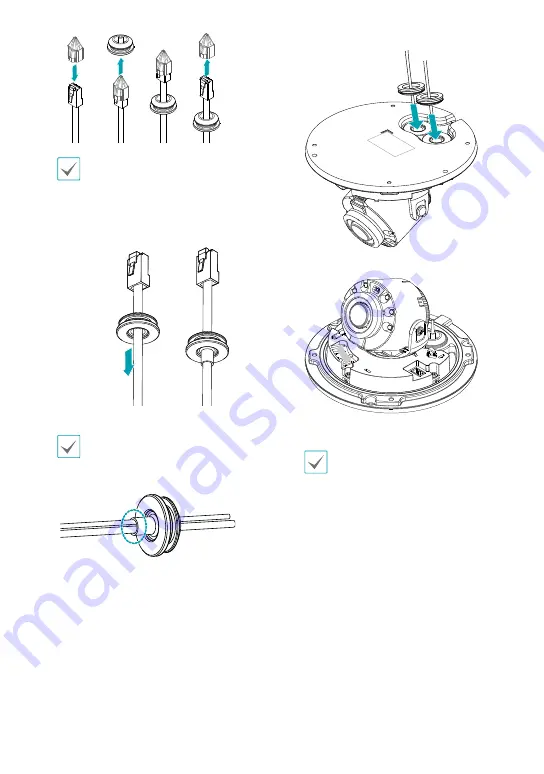
It is recommended to use lubricant to move 
the LAN cable smoothly.

Pull the cable slightly and arrange the rubber as 
shown below. 


To pass through a thin cable or more than two 
cables, it is advised to finish it using silicon to make 
sure waterproofed perfectly. (Silicon finishing part 
— refer to the bottom image.)

Assemble the cable rubber to the bottom cover. 

Attach the enclosed desiccant in the bottom to 
prevent moisture.

Use the screws, anchor provided with the camera 
to secure the install body on a wall or a ceiling.

Use the provided guide pattern to check the 
distance between the screws.

Summary of Contents for IDIS DC-D4537HRXA

Page 1: ...Network Camera Quick Guide Powered by DC D4537RXA DC D4537HRXA ...

Page 2: ... outlets and extension cords as this can result in the risk of fire or electric shock 11 Objects and Liquids Never push objects of any kind through openings of this equipment as they may touch dangerous voltage points or short out parts that could result in a fire or electric shock Never spill liquid of any kind on the equipment 12 Servicing Do not attempt to service this equipment yourself Refer ...

Page 3: ... office for details of where and how they can take this item for environmentally safe recycling Business users should contact their supplier and check the terms and conditions of the purchase contract This product should not be mixed with other commercial wastes for disposal Safety Symbols Symbol Publication Description IEC60417 No 5031 Direct current Copyright 2022 IDIS Co Ltd IDIS Co Ltd reserve...

Page 4: ...es are included Some parts may differ depending on the situation Item Network Camera Quick Guide Terminal Blocks 2 ea Screws and Anchors each 3 ea DC D4537HRXA Screws and Anchors each 2 ea DC D4537RXA Protect Connector DC D4537HRXA only Desiccant 3ea double sided tape 2ea DC D4537HRXA only Allen Wrench DC D4537HRXA only Guide Pattern Please download software IDIS Discovery IDIS Center IDIS Solutio...

Page 5: ...9 0 7 5 6 5 DC D4537HRXA 1 2 3 6 5 5 9 0 5 7 1 IR LED 7 Network Port 2 Lens 8 Dome Cover Assembly Part 3 Factory Reset Button 9 Alarm I O Audio I O 4 Built in Microphone 0 SD Memory Card Slot 5 Wall Ceiling Installation Hole Cable Rubber 6 Power ...

Page 6: ...erclockwise 2 Remove the dome cover DC D4537HRXA 1 Loosen the screws counterclockwise using the Allen wrench provided with the product 2 Remove the dome cover Inserting an SD Memory Card Insert an SD memory card into the SD memory card slot with the micro SD print facing upward DC D4537RXA micro SD ...

Page 7: ...ea If the camera is installed in direct sunlight it may be affected adversely DC D4537RXA 1 Use the screws anchor provided with the camera to secure the install body on a wall or a ceiling Use the provided guide pattern to check the distance between the screws 2 Connect external devices the network cable and the power adapter 3 Adjust the angle For more information refer to the Angle Adjustment DC...

Page 8: ...d to finish it using silicon to make sure waterproofed perfectly Silicon finishing part refer to the bottom image 4 Assemble the cable rubber to the bottom cover 5 Attach the enclosed desiccant in the bottom to prevent moisture 6 Use the screws anchor provided with the camera to secure the install body on a wall or a ceiling Use the provided guide pattern to check the distance between the screws ...

Page 9: ...er DC D4537RXA Attach the dome cover to the bottom cover in a straight line Turn the dome cover clockwise to fasten the dome cover DC D4537HRXA 1 Attach the double sided tape to the desiccant first and attach it to the specified location inside the dome cover as shown below Check the location of the wall ceiling installation hole Wall ceiling installation hole Before closing the dome cover make su...

Page 10: ...10 2 Fasten the screws for the dome cover clockwise using the Allen wrench provided with the camera Remove the protective film inside and outside before closing the dome cover ...

Page 11: ... CE DC D4537HRXA FCC CE IP67 IK10 External Dimensions Ø x H DC D4537RXA 122mm x 103 40mm 4 8 x 4 07 DC D4537HRXA 155mm x 104 4mm 6 1 x 4 11 Weight Main Unit DC D4537RXA 0 34kg 0 74lb DC D4537HRXA 0 98kg 2 16lb DirectIP NVR makes it easy to use cameras without extra network configurations Each camera can be controlled via the DirectIP NVR setup menu without any PC For detailed camera settings pleas...

Page 12: ...IDIS Co Ltd For more information please visit www idisglobal com ...

Reviews: