background image

M

ai

nt

en

anc

Go to table of contents 

DCS_Direct_Jet_1024UVHS_Maintenance_Troubleshooting_Guide_1.2.docx


11 | 

P a g e


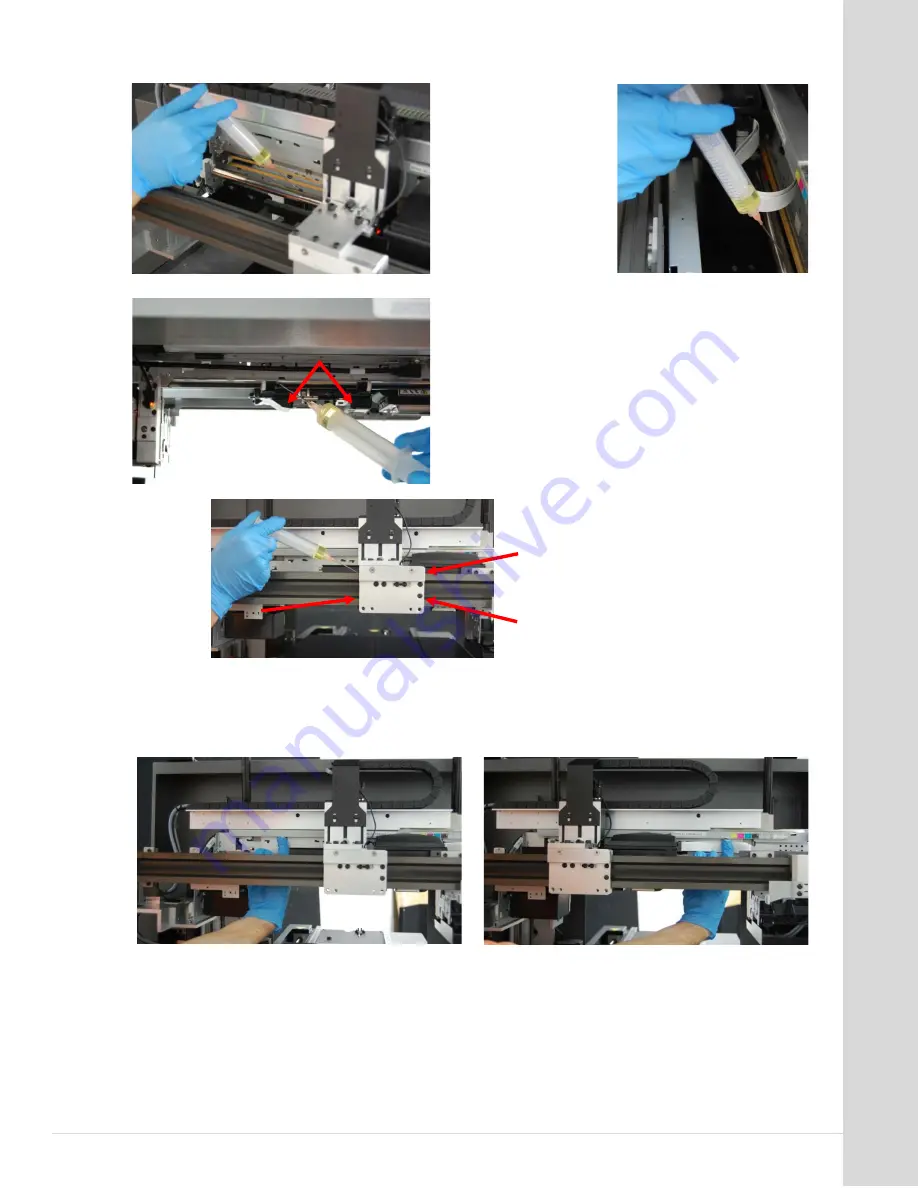
Apply a drop or two of oil to the areas indicated. 

Do not over-lubricate.


The outside of 

the print head 

bushings on both 

sides.  


It is critical that the 

area between the 

print head bushings 

be lubricated.


Apply the 3-in-1 oil and 

then, using a gloved 

finger, apply 

lithium 

grease

 to the same 

locations. 


Upper and lower rail and 

car on both sides of the 

UV lamp carriage. 

Do 

not use WD-40 on 

the UV lamp rails. 

Clean with an IPA 

wipe when needed.


Manually move the print head left and right (do not move the lamp, it will follow 

along with the print head) to spread the oil along the length of the shaft. 


Again, using a gloved finger, apply a light grease (ex: lithium) in the areas indicated 

to the print head upper guide. 


Use a very small amount of 

grease and apply to the 

underside of the guide rail. 

Apply in several areas, moving the print 

head for access when necessary. DO NOT 

grab the UV lamp. It will track with the 

print head. 


Move the print head left and right to ensure even distribution of the grease. 


Summary of Contents for Direct Jet 1014UV

Page 1: ...DCS_Direct_Jet_1024UVHS_Maintenance_Troubleshooting_Guide_1 2 docx Go to table of contents Maintenance and Troubleshooting ...

Page 2: ...al Business Machines Acknowledge Corporation Windows is a trademark of Microsoft Corporation All other ments product and company names mentioned herein are the trademarks of their respective owners Technical If you require technical assistance contact a technical representative at 860 829 1027 Support or email techsupport directcolorsystems com Technical information and downloads are available on ...

Page 3: ...024UVHS_Maintenance_Troubleshooting_Guide_1 2 docx Equipment Certificate of Compliance Printing Edition 1 2 February 2013 History Addition to FAQs Printed in the USA Copyright 2013 Direct Color LLC All rights reserved ...

Page 4: ...tents SAFETY AND PRECAUTIONS 6 MAINTENANCE and CLEANING 8 Daily Maintenance and Cleaning 9 Weekly Maintenance and Cleaning 9 Monthly or Periodic Maintenance 13 Correcting a Bad Nozzle Check Condition 15 The Capping Station 16 Replacing a Direct Jet Print Head 27 TROUBLE SHOOTING 28 PRINTING INFO SHEET AND FAQs 37 ...

Page 5: ...152 mm thick The Direct Jet 1024UVHS model accepts substrates up to 13 330 mm x 24 610 mm in size and has a printable area of 10 254mm x 24 610 mm Innovative Multisolve UV LED inks print and bond to plastic wood stone etc Using our adhesion promoter the inks will bind to many difficult surfaces such as glass or stainless steel Prints white ink Prints clear ink A print speed of 1 25 minutes to prin...

Page 6: ...and requires a minimum of two people Do not attempt to repair this machine yourself without prior DCS authorization Unless specified in this guide only qualified service personnel should attempt any disassembly repair or access to internal components If you need to make mechanical adjustments turn off your printer and disconnect it from all power and data sources Safety Warning Safety Glasses and ...

Page 7: ..._Maintenance_Troubleshooting_Guide_1 2 docx 7 P a g e Below you will find diagrams of the printer and its parts Be sure to familiarize yourself with all the individual parts and descriptions of printer as they will be referred to later in this guide ...

Page 8: ...e 9 Complete Maintenance Log 40 BEGINNING OF THE WEEK Turn on main power wait 5 seconds 9 Shake white ink before turning on print engine 9 Power up the print engine 9 Reset Waste Ink Pad Counter and power cycle print engine 9 Inspect spit tray clean replace as needed 10 Clean and lubricate print station X axis shafts and rails 10 Clean the UV lamp 12 Lubricate Y axis rails 12 Achieve a correct noz...

Page 9: ... the swab 7 Turn off the main power When the green LED light on the control panel power has turned to amber power off the printer with the main power switch 8 Empty the waste ink bottle The ink in the bottle should be emptied at the end of each day or more often if necessary Direct Color Systems recommends filling an empty coffee can or similar with cat litter or an oil absorbing product found in ...

Page 10: ...ded Use a 3 in 1 oil or a light sewing machine oil on the shafts and rails Use the lithium grease on the round shaft only Locate a spare syringe and filling needle in your printer accessory kit Fill the syringe with a small amount of 3 in 1 oil Use a new syringe and filling needle and label it to avoid mixing the oil with any inks or wash The lithium grease can be applied with a gloved finger Move...

Page 11: ...es of the UV lamp carriage Do not use WD 40 on the UV lamp rails Clean with an IPA wipe when needed Manually move the print head left and right do not move the lamp it will follow along with the print head to spread the oil along the length of the shaft Again using a gloved finger apply a light grease ex lithium in the areas indicated to the print head upper guide Use a very small amount of grease...

Page 12: ...Use a glass scraper found in your accessories kit and gently scrape across the surface until the glass is clear Wipe the glass again Visually confirm that the lamp has not moved by checking that it is higher than the print head and that it is parallel to the media table Also confirm that the reflectors surrounding the glass have not been damaged Replace if they are bent 12 Lubricate Y axis rails U...

Page 13: ...an the wiper blade Clean the wiper in the capping station to avoid streaking in your finished images and or if drops of ink on the bottom of the head are not being wiped off after a cleaning cycle Monthly or Periodic Maintenance 15 Inspect intake fan filter on UV lamp Lift the cover Press to unlock the print head carriage When it has stopped moving manually move it to the far left of the shaft Ins...

Page 14: ...an guard and secure with the retainer and 4 screws 16 Replace syringes and filling needles every 28 days No more than every 28 days discard all filling syringes and filling needles Begin using new ones 17 Clean encoder wheel for Y axis every 84 days Clean with an IPA wipe 18 Every 3 months replace the capping station Go to page 16 for instructions 19 Replace all ink cartridges every 84 days or mor...

Page 15: ...k for no ink flow Check that ink is flowing from the cartridge 1 If necessary press to return the print head to its normal position 2 Remove the filler cap on the cartridge color that has the bad nozzle check This will allow more ink flow through that head 3 Do 2 print head cleaning cycles Replace the cartridge filler cap Do a nozzle check If this doesn t give a good nozzle check then proceed to C...

Page 16: ...p the wiper Do not remove the capping station The picture is for demonstration purposes only 3 Wearing gloves wipe the blade clean with an IPA wipe provided in your cleaning kit Inspect the edge of the wiper blade for damage or irregular shaped dried ink that can t be removed with cleaning If it cannot be removed the blade must be replaced Contact DCS for instructions for replacing the blade 4 Ret...

Page 17: ...s an electrical failure of the pump motor d It is more than 90 days old Tools Required Long magnetized Philips head screwdriver Approximately 20 minutes Time Required Needle nose pliers 1 Press the up arrow button until the print engine is at its maximum height Press Turn off main power DO NOT PRESS 2 The Capping Station is mounted to the printer with 5 Philips head screws 4 hold it in place 1 for...

Page 18: ... the print engine Disconnect orange ground wire 5 Disconnect the electrical cable that goes to the motor Do not leave the gender changer connected to the capping station Leave it connected to the wire that is attached to the printer 6 Carefully remove the unit 7 Reverse procedure to install the replacement unit 8 Select an Initial Charge from the Device Properties screen to get the ink flowing thr...

Page 19: ...Required 3 32 hex head wrench Approximately 20 minutes Time Required 1 Make sure the print engine power is ON the green LED is on solid 2 Load a piece of 8 5 x 11 or A4 paper or a white substrate of similar size Use the edge guides to align it on the left edge of the table 3 Open the Color Byte Rip Pro Queue Select the Color Only queue 4 Be sure the table is at Print Home Go to Devices Print Test ...

Page 20: ... 500 If the black line is less than 500 then the print home sensor must be moved toward the left by the difference between the width of the black line and 500 1 Raise the elevator to its maximum height 2 Loosen the locking screws holding the sensor 3 Turn the adjustment screw clockwise to move the sensor toward the far left position One full rotation of the adjustment screw equals approximately 02...

Page 21: ... to that and enter a value of 40 5 Reprint the Test Page There is a white gap before the vertical line If there is a white gap before the 1 000 thick line then an adjustment must be made to close this gap Measure the gap and record the resulting value without decimals For example if the gap is 0 003 thick record a value of 3 1 Click on Printer Status and Settings 2 Select Read First Dot and record...

Page 22: ... PT 1320 T004 Head Height Tool provided by DCS Approximately 20 Minutes Time Required Make sure the print engine power is ON LED solid green Press and raise the print engine so that there is no chance of damaging the print head during this procedure Press to move the table to print home Open the Color Byte Rip Pro Queue Click OK on the Reminder dialog box that says Have you performed your weekly I...

Page 23: ... Print Head amber light is displayed on the green button of the front panel DO NOT turn print engine on Check for level Move the media table to the far left Remove any substrate and tacky mat from the media table Remove the media guide and lower the edge guides Move the media table to the far right Use SLOW TABLE SPEED by pressing and holding while pressing to move the media table toward the print...

Page 24: ...ge between the Print Head and the Media Table It should fit all the way under the head with very little gap just enough to slide a piece of paper in between Move the head to another point on the axis and check again Check in several places If there is any significant difference at any of these points contact DCS Tech Support for adjustment information If the head height needs adjustment go to page...

Page 25: ...e the arrow keys to move the media table so the front edge is under the print head Place the print head near the center of the media table Slide the Head Height Gauge between the media table and print head It should slide easily but not have a gap larger than the thickness of a piece of copier paper Each full turn of the adjustment screw equals 010 0 25mm If the Gauge will not fit a Loosen the loc...

Page 26: ... in front of the UV lamp Press and hold then use the arrow keys to move the media table so the shims are under the lamp The lamp should be only slightly above the shims enough so that a piece of copier paper can fit If the lamp is not at the right height hold the lamp and use the hex tools to first loosen the set screw and then the lamp screw Do not let the lamp slide on its own Move the lamp so t...

Page 27: ...urred to the Print Head unit 2 Some electrical problem has occurred with the Print Head unit 3 There is a clog in the head that prevents the correct nozzle check pattern to be printed and after all attempts at clearing the head the head will not properly print the correct nozzle check Contact Direct Color Systems for the print head replacement instructions and special tools needed for replacing th...

Page 28: ...ight 2 Power OFF Flashes at high speed OFF 1 Press to turn the print engine on Fatal error OFF Flashes at high speed Flashes at high speed 2 See below Maintenance request OFF Flashes alternately Flashes alternately 3 The waste ink counter has exceeded its maximum number Reset the waste ink pad counter Media error ON 4 See below Ink cartridge replacement is in progress Flashes 5 Wait for command to...

Page 29: ...error This condition is caused when a print command was sent to the printer and the media table was not at print home To clear press the Print Home button then Press the Media Feed Cancel button This should clear the error and start the print No ink cartridge error One or more ink cartridges are not installed or installed incorrectly wrong slot or the cartridge chip is reading ink out Press and th...

Page 30: ...40 C It will turn back on automatically when the operating temperature has returned to an acceptable value The filter If it is dirty it will reduce air flow and can cause high temperature leading to automatic shut down The ambient temperature The filter Switch AC main power on No lights on the control panel and no table or elevator movement when control panel buttons are pressed Check AC power cor...

Page 31: ...on the YACB board Check F1 42 VDC fuse on the YACB board Check F2 5 VDC fuse on the YACB board Check the Y axis motor and gear train Replace 42 VDC 2 Amp Fuse Replace 5 VDC 1 Amp Fuse Replace YACB Board Replace Y axis motor Replace Printer Power Supply Pressing Control Panel buttons Up Arrow and Down Arrow doesn t move the print engine elevator up or down Check and reseat cable connected to CN1 on...

Page 32: ...n You may have to do this up to 3 times to clear this error If the fatal error continues to occur check the following 1 CR motor not turning Print Head Motor A Missing 42 volts check EIB F3 42 volt 75 amp fuse B Check the CR motor connector at the motor end and at the Epson bd Replace EIB 42 volt Fuse Replace CR motor The ASF assembly in the DSC configuration is the motor a haft moon disc attached...

Page 33: ... drive of the CR motor is transmitted to the Carriage Unit and the Carriage Unit performs Head Position detection operation in the following path The Carriage Unit Verifies that it s at the Home Position It tries to move Right then moves left to confirm Carriage Unit lock position Then moves Right to Home position 3 The drive of the Pump Motor is transmitted to the Cap Unit the Cap opens lowers an...

Page 34: ...t Head ID to be the same on Print Head as read from the software Replace Small Waste Pad Replace Print Head Horizontal banding in the Image being printed Check Nozzle Check Pattern for Correct spray Check Print Head Height See Head Height Adjustment Check Print Head ID to be the same on Print Head as read from the software Check Media Table speed to make sure it is not to slow and causing erratic ...

Page 35: ...on the cartridge This will allow an excessive amount of ink to flow through the nozzle and into the capping station 3 Filling the cartridges while they are still in the Print Head This should never be done because when the filler cap on the cartridge is removed the valve on the bottom of cartridge is still open This will allow an excessive amount of ink to flow through the nozzle and into the capp...

Page 36: ...ge has a halo or faded outline around the image Possible Cause Solution 1 Static on plastic substrate 1 Wipe down the substrate lightly with an alcohol wipe The printed image has excessive debris dots or lint in the image Possible Cause Solution 1 Airborne dust settling on the substrate 1 Ensure that the printer s cover is installed at all times during printing 2 Airborne dust settling on the Medi...

Page 37: ...ith the clear A thinner layer will be harder to get under and scrape off Always allow the printed product to cure completely for 24 hours before testing adhesion Q How can I print larger images on rounded objects A When printing to round objects golf balls bottles etc eliminate the small dots and use a mixture of medium and large dots This will help get a larger radius Be aware though that it will...

Page 38: ...ng products Windex Pledge etc A Yes The UV inks are resistant to cleaners and solvents Q How long does it take to print an 8 x10 203mm x 254mm image A Again this is print mode dependent Consult the current DCS Product Catalog for a complete list of printer metrics Q What is the largest object that can be printed on A The 1024UV and 1024UVHS can print on an object 13 w x 24 l x 6 h 330mm x 610mm x ...

Page 39: ... use the provided cardboard ink box and store the box in a light tight cabinet as well Do not store the needles and syringes in an air tight box Q Should I use a new filling needle and syringe every time I fill my ink cartridges A No It is only necessary to use a new filling needle and syringe every 84 days However after filling a cartridge be sure to pump the syringe into the trash to discharge a...

Page 40: ...Maintenance Log Direct Jet UV Printer DCS_Direct_Jet_UV_Printer_Maintenance_Log_REVB021413 ...

Page 41: ...d for the day For the most part these tasks remain the same except for incremental replacement of accessories and parts e g Week 12 notes replacement of the capping station Using the Notes Section The note section is very important This section is for anything that occurs that is out of the ordinary e g nozzle drops outs head strikes premature failure of parts etc This section will be examined ver...

Page 42: ... Nozzle Check Shake White Ink Power up Print Engine Achieve Correct Nozzle Check Shake White Ink Power up Print Engine Achieve Correct Nozzle Check Pre Production Day 1 Day 2 Day 3 Day 4 Day 5 Day 6 Day 7 Mid Production Day 1 Post Production Day 1 Achieve Correct Nozzle Check Power Down Machine Empty ink waste bottle Achieve Correct Nozzle Check Power Down Machine Empty ink waste bottle Achieve Co...

Page 43: ...ozzle Check Shake White Ink Power up Print Engine Achieve Correct Nozzle Check Shake White Ink Power up Print Engine Achieve Correct Nozzle Check Pre Production Day 8 Day 9 Day 10 Day 11 Day 12 Day 13 Day 14 Mid Production Day 1 Post Production Day 1 Achieve Correct Nozzle Check Power Down Machine Empty ink waste bottle Achieve Correct Nozzle Check Power Down Machine Empty ink waste bottle Achieve...

Page 44: ...zzle Check Shake White Ink Power up Print Engine Achieve Correct Nozzle Check Shake White Ink Power up Print Engine Achieve Correct Nozzle Check Pre Production Day 15 Day 16 Day 17 Day 18 Day 19 Day 20 Day 21 Mid Production Day 1 Post Production Day 1 Achieve Correct Nozzle Check Power Down Machine Empty ink waste bottle Achieve Correct Nozzle Check Power Down Machine Empty ink waste bottle Achiev...

Page 45: ...zzle Check Shake White Ink Power up Print Engine Achieve Correct Nozzle Check Shake White Ink Power up Print Engine Achieve Correct Nozzle Check Pre Production Day 22 Day 23 Day 24 Day 25 Day 26 Day 27 Day 28 Mid Production Day 1 Post Production Day 1 Achieve Correct Nozzle Check Power Down Machine Empty ink waste bottle Achieve Correct Nozzle Check Power Down Machine Empty ink waste bottle Achiev...

Page 46: ...ite Ink Power up Print Engine Achieve Correct Nozzle Check Shake White Ink Power up Print Engine Achieve Correct Nozzle Check Pre Production Day 29 Day 30 Day 31 Day 32 Day 33 Day 34 Day 35 Mid Production Day 1 Post Production Day 1 Achieve Correct Nozzle Check Power Down Machine Empty ink waste bottle Achieve Correct Nozzle Check Power Down Machine Empty ink waste bottle Achieve Correct Nozzle Ch...

Page 47: ...zzle Check Shake White Ink Power up Print Engine Achieve Correct Nozzle Check Shake White Ink Power up Print Engine Achieve Correct Nozzle Check Pre Production Day 36 Day 37 Day 38 Day 39 Day 40 Day 41 Day 42 Mid Production Day 1 Post Production Day 1 Achieve Correct Nozzle Check Power Down Machine Empty ink waste bottle Achieve Correct Nozzle Check Power Down Machine Empty ink waste bottle Achiev...

Page 48: ...zzle Check Shake White Ink Power up Print Engine Achieve Correct Nozzle Check Shake White Ink Power up Print Engine Achieve Correct Nozzle Check Pre Production Day 43 Day 44 Day 45 Day 46 Day 47 Day 48 Day 49 Mid Production Day 1 Post Production Day 1 Achieve Correct Nozzle Check Power Down Machine Empty ink waste bottle Achieve Correct Nozzle Check Power Down Machine Empty ink waste bottle Achiev...

Page 49: ...zzle Check Shake White Ink Power up Print Engine Achieve Correct Nozzle Check Shake White Ink Power up Print Engine Achieve Correct Nozzle Check Pre Production Day 50 Day 51 Day 52 Day 53 Day 54 Day 55 Day 56 Mid Production Day 1 Post Production Day 1 Achieve Correct Nozzle Check Power Down Machine Empty ink waste bottle Achieve Correct Nozzle Check Power Down Machine Empty ink waste bottle Achiev...

Page 50: ...ite Ink Power up Print Engine Achieve Correct Nozzle Check Shake White Ink Power up Print Engine Achieve Correct Nozzle Check Pre Production Day 57 Day 58 Day 59 Day 60 Day 61 Day 62 Day 63 Mid Production Day 1 Post Production Day 1 Achieve Correct Nozzle Check Power Down Machine Empty ink waste bottle Achieve Correct Nozzle Check Power Down Machine Empty ink waste bottle Achieve Correct Nozzle Ch...

Page 51: ...zzle Check Shake White Ink Power up Print Engine Achieve Correct Nozzle Check Shake White Ink Power up Print Engine Achieve Correct Nozzle Check Pre Production Day 64 Day 65 Day 66 Day 67 Day 68 Day 69 Day 70 Mid Production Day 1 Post Production Day 1 Achieve Correct Nozzle Check Power Down Machine Empty ink waste bottle Achieve Correct Nozzle Check Power Down Machine Empty ink waste bottle Achiev...

Page 52: ...zzle Check Shake White Ink Power up Print Engine Achieve Correct Nozzle Check Shake White Ink Power up Print Engine Achieve Correct Nozzle Check Pre Production Day 71 Day 72 Day 73 Day 74 Day 75 Day 76 Day 77 Mid Production Day 1 Post Production Day 1 Achieve Correct Nozzle Check Power Down Machine Empty ink waste bottle Achieve Correct Nozzle Check Power Down Machine Empty ink waste bottle Achiev...

Page 53: ...eve Correct Nozzle Check Shake White Ink Power up Print Engine Achieve Correct Nozzle Check Pre Production Day 78 Day 79 Day 80 Day 81 Day 82 Day 83 Day 84 Mid Production Day 1 Post Production Day 1 Achieve Correct Nozzle Check Power Down Machine Empty ink waste bottle Achieve Correct Nozzle Check Power Down Machine Empty ink waste bottle Achieve Correct Nozzle Check Power Down Machine Empty ink w...

Reviews: