Dimplex DWF3651 Owner'S Manual Download Page 8

8  

www.dimplex.com


Fireplace Installation 

to mount the unit on a wall, 

above an electrical outlet. 

Access to the electrical outlet 

must be maintained. Ensure 

the installation meets the 

national and state/provincial 

electrical codes.

!

 NOTE:

 It is recommended 

that the bottom of the unit not be 

mounted higher than 1020mm 

(40") from the Fireplace Installa

-

tion ground to maintain an opti-

mized viewing angle of the flame.

 CAUTION: 

Ensure that the top 

of the unit is at least 610mm 

(24") from the ceiling or any 

object (i.e. Electrical recep

-

tacles) that may obstruct or be 

susceptible the flow or tem

-

perature of air out of the unit.

 CAUTION:

 High temperature, 

keep electrical cords, drapery, 

and other furnishings at least 

3 feet (0.9m) from the front of 

the heater and away from the 

side and rear.

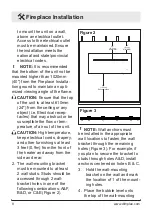
2.  The wall-mounting bracket 

must be mounted to at least 

2 wall studs. Studs should be 

accessed through 2 wall-

bracket holes in one of the 

following combinations: A&F, 

B&D, or C&E (Figure 2).

!


NOTE: 

Wall anchors must 

be installed in the appropriate 

wall locations to fasten the wall 

bracket through the remaining 

holes (Figure 3). For example, if 

you plan to secure the bracket to 

studs through holes A&D, install 

anchors centered on holes B & C.
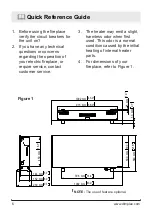
3. 

Hold the wall-mounting 

bracket on the wall and mark 

the location of 1 of the mount

-

ing holes.

4.  Place the bubble level onto 

the top of the wall-mounting 

Figure 2

Figure 3

40"

(102 cm)

Recommended

24"

(61 cm)

MINIMUM

32"

(81.3 cm)

MINIMUM

Summary of Contents for DWF3651

Page 1: ...this manual first before attempting to install or use this fireplace For your safety always comply with all warnings and safety instructions contained in this manual to prevent personal injury or pro...

Page 2: ...AUTION Procedures and techniques which if not carefully followed will result in damage to the equipment WARNING Procedures and techniques which if not carefully followed will expose the user to the ri...

Page 3: ...t www dimplex com customer_support For Troubleshooting and Technical Support OR Toll Free 1 888 DIMPLEX 1 888 346 7539 Monday to Friday 8 00 a m to 4 30 p m EST In order to better serve you please hav...

Page 4: ...oid a hazard Do not operate any unit with a damaged cord or plug or if the heater has malfunctioned or if IMPORTANT INSTRUCTIONS the electric fireplace has been dropped or damaged in any man ner conta...

Page 5: ...ma terials in the electric fireplace Do not strike the fireplace glass Always use a certified electri cian should new circuits or outlets be required Always use properly grounded fused and polarized...

Page 6: ...ify the circuit breakers for the unit on 2 If you have any technical questions or concerns regarding the operation of your electric fireplace or require service contact customer service 3 The heater m...

Page 7: ...codes and other applicable regulations to reduce the risk of fire electric shock and injury to persons Do not attempt to wire your own new outlets or circuits To reduce the risk of fire electric Fire...

Page 8: ...UTION High temperature keep electrical cords drapery and other furnishings at least 3 feet 0 9m from the front of the heater and away from the side and rear 2 The wall mounting bracket must be mounted...

Page 9: ...lling the retaining screws Figure 7 14 Excess electrical cord can be bracket 5 Adjust the wall mounting bracket so the bubble on the level is centered between the two black lines 6 Mark 3 other mounti...

Page 10: ...ews 3 Turn the unit upright 4 Attach the provided cover plates over the two hanging bracket openings on the back of the unit with the provided screws Figure 8 5 Carefully pour and evenly dis tribute t...

Page 11: ...sing and battery cover A Standby Turns the unit On and Off Activated by pressing the Standby button on the remote or the unit The unit will turn on with the same functions that it was set to when it w...

Page 12: ...heater parts and will not occur again D E Thermostat Controls Adjusts the temperature set point to your individual requirements Once the desired set temperature is reached the heater will turn off The...

Page 13: ...will not come back on without being reset It can be reset by unplugging the Operation or the is pressed the On Screen Display will indicate F Color Themes Different presets of ambient light ing color...

Page 14: ...ots To prevent scratching do not use abrasive cleaners Fireplace Surface Cleaning Use only a damp cloth to clean painted surfaces of the fireplace Do not use abrasive cleaners Servicing Except for ins...

Page 15: ...rom defects in material and workmanship for a period of 1 year from the date of the first purchase of such products The limited 1 year warranty period also applies to any implied warranties that may e...

Page 16: ...ASIS FOR ANY INDIRECT SPECIAL PUNITIVE EXEMPLARY CONSEQUENTIAL OR INCIDENTAL LOSS COST OR DAMAGE ARISING OUT OF OR IN CONNECTION WITH THE SALE MAINTENANCE USE OR INABILITY TO USE THE PRODUCT EVEN IF D...

Page 17: ...RP Display Control Board 3001430200RP Switchboard 3001520100RP Relay Board 3001440200RP AC DC Adapter 2100250100RP Remote Control 6700520200RP Thermistor 3001560100RP Surface Mount Hardware Kit 960141...

Reviews: