


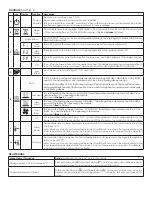

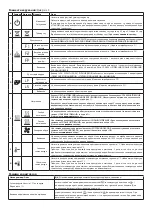


Controls:
See Fig. 2
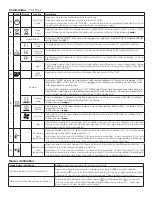
Icon Display
Function
Description
A
-
Power /
Standby
Press once to turn the product ‘ON’.
Press a second time to put the product into ‘STANDBY’
(When returning from ‘STANDBY’ mode the product will return to previous settings unless the product
has been plugged out, in which case it will reset to factory settings)
B
Sleep
Timer
Press multiple times to change the ‘SLEEP TIMER’ in 0.5 hr increments from 0.5 hr to 8.0 hr before turning
off. The remaining time on the ‘SLEEP TIMER’ displays. (T
his icon is
Green
in Colour)
C
Flame Effect
‘FLAME EFFECT’ button cycles the unit
sequentially through the 4 setting, LOW FLAME, HIGH FLAME,
DEMO MODE and OFF.
f1
Low
Flame
This setting will run the flame effect at a low brighness level. (The display will show F1)
f2
High
Flame
This setting will run the flame effect at a high brighness level. (The display will show F2)
fp
Demo
Mode
This setting will slowly pulse the flame effect between low and high brightness. (The display will show
FP)
-
Off
This will turn the flame effect off. If the heater is running, the display will activate and remain active to
read the set temperature and show if the product is on LOW HEAT/ HIGH HEAT/COOL BLOW.
D
-
Log
Effect
Press this button to turn the log LED ‘ON’ and ‘OFF‘
E
Heat
‘HEAT’ button cycles the unit sequentially through the 4 settings: LOW HEAT, HIGH HEAT, COOL BLOW
and OFF. The heat setting will be indicated by an icon in the floating display see Fig.1.
When the flame effect is ‘ON’ the floating display will turn off after 5 seconds, however if the heater is
being used independantly of the flame effect. The low heat or high heat icon will appear continuously
in the floating display.
Low Heat
This setting will run the heater at ‘LOW HEAT’ this setting will be indicated by the ‘LOW HEAT’ icon
and the letters ‘LO’ appearing in the display.
(This icon is
Orange
in Colour)
High
Heat
This icon in the floating display indicates ‘HIGH HEAT’ this setting will be indicated by the ‘HIGH HEAT’
icon and the letters ‘HI’ appearing in the display.
(This icon is
Red
in Colour)
Cool
Blow
This icon in the floating display indicates ‘COOL BLOW’ this setting will be indicated by the ‘COOL
BLOW’ icon and the letters ‘CB’ appearing in the display.
(This icon is
Blue
in Colour)
-
Off
This switches the heater and blower ‘OFF’, no icon will be displayed in the floating display. Note the
blower will run for 10-20 seconds after being turned off this is to ensure the product cools down safely.
F
-
Temp
Down
Press multiple times to lower the heater temperature in 1
0
C increments. The lowest temperature that
can be set 5
0
C.
Note: Once you stop at your desired temperature this will flash 3 times, then the display will show the
room temperature as detected by the product. If the set temperature is lower than the detected
room temperature the heater will not activate.
G
-
Temp Up
Press multiple times to increase the heater temperature in 1
0
C increments. The highest temperature
that can be set 37
0
C.
Note: Once you stop at your desired temperature this will flash 3 times, then the display will show the
room temperature as detected by the product. If the set temperature is lower than the detected
room temperature the heater will not activate.
User Modes:
Mode Name /Discription
Action
(Actions cannot be input by remote control)
Change Celsius (
0
C) to Fahrenheit (
0
F)
Press both Temp up ( ) and Temp down ( ) on the unit and hold until beep is heard
and display flashes. (To revert back to Celsius repeat this action)
Disable/Enable Heat Options
Hold both Heat Button (
) and Flame Button
( )
, on the unit, for 2 seconds, when the
heater has been disabled the display will read “--” and beep. To enble heat repeat this
action.


