


General Tips
Only use filtered tap water in this appliance.
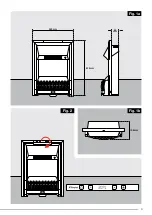
always ensure that the appliance is sitting on a level surface.
if you intend not using the appliance for longer than 2 weeks, remove and empty the sump and
water tank.
once installed, never move this appliance or lay on its back, without draining the water from
sump and water tank.
Cleaning
Warning – always press
to turn off the product and disconnect the product from the power
supply before cleaning the fire. Leave the appliance for 10 minutes to allow the product to cool
down.
Maintenance
•
press the button to display the current room temperature followed by the current set point
temperature
•
press the and
buttons to adjust your set point temperature. Note: if the set point
temperature is below the room temperature, the heat function will not operate. the temperature
range is from 15 - 35°C
•
press to increase the
setting.
•
press to decrease the
setting.
Setting the Thermostat
plug in the product and press to turn it on. press the button twice to enter the temperature
set mode
. the current room temperature will be displayed (e.g. r23c) followed by the
current set point room temperature (e.g. 26c). press the and buttons to select your set
point room temperature. Allow the display to turn off. Press the button once to enter the Heat
option. press the and buttons to select either
or
heat output. the heater will
turn on when your set point room temperature is higher than the room temperature.
Thermal Safety Cut-out
A thermal safety cut-out is incorporated in the fan heater to prevent damage due to overheating.
This can happen if the heat outlet was restricted in any way. If the cut-out operates, unplug the
heater from the socket outlet and allow approximately 10 minutes before reconnecting. Before
switching the heater back on remove any obstruction that may be restricting the heat outlet, then
continue normal operation.
CAUTION:
in order to avoid a hazard due to inadvertent resetting of the thermal cutout, this
appliance must not be supplied through an external switching device, such as a timer, or
connected to a switch that is regularly switched on and off by the utility.
Getting the Desired Flame Effect
1. using the manual controls or the remote control choose a
setting between F1 and F6.
F1 being the lowest setting and F6 being the highest setting.
2.
Generally the flames appear more realistic when the flame control is turned down.
3.
Give the flame generator time to react to changes you may make.
4.
The fire will use less water if the flame effect is set to a lower level.
5.
Do not tilt or move the fire while there is water in the tank or sump.
6.
Make sure that the fire is on a level floor.
6


