

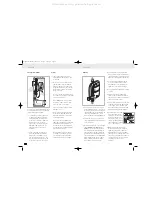

2) Switch on the electrical supply at the
double pole isolating switch, the power
neon on this switch should light.
3) Start the shower by pressing the
‘Cold’
power selector button. Water should
start to flow from the handset within a
few seconds. The water will be at full
force and will run cold.
4) Now press the
‘Low’
power selector
button. Allow a few seconds for the
warmer temperature to reach the
showerhead – this shows that the
‘Low’
power is operating correctly.
5) Now press the
‘High’
power selector
button. The temperature at the shower
head will rise further – this shows that
the full power setting is operating
correctly.
6) Turn the bottom temperature control
knob clockwise for hotter water and
anti-clockwise for cooler water. Allow
a few seconds between selections for
the temperature change to reach the
showerhead. Note that selecting a
hotter setting in the temperature
control reduces the flow of water.
7) Press the STOP button to stop the water
flow. Water should continue to flow,
eventually running cool before
switching off.
A small amount of water may continue to
drip from the unit as water drains from the
pipe-work. This should stop within a few
minutes.
The commissioning procedure is now
complete.
SECTION 4
Operation
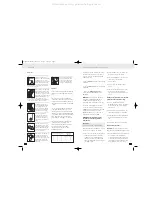
‘Power indicator’:
The power indicator on the shower unit
will light when the shower is switched
on and water is flowing on one of the
two heat settings. The indicator does
not light on the cold setting.
‘Auto Reset Indicator’
The Auto Reset Indicator will illuminate if
an overheat temperature is sensed
during operation. Once activated the
electricity supply to the elements is
switched off until the unit has cooled
sufficiently, where upon power to the
elements will be restored.
‘Low Pressure Indicator’
The low pressure indicator will
illuminate if the mains water supply
pressure falls below the minimum
level. The heat settings will be
disabled until normal operating
pressure is restored.
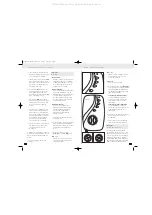
1) Switch on using the pull-cord or wall
mounted switch.
2) To start the shower, turn the temperature
dial to the desired number and press
the desired power button, upon which
water will start to run through the
shower.
3) The shower has three positions
‘Cold’, ‘Low’
power and
‘High’
power.
‘Cold’
setting:
Adjustment of the flow control on this
setting will only alter the flow of water
not the temperature.
FINAL ASSEMBLY AND COMMISSIONING / OPERATION
OPERATION / LOOKING AFTER YOUR SHOWER
‘Low’
setting:
This is the low power setting for economy
during warmer months or when a
cool shower is required.
‘High’
setting:
This is the full power setting.
4) If necessary turn the bottom
‘temperature’
control knob slowly to obtain the desired
showering temperature. Waiting a few
seconds after each adjustment for the
temperature to stabilise.
To increase the shower temperature
Turn the temperature control knob
clockwise, this will decrease the flow
of water and increase the shower
temperature.
To decrease the shower temperature
Turn the temperature control knob
anti-clockwise, this will increase the flow
of water and decrease the shower
temperature.
5) To stop the shower press the STOP button.
Allow the water to run until it stops
automatically
6) Switch off the electricity supply using
the pull-cord or wall mounted switch.
SECTION 5
Looking after your shower
The showerhead should be cleaned
periodically to remove limescale or other
particles which will reduce the performance
of the shower. The frequency of cleaning
will vary according to the local water
quality. In hard water areas cleaning will
be needed more often than in soft water
areas. A liquid non-abrasive bathroom
HIGH
LOW
COLD
LOW
PRESSURE
AUTO
RESET
TEMPERATURE
STOP
Cooler
Warmer
TEMPERATURE
TEMPERATURE
HIGH
LOW
COLD
LOW
PRESSURE
AUTO
RESET
STOP
8
9
Dimp13292-Shower inst aX4 5/5/04 2:08 pm Page 9
All manuals and user guides at all-guides.com