background image

I. System Requirement  


Basic environment for setup this device:  

Hardware requirement:  a PC or Notebook  

Operation system:Windows2000/XP/Vista/7  


II. Feature  


No screws design, easy install or remove disk drive  
Suitable for 3.5" SATA HDD  

Compliant USB3.0 to SATA interface, transfer rate max up  

to5Gbps  

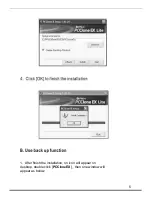
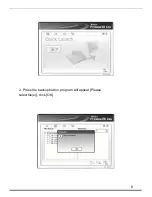
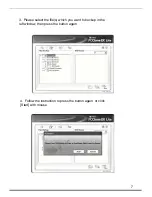
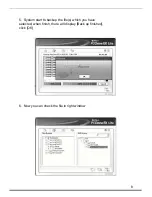
One  touch  backup  function  

Support Plug-paly and Hot-plug.  

Power Supply: Self-power, AC100~240V input, DC 12V output  


III. Check fittings  

Before using the product, please check the fittings in the  

package compliant with the below. If not, please contact the  
local dealers timely.  


one 3.5" External Enclosure  

one  12V  Adapter  

one  CD  Driver  

one User's Manual  

one  USB3.0  cable  


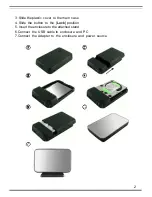
IV. Hardware Install  


1. Slide  the button  to  [

Unlock

]  position,  and  pull  the  plastic  

cover  out  
2. Connect the 3.5"  SATA HDD to the 22pin SATA connector  
correctly and firmly  

Summary of Contents for DA-70577

Page 1: ...SATA HDD 3 5 USB 3 0 External Enclosure User Manual DA 70577...

Page 2: ...unction Support Plug paly and Hot plug Power Supply Self power AC100 240V input DC 12V output III Check fittings Before using the product please check the fittings in the package compliant with the be...

Page 3: ...tic cover to the main case 4 Slide the button to the Lock position 5 Insert the enclosure to the attached stand 6 Connect the USB cable to enclosure and PC 7 Connect the Adapter to the enclosure and p...

Page 4: ...in7 system will automatically detect the new hardware and finish the setup Then an icon will appear on the right bottom area of the system toolbar as below Congratulation you enyoy this product now VI...

Page 5: ...ation and usage A software installation 1 Open the folder PCCLONEEX_LITE_1_82_01_JMICRON and double click Setup the window will apear as below 2 Click Agree to accrpt the license agreement 3 Click Ins...

Page 6: ...1 After finish the installation on icon will appear on desktop double click PCCloneEX then one window will appear as below 5...

Page 7: ...2 Press the backup button program will appear Please select file s click OK 6...

Page 8: ...3 Please select the file s which you want to backup in the left window then press the button again 4 Follow the instruction to press the button again or click Start with mouse 7...

Page 9: ...5 System start to backup the file s which you have selected when finish there will display Back up finished click OK 6 Now you can check the file in right window 8...

Page 10: ...ive you must format it before you use it please follow the steps as bellow to format your new Hard Disk Drive 1 Right click My Computer and select Manager 2 System will display a Computer Manager wind...

Page 11: ...manual The information contained in this manual is provided for the general use by the customers No part of this document may be reproduced or transmitted in any form by any means without the express...

Reviews: