DIGITAL YACHT iKConnect Installation And Instruction Manual Download Page 4

Installation Step 3 

The  following  steps  only  need  to  be  followed  if  you
are  connecting  the  iKConnect  to  a  Digital  Yacht
WL70 long range Wi-Fi Adaptor.

Using its integrated USB cable, plug the WL70 in to
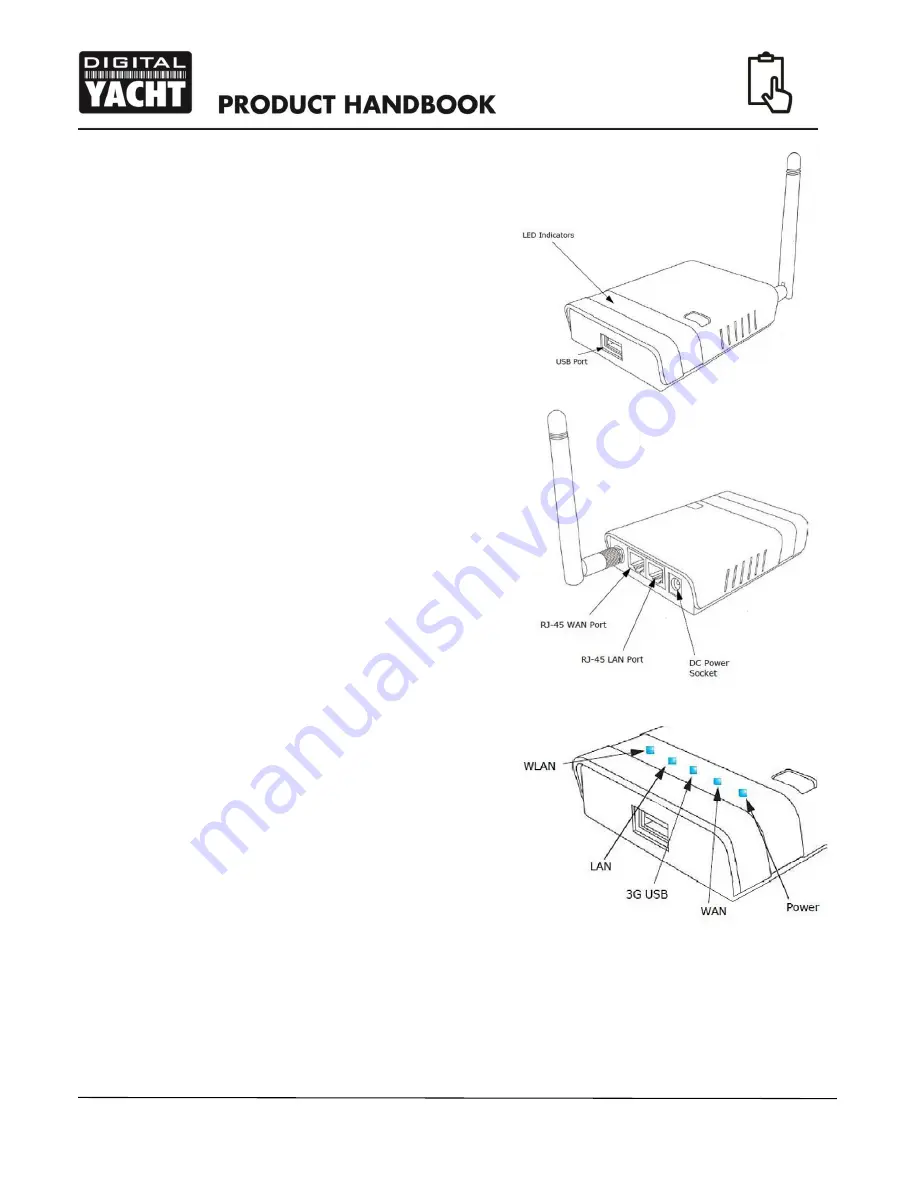
the USB socket on the front of the iKConnect.

The WL70 is only detected during power up and we
do not currently support “hot plugging” of the WL70
whilst  the  iKConnect  is  powered  up.  Therefore
always  plug  and  unplug  the  WL70  whilst  the
iKConnect is powered off.

Installation Step 4 

The following steps only need to be followed if you are
connecting  the  iKConnect  to  another  wired  network
device, like the Digital Yacht iKommunicate gateway.

Connect the supplied RJ45 network  cable between the
network  device’s  Ethernet  socket  and  the  iKConnect’s
“RJ-45 LAN Port” socket.

Installation Step 5 

Now that we have all of the connections made, we can
apply power to the iKConnect

As the iKConnect powers up the LEDs on the top side
of the unit will briefly illuminate and then only the Power
LED will stay illuminated.

As the iKConnect initialises and configures itself, the
WPS button will flash for about 15 seconds and after
that stops the iKConnect should be fully powered up
and ready to be used.

During normal operation, the Power and WPS LEDs will
be illuminated and also the LAN, USB, WAN and WLAN
LEDs if you have devices connected to these ports.

As network traffic is transmitted/received on any of the network ports, the relevant LED will flash.

On the following page, is a typical network diagram showing how the iKConnect can be used as the wireless
router on the boat.

Summary of Contents for iKConnect

Page 1: ...iKConnect Wireless Router...

Page 2: ...at 5 cable to connect between the iKConnect and your Ethernet network A connection to the boat s 12v DC supply where the unit is to be installed Two suitable pan head screws for fixing the iKConnect i...

Page 3: ...om the boat s supply Power is connected to the iKConnect via the supplied 2 1mm DC Jack Plug cable assembly The cable has two wires the Red wire is the positive connection and the Black wire is the ne...

Page 4: ...ween the network device s Ethernet socket and the iKConnect s RJ 45 LAN Port socket Installation Step 5 Now that we have all of the connections made we can apply power to the iKConnect As the iKConnec...

Page 5: ...arina hotspots and we do not recommend changing them unless you are experienced with configuring PC networks and wireless routers We do however recommend that you change the default wireless Password...

Page 6: ...k the Edit button for the iKConnect network You should now be taken to the iKConnect network setting page shown in Fig 4 Scroll down the page to the Interface Configuration section and change the SSID...

Page 7: ...ablet or Computer that is connected to the iKConnect by opening the browser on the device and typing the iKConnect IP address 192 168 1 1 in to the browser s address bar You will then see the iKConnec...

Page 8: ...URL in to your browser s address bar You may find that you are redirected to the Welcome Register Login type page of the marina hotspot where you will need to follow the instructions register type in...

Page 9: ...Connect to its factory defaults Apply power to iKConnect and allow 30 seconds for it to fully boot up Now turn the unit over and locate the Reset switch see Fig 13 With the end of a pencil ball point...

Reviews: