background image


24 

Auto Logout

: Turn On or Off Auto Logout option. 

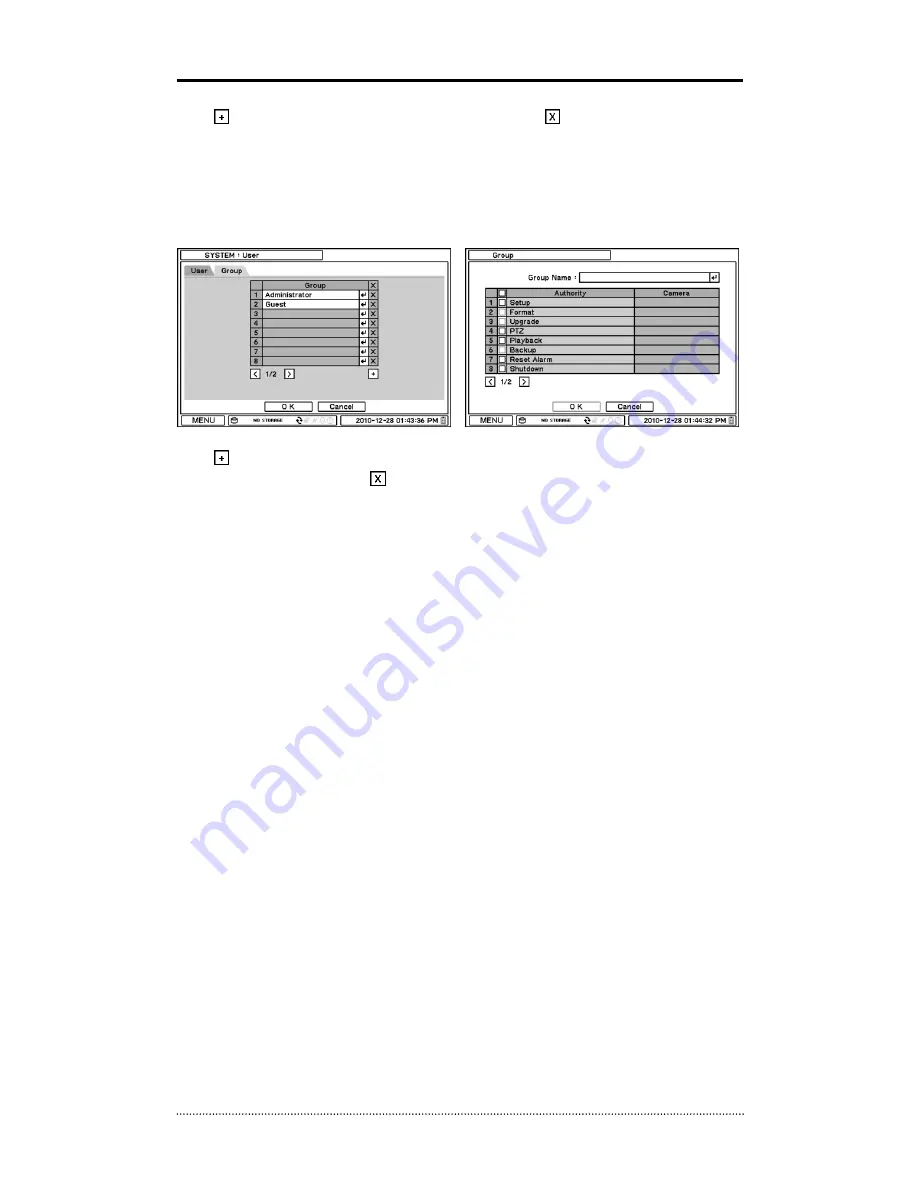
Press 

  to add a new user. To remove an existing user, press 

  next to it. 

User Name

: Enter a user name 

Group

: Select a Group which a new user will belong to 

Password

: Set a new password or change a password. 


Note

: Default password is “1111” 

Note

: Do not use “admin” as an user name since it may cause a fatal error. 


Set user registration and access rights for the system. Press Group tap to add and set group. 
Press 

  to add a new group. Enter a group name and select access rights for a group. To 

remove an existing Group, press 

  next to it. 

Summary of Contents for HDF1212E

Page 1: ...User s Manual Premium Entry Level Real Time DVR H 264 Stand Alone DVR Independent Dual Display Triple Streaming Auto IP Detection iPhone Android Phone Support ...

Page 2: ...product The information in this manual is prepared based on the current specifications for the product The manufacturer is currently adding new functions and will continue to upgrade the product with new technology All specifications may be changed without notice to individual users Cautions We strongly recommend that users read all safety cautions carefully before operating the product to operate...

Page 3: ...wer switch and remove the power cord from the power outlet Failure to do so may result in fire and electric shock Please use only the power cord supplied with the product Use of other power cords may result in fire and electric shock In case of smoke smell or noise immediately turn off the power switch and remove the power cord from the power outlet Continued operation of the product may result in...

Page 4: ...ecommended to read the relevant details carefully so as to operate the product properly and without harm The product may not work properly if the power source is unstable or and if electric shock occurs Make sure the correct rated power is available The product is designed to be proof against electric power failures however damage may occur as a result of power failure Current data may be damaged ...

Page 5: ... Configuration 22 2 1 SYSTEM 22 2 1 1 MENU SYSTEM Information 22 2 1 2 MENU SYSTEM Date Time 23 2 1 3 MENU SYSTEM User 23 2 1 4 MENU SYSTEM Quick Setup 25 2 1 5 MENU SYSTEM System Log 25 2 2 DEVICE 26 2 2 1 MENU DEVICE Camera 26 2 2 2 MENU DEVICE Audio 27 2 2 3 MENU DEVICE Alarm 27 2 2 4 MENU DEVICE Keyboard 28 2 2 5 MENU DEVICE RS232 RS485 28 2 3 DISPLAY 29 2 3 1 MENU DISPLAY Display 29 2 3 2 MEN...

Page 6: ...48 4 1 Backup 48 4 2 Instant Backup 49 4 3 Clip Maker 49 Chapter 4 Remote Software Web Viewer 50 4 1 Login 50 4 2 Live 50 4 3 Playback 51 4 3 1 Calendar Search 52 4 3 2 EVENT Search 52 APPENDIX A DDNS 53 1 DDNS Dynamic Domain Name Server 53 1 1 Use DDNS service after signing up for autoipset com 53 1 2 Use DDNS without signing up for autoipset com 56 Appendix B How to Make Digital Signage Data 57 ...

Page 7: ...r for Backup Playback Two USB Port for Mouse operation Multi USB Hub and Backup Up to Two SATA HDD and No Limitation of Capacity Two Way Audio Multiple DVRs can be operated with One Keyboard Controller Text In Relay Output Support Real Time Recording and Multi Ch Playback Triple Streaming Digital Zoom iPhone Android Phone Support Independent Dual Display Dual Display allows user to use both VGA an...

Page 8: ...de Calendar Search Event Search Text In Search Go to Time Playback Mode Multi Channel Normal Reverse Play RW FF x2 x4 x8 x16 x32 Frame to Frame Pause Network Interface Ethernet 10 100 Base Protocol TCP IP HTTP DHCP ADSL PPPoE RTP RTSP Application Live Playback Setup Notification Callback E Mail Web Browse Internet Explorer 7 or higher Mobile Support iPhone Android Phone Real Streaming Storage 2 x ...

Page 9: ...t Time Event Emergency E REC Playback Display 1 4 6 9 Digital Zoom 1 4 6 8 9 13 16 Digital Zoom Search Mode Calendar Search Event Search Text In Search Go to Time Playback Mode Multi Channel Normal Reverse Play RW FF x2 x4 x8 x16 x32 Frame to Frame Pause Network Interface Ethernet 10 100 Base Protocol TCP IP HTTP DHCP ADSL PPPoE RTP RTSP Application Live Playback Setup Notification Callback E Mail...

Page 10: ... The following components are included in the product DVR Unit DC Adaptor Power Cord Remote Controller Quick Guide Customer Card Note Please download Users Guide and Remote Client S W from the address written on a customer card included in the package ...

Page 11: ...he front panel Video Input Connect the coaxial cables from the cameras to the BNC video connectors Audio Input The DVR can record audio up to 4 sources Connect the audio sources to the Audio In RCA connectors All channels need external pre amplifiers It is the user s responsibility to determine if local laws and regulations permit recording audio Audio Out The DVR does not have amplified audio out...

Page 12: ...nitoring options for users Note VGA Monitor is set as a main monitor when system boots up To move to another monitor CVBS and control it please use one of following control options 1 Press and Hold Display button for 3 seconds 2 Click 2 mouse buttons at the same time 3 Choose Move Display Focus on the contextual menu on GUI Please refer to following list for independent dual display control option...

Page 13: ...or POS machine for Text In function To make connections on the terminal block press and hold the button and insert the wire in the hole below the button ETC Network Connect a Cat5 cable with an RJ 45 connector to the DVR connector for remote monitoring remote playback remote setup See Chapter 3 2 DVR Configuration for configuring the Network connections Reset The DVR has a Reset switch that will o...

Page 14: ...ated only for mouse Video Input Connect the coaxial cables from the cameras to the BNC video connectors Loop Through Video Connect the coaxial cables from the Loop BNC connector to another device Note To use Loop option additional looping cable will be needed Please contact your supplier Audio Input The DVR can record audio up to 8 sources Connect the audio sources to the Audio In Multi connectors...

Page 15: ...rens or lights Alarm output connectors are TTL signals 3 sensor input and 1 emergency sensor input connectors are provided to connect external devices You can use sensors to signal the DVR with event The emergency sensor is designed for Emergency recording only It will follow Emergency recording setting when it is triggered An RS 232C connector is provided to connect an ATM or POS machine for Text...

Page 16: ... where exposed to rain and wind and water drop May cause fire electric shock and transformation Keep away from fire May cause fire Do not disassemble or remodel on your own May cause malfunction or electric shock Do not put next to flammable materials like flammable spray May cause fire Do not install it at a place with too much dirt May cause fire Do not install it on unstable places like shaking...

Page 17: ...These are used to change settings for the product in MENU mode or used in PTZ control mode pan tilt BACKUP Button Copies recorded data to an external storage device PLAYBACK Button Changes to the playback mode from the live mode PAUSE Button Under playback mode the button can be used to pause the playback screen Display menu to save PTZ preset under PTZ mode PLAY Button Plays the video forward Pre...

Page 18: ...rd will turn on the power of DVR It will take approximately 10 to 30 seconds for the system to be initialized Once the system is initialized it will display live screen and begin to record video automatically Note To turn off the system select SHUTDOWN under main menu MENU SHUTDOWN and unplug the power cord when the shutdown message appears Note When installing the HDD for the first time the HDD s...

Page 19: ...r 1 4 Display Icons No Recording Recording Red E REC Emergency Recording Event Recording Red Pre Event Recording Blue Motion Detection Sensor Detection Text In PTZ Camera Instant Backup Clip Maker Blue Backup Red Video Loss ...

Page 20: ... using a mouse Click button to pop up virtual keyboard when using the front buttons or remote controller to enter password The factory default password is 1111 so press 1111 and OK to log in to the system for a first time log in Password can be set under password set up option MENU SYSTEM User System will be automatically log out if it is not in use for sometime This Auto Logout Time can be set un...

Page 21: ...e Please make sure the system log out is done when the system setting or operation completed to prevent any unauthorized changes of system settings or operations MAIN MENU SYSTEM Information Date Time User Quick Setup System Log DEVICE Camera Audio Alarm Keyboard RS232 RS485 DISPLAY Display VGA CVBS Digital Signage RECORD Storage Record Utilities NETWORK Address DDNS Notification Transmission EVEN...

Page 22: ...nt image display Sequence Begin sequence display Zoom Zoom in image x2 x4 x8 PIP Select PIP mode and camera Audio Select Audio outs PTZ Select PTZ options Backup Select backup options Playback Playback recorded data E Record Start Emergency Recording Log Select System Event log Move Display Focus Move control focus e g setup OSD and etc from one monitor to another when using both CVBS and VGA at t...

Page 23: ...ring the upgrade Removing USB Flash Memory or Turning off the system during the upgrade may cause system malfunctioning Remote Control ID Enter Remote Control ID to control multiple DVRs individually If Remote Control ID remains as 0 Remote ID does not have to be selected when using remote controller It will work as general ID for any remote controls and a remote control will communicate with any ...

Page 24: ...e with the registered time server Note NTP is not essential for DVR operation Any type of Standard Time Server can be used e g time windows com Time Synch might not be completed due to heavy traffic or delays from the Time Synch server Press Holiday to set specific dates for Holiday setup Set specific date by pressing button Change and delete dates using and buttons Note There are some Holidays fa...

Page 25: ... will belong to Password Set a new password or change a password Note Default password is 1111 Note Do not use admin as an user name since it may cause a fatal error Set user registration and access rights for the system Press Group tap to add and set group Press to add a new group Enter a group name and select access rights for a group To remove an existing Group press next to it ...

Page 26: ...ows easy and basic setup for main menu settings 2 1 5 MENU SYSTEM System Log In the System Log full list of system logs can be searched Press Reload button to refresh log list USE button to search log list page by page Log list can be export in txt format ...

Page 27: ... Camera title Press Setup button under Color to adjust video color Click or drag a control box to adjust each color level PTZ Control Select channel connected with PTZ camera Select PTZ from the contextual menu appears by pressing right mouse button Note PTZ can only be controlled in single screen mode Use icons on screen to control PTZ By using a mouse click arrows to move around PTZ and click ic...

Page 28: ...will be displayed on screen Note Any Covert options will not affect recording data as it only changes monitoring conditions 2 2 2 MENU DEVICE Audio Select Audio for Audio recording Each Camera and Audio can be linked regardless of its channel numbers 2 2 3 MENU DEVICE Alarm Alarm duration Set Alarm activation time from 5 seconds to 10 minutes Select Schedule tap to schedule Alarm operation Alarm c...

Page 29: ...m the list 2 2 5 MENU DEVICE RS232 RS485 Press to select a device for each ports RS232 Supports Text In POS device PTZ and Keyboard RS485 Supports Text In POS device PTZ and Keyboard Note Text In devices e g Cash Register needs to use ASCII code for Text In info on DVR ...

Page 30: ...ect On Off and time to hide Status Bar when system is not in use 2 3 2 MENU DISPLAY VGA OSD margin Set OSD margin position using Sequence Interval Set time interval between cameras under sequence mode Event Pop up Pops up the camera image in full screen when pre set event occurs PIP Picture In Picture size and its display positions can be selected under PIP menu Please select desired size and posi...

Page 31: ...terval Set time interval between cameras under sequence mode Event Pop up Pops up the camera image in full screen when pre set event occurs PIP Picture In Picture size and its display positions can be selected under PIP menu Please select desired size and positions of PIP display ...

Page 32: ...fter system is not in use for the time set Picture Interval sec Select the type of data to be displayed under Digital Signage mode Select either Video or Image data format Select the interval time for image data Import Retrieve prepared Digital Signage data on USB Memory Please refer to Appendix C for how to prepare video digital signage Schedule Schedule Digital Signage by time and date ...

Page 33: ...st status 2 4 2 MENU RECORD Record In Record general recording options can be selected including overwrite resolution speed recording quality and etc Overwrite Select Overwrite to overwrite recorded HDD data when it is full Auto Deletion days Turn on Auto Deletion to delete any data older than the defined days automatically Resolution Select recording resolution Time Record Set ips quality for con...

Page 34: ...set for Emergency recording from 5 seconds to 30 minute or continuously by selecting No Limit option Event Record Duration Set recording duration for events up to 30 minutes In Schedule fully detailed and specified recording schedules can be set by day time modes cameras and recording options Press to add a new schedule To remove an existing schedule press next to it Press Setting to set recording...

Page 35: ...shows the HDD size requires for a day recording Day and Hours shows the period can be recorded based on the installed HDD size Note The calculation results show approximate data only Same frame rate and video quality does not guarantee same storage size and recording duration This is due to the variety of conditions on images such as more less colors or more less movements This situational varianc...

Page 36: ...Server Address automatically when use DHCP or PPPoE option In Port Select appropriate port number for external access to the system The port list shows necessary ports to be opened for each operation Network Port Set port for DVR Remote Client Web Port Set port for Web Remote Client RTSP Port Set port for Android based devices iPhone Port Set port for iPhone Note ID and Password are required in AD...

Page 37: ... event will be sent to remote site In Email Events can be notified to personal email addresses by text message E Mail Interval Select E Mail Interval to set time interval between consequential events being sent to remote site via email Recipient Enter the email address of a recipient Up to 5 recipients can be entered Note Any events occur between the pre set interval time will not be sent to remot...

Page 38: ...ned 4th Sensor is designed for Emergency recording only It will follow Emergency recording setting when it is triggered In Record each sensor can be synchronized with single and multi cameras Press to select cameras to be synchronized with sensors In Alarm each sensor can be synchronized with single and multi alarms Press to select alarms to be synchronized with sensors In Notification each sensor...

Page 39: ...ideo Loss 2 6 2 MENU EVENT Motion In Motion system provides Motion Detection function Set Motion Detection using Sensitivity View and Area options Sensitivity Select motion sensitivity from Very Low to Very High Area Define the area for motion detection Press Setup under Area to define motions detection areas The blocks indicate the area where is defined for motion detection Select Block Use arrow...

Page 40: ... and multi alarms Press to select alarms to be synchronized with cameras for motion events In Notification each camera with motion can be synchronized with single and multi callback or emailing sites Press to enter callback or email address to be synchronized with cameras for motion events PTZ can be sync with Motion event using its preset function If Motion is detected PTZ moves to the position w...

Page 41: ... be synchronized with single and multi alarms Press to select alarms to be synchronized with cameras for video loss In Notification each camera with video loss can be synchronized with single and multi callback or emailing sites Press to enter callback or email address to be synchronized with cameras for video loss PTZ can be sync with Video Loss event using its preset function If Video Loss occur...

Page 42: ... more line options Ignore String Enter a word to ignore strings includes selected word Line Delimiter Enter a symbol or a word to distinguish the end of lines Case Sensitive Select Case Sensitive option if distinguish a word with case sensitivity In Record text event can be synchronized with single or multi camera record Press to select camera s to be synchronized with text event If RS232 RS485 Po...

Page 43: ...single and multi callback or emailing sites Press to enter callback or email address to be synchronized with text event In Text In each text input can be synchronized with single and multi cameras Press to select cameras to be synchronized with text inputs ...

Page 44: ...le temperature level of storage If HDD temperature increases over pre set temperature it will notify a user in various ways according to following settings In Alarm each system event can be synchronized with single and multi alarms Press to select alarms to be synchronized with each event If Alert is selected system will pop up a warning message on screen In Notification each system events can be ...

Page 45: ...Also search data by 5 10 15 30 60 seconds backward from the current time of search Search Select Calendar Search Event Search and Text In Search OSD Select OSD display option Text In Info Select Text display option for POS or ATM machines Zoom Zoom in image by X2 Audio Select Audio outs Backup Select backup or Clip Copy option Storage Select HDD or Backup Data to playback Emergency Record Start Em...

Page 46: ...he left indicate cameras numbers The color bar shows the full information of recorded data on the selected date Move the indicator line to select specific recorded time of the selected date For a detail display of recorded data please press Detail Once desired settings are completed press Go To to begin playback 3 3 Event Search Event Search provides easy search by event list recorded Select the d...

Page 47: ...ctions Search for Time and Transaction information Press Search for detail information From Set beginning time to start search or select First for search from the first data To Set end time to end search or select Last for search to the last data Search Text Enter any words to search text data include the words Once entering all the search information press OK to start Text In search ...

Page 48: ... file to playback it on DVR 3 6 Playback Control R Play Reverse Playback Step Backward Go to the previous image Pause Freeze or Stop current image Step Forward Go to the next image Play Play the data at normal speed To control the backward and forward playback speed press on or repeatedly Playback speed can increase up to x32 ...

Page 49: ...in DVRMediaPlayer exe format allows multi camera backup and the files would not require any specific codec for playback on PC To open and play a file saved in DVRMediaPlayer exe double click the file and it will automatically be played on Internet Explore window This fuction is supported only on Internet Explorer 7 0 or above Note The backup process could be slowdown if the system is being monitor...

Page 50: ...data backup is being processed It may cause critical damage to either the media or system if the backup media is removed during the backup process Note Playback speed will be slower than usual while instant back up is processing 4 3 Clip Maker Clip Maker allows to create single channel backup file which can be played on PC Select Clip Maker option on the pop up menu during the live or pause mode o...

Page 51: ...ult value http hostname autoipset com Web port or 211 104 176 143 Web port Ex http hostname autoipset com 8080 or 211 104 176 143 8080 Port numbers can be checked at DVR MENU Network Address Port At the DVR s login page User should input correct ID Password and Port Number in order to use Live or Playback function ID DVR s Administrator ID or User ID Default ID admin or user Password DVR s Passwor...

Page 52: ...ly for administrator 4 3 Playback User can search and play the DVR s recorded data Playback Icon Backward High Speed Play X2 4 8 16 32 Backward Play Forward High Speed Play X2 4 8 16 32 Forward Play Jump to the beginning of data at the selected date Backward Play by one frame Jump to the end of data at the selected date Forward Play by one frame Pause ...

Page 53: ...esh the DVR s recorded data information 4 3 2 EVENT Search User can search recorded events data through the Event Search function Event Search window will be come up if user clicks the Event Search button then user should select the date and click ok button Now you can select any event that you want to check on the Event list Change the Event List pages Event Search again with different date Note ...

Page 54: ...ork with your dynamic IP address of DVR You can use DDNS service after signing up for autoipset com or without signing up process 1 1 Use DDNS service after signing up for autoipset com 1 Sign up for autoipset com Please run Internet Explorer program and then please type http www autoipset com at Internet Explorer s address bar You will see the web page for DDNS service like below Please click Reg...

Page 55: ...nd then click submit button You should check the duplication of your user ID by clicking Check ID before submission 2 Log in Please log in with your ID and Password After you log in you can see the list of your registered DVR like below at the product list ...

Page 56: ...en please click Update button Finally if you see the message DDNS Succeeded in updating then all the registration process is done 4 DDNS Management Status Specification Elapsed time since last update is Less than 5 minutes Elapsed time since last update is more than 5 minutes and less than 20 minutes Elapsed time since last update is more than 20 minutes No update history 5 Delete the registered D...

Page 57: ...Please select DDNS menu at your DVR with the following route DVR MENU NETWORK DDNS Please input a hostname that you want to use and then please click Update button If you see the message DDNS Succeeded in updating then all the registration process is done ...

Page 58: ...alDub program from http virtualdub sourceforge net Open and run VirtualDub exe program It does not require additional installation process VirtualDub use VFW Video for Windows compatible codec so some video files can not be used with To use various type of video files you need to install full version includes VFW codec from http www codecguide com download_kl htm Note VirtualDub requires a Video f...

Page 59: ...ck Video Filters Add and it will open the window as shown below Select resize from the list and click OK First select Aspect Ratio as disabled and select Absolute for New size Change resolution to 704x480 704x576 for PAL and click OK ...

Page 60: ...59 The Filtered file size will be enlarged as shown below Select frame rate next Click Video Frame Rate and enter the frame rate 15fps and click OK ...

Page 61: ...mat Create a folder by name of advertise and same the files in that folder in USB flash memory Files must be saved in the folder and the folder name should be advertise DVR will not recognize any other folder names Once it is done connect USB flash memory to DVR and follow Digital Signage instructions Import to use Digital Signage features ...

Page 62: ... DIGITAL APPARATUS MEETS ALL REQUIREMENTS OF THE CANADIAN INTERFERENCE CAUSING EQUIPMENT REGULATIONS WEEE Waste Electrical Electronic Equipment Correct Disposal of This Product Applicable in the European Union and other European countries with separate collection systems This marking shown on the product or its literature indicates that it should not be disposed with other household wastes at the ...

Reviews: